Wicking beds are effective, hands-on teaching tools which introduce students to gardening while teaching Mathematics, Science and English. They also form part of teaching students how to plan, manage, and run a project. We hope that when students grow up, they will remember that growing vegetables at school was fun.
In this article, we show how to build wicking beds that complies with school regulations but are just as productive and toxin free when used in home gardens and small commercial businesses. While it may seem complex at first, they are easy to build and can be assembled by two people in a few hours.
These designs were developed in consultation with local teachers and school staff to ensure they are suitable for outdoor classes and school requirements. Their input helped shape a design that is safe, durable, and easy for students to work with across multiple age groups.
Design Considerations
The materials we have used are safe and non-toxic. Pay attention when picking your timber to not use anything treated with CCA (Chromated Copper Arsenate) or LOSP (Light Organic Solvent Preservative). All timber used should be treated with ACQ (Alkaline Copper Quaternary) or MicroPro® Micronized Copper Azole (MCA).
The bed can be packaged into a kit and prepared offsite. By doing most of the work offsite, it’s possible to quickly and easily set the bed up at its location. This has encouraged service organisations, PNC’s and individuals to donate them to local schools. When prepared as a kit, it is essential that you dont pierce the liner until it is installed at its final destination. It is near impossible to realign the holes in the liner and the frame once moved and installed.
Selecting your bed design
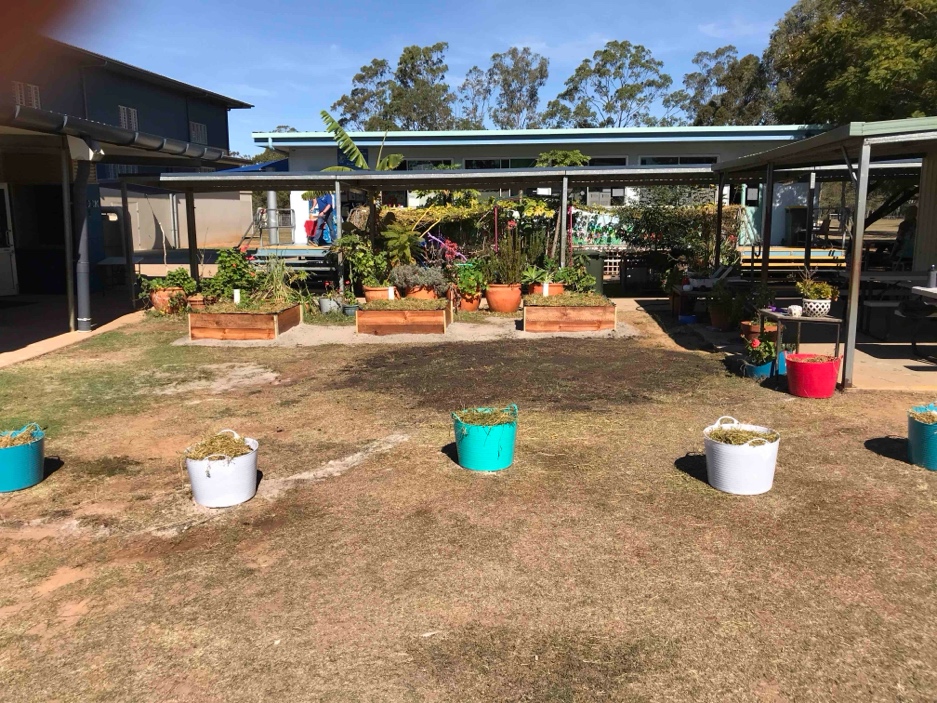
We have three bed designs, each suitable for different purposes. All the beds are 40cm high. Click on the diagrams below to enlarge.
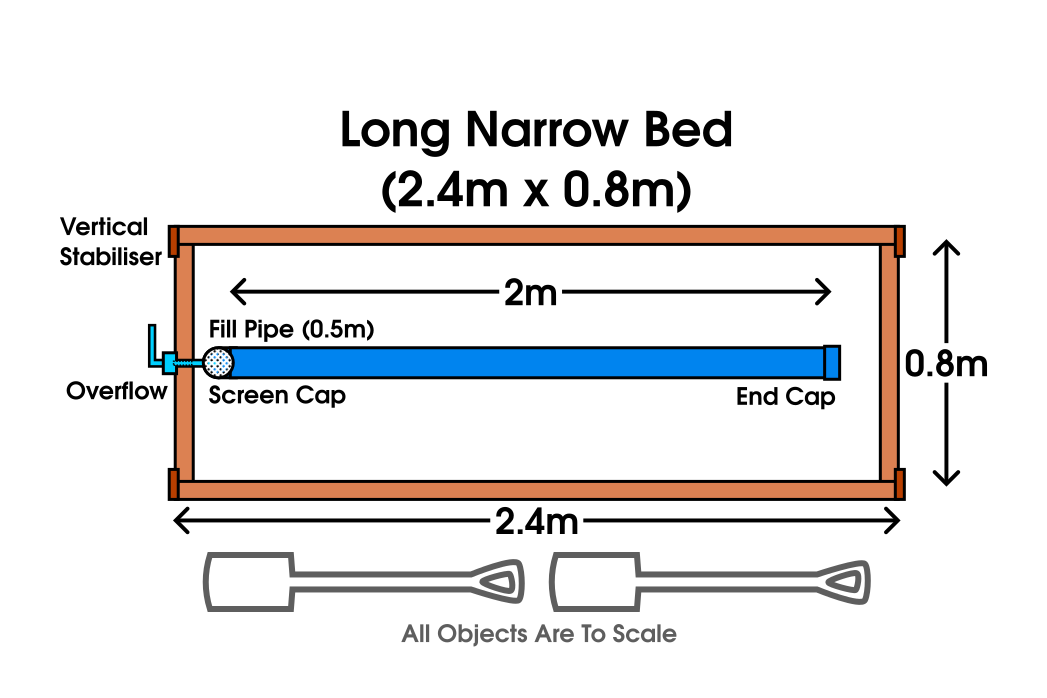
The first is the Long Narrow Bed, this is best for primary schools as it allows even small kids to reach the centre. It is large enough to allow a half or more of a class to surround the bed. It’s also the simplest of the three designs.
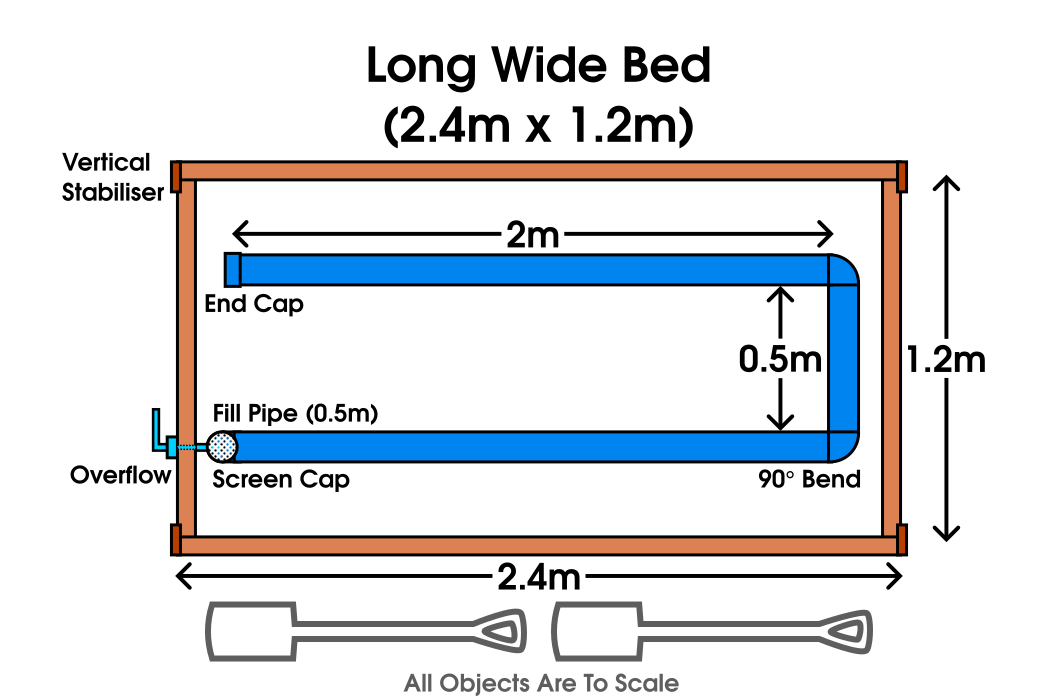
Next up we have the Long Wide Bed, this is better suited to older kids and adults. It’s large enough to grow a greater diversity of vegetables and gives you plenty of space to work with.
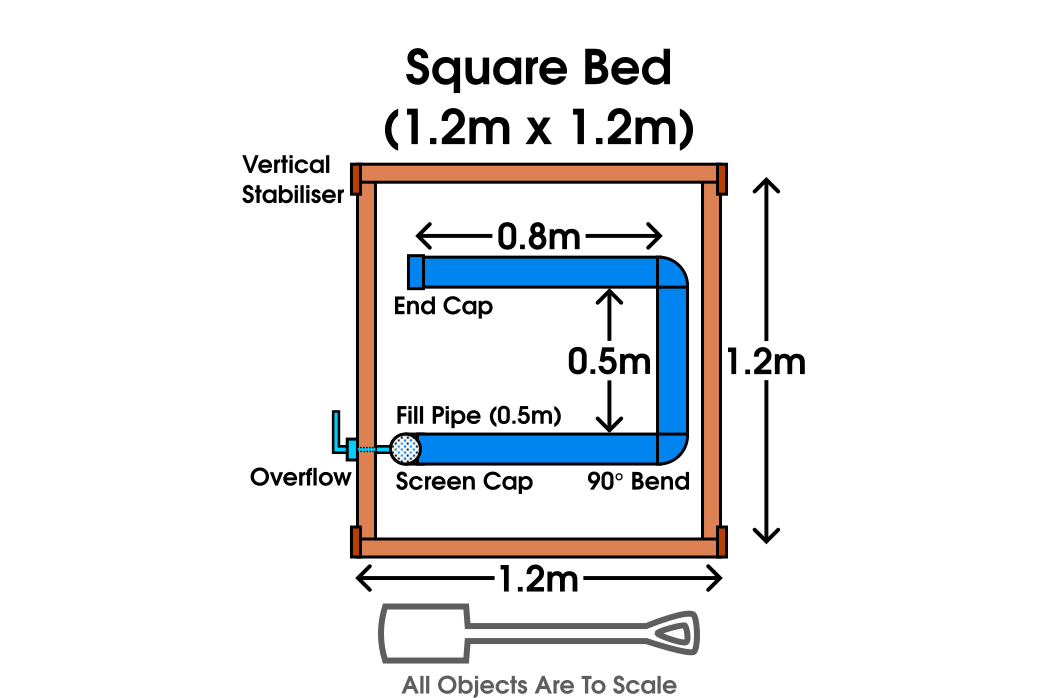
Finally, we have the Square Bed. This works best for projects, allowing you to give a group of students the responsibility of taking care of a crop from preparing the soil to harvesting.
| Bed Type | Width (m) | Length (m) | Surface Area (m²) | Internal Volume (m³=1,000L) |
|---|---|---|---|---|
| Long Narrow Bed | 2.4 | 0.9 | 2.16 | 0.664 |
| Long Wide Bed | 2.4 | 1.3 | 3.12 | 1.012 |
| Square Bed | 1.2 | 1.3 | 1.56 | 0.528 |
Involving the Groundskeeper
Try to get the groundskeeper involved and keep them informed. They can provide valuable knowledge and assistance, and can help to prevent costly mistakes. If you’re lucky, they may also look after your bed over the holidays!
Keeping the groundskeeper informed from the start helps to ensure the beds remain free from accidental sprays. It can also we can also prevent time-consuming mistakes like the time a well-meaning groundskeeper folded down the liner walling the bed and then filled it, resulting in needing to dig out the bed and pull the liner back up to allow the bed to hold water again!
Picking the right location
When choosing a site, consider the location with care.
The site will need at least six hours of sunlight during the winter and avoid shade from trees and buildings. The ground should be level and free of large rocks and sharp objects. The site should not be too windy, avoid area’s such as wind tunnels.
The location should be easily accessible, and the beds should be given sufficient space to allow the students to surround them. There should be easy access to a tap. Think ahead and plan out where the bed’s outlets will be to prevent the overflow from making the ground a slippery swamp.
Preparing the ground
If nut grass or other aggressive plants are present that may penetrate the liner, place a metal sheet or other hard barrier under the bed to prevent future leaks.
Clear away all sharp objects, including sticks, roots, and debris that could puncture the liner and then level the ground carefully to create a smooth, even base.
Materials and Equipment
All materials required are available from your local hardware or garden store, and common household tools are all that is needed to build the beds. Make sure to measure twice, cut once. We learned the hard way.
Checklists with all the materials and site requirements are available at the end of this article. We have separate documents for each design.
Schools have strict legal requirements on what materials can be used, so make sure that everything complies with school regulations. It is essential that all timber used should be treated with ACQ (Alkaline Copper Quaternary) or MicroPro® Micronized Copper Azole (MCA).
The Frame
The frame consists of two layers of sleepers held together with four wooden uprights, fastened with heavy-duty countersunk screws.
Timber
Use Micro PRO Sienna treated pine, available in sleepers of 2.4 m x 20 cm x 5 cm.
- Long Narrow Bed Six sleepers of 2.4 m in total. One sleeper is cut into three 0.8 m pieces, and the other sleeper is cut into an 0.8 m length leaving a spare 1.6 m offcut.
- Long Wide Bed Six sleepers of 2.4 m in total. Two of the sleepers are cut into lengths of 1.2 m resulting in a total of four 1.2 m sleepers.
- Square Bed Four sleepers of 2.4 m in total. Each sleeper is cut in half to form eight 1.2 m sleepers.
Always measure your sleepers before leaving the store. Even when listed as 2.4 m, lengths can sometimes be slightly longer than described.
Many hardware stores, such as Bunnings, offer a cutting service. The first cut is free, and additional cuts typically cost a dollar per cut. This can make transport much easier and save you time and effort on site. The Bunnings order form below already contains the specifications. After the store cuts the sleepers, measure them again to ensure they match your required dimensions before you leave. Delivery services are also available if transporting long materials is difficult.
You will also need four lengths of 40 cm ACQ-treated decking timber to give vertical structural strength. This is typically about 9 cm wide and 2 cm thick.
Fasteners
The screws must be weather treated and countersunk to avoid injuries.
You will need:
- 16 batten screws (18-8 × 100 mm) that hold the battens together
- 32 screws (10-8 × 40 mm) to connect the uprights to the battens.
The Liner
To make the bed watertight, use Concrete Underlay AS 2870 (200-micron, 2 m wide rolls when folded, or 4 m wide when unfolded). It should be folded over and used doubled up for extra thickness and durability, this acts as insurance against leaks. When purchasing, we prefer using the rolls that are already doubled up such as the example linked above. It should cover the floor and all four sides of the bed.
| Bed Type | Doubled Up Dimensions | Dimensions when unfolded |
|---|---|---|
| Long Narrow Bed | 3.1 m x 1.6 m | 3.1 m x 3.2 m |
| Long Wide Bed | 3.1 m x 2.0 m | 3.1 m x 4.0 m |
| Square Bed | 2.0 m x 1.9 m | 2.0 m x 3.8 m |
Look for a store that allows you to buy it by the meter, as full rolls can be quite expensive and are too large for our needs. Make sure to check the packaging for holes or damages before purchase.
The Water Reservoir
Apart from during heatwaves, the reservoir holds enough water for up to a week for the plants to grow, which makes watering mostly a weekend job. Connecting the overflow directly into the reservoir prevents it clogging up during heavy rainfall and thus the bed turning into a quagmire.
Pipe and Connections
Both the fill pipe and storage pipe(s) are 90 mm PVC Stormwater Pipe:
- Long Narrow Bed
One length of 0.5 m
One length of 2.1 m
One elbow - Long Wide Bed
Two lengths of 0.5 m
Two lengths of 2.1 m
Three elbows - Square Bed
Two lengths of 0.5 m
Two lengths of 0.8 m
Three elbows
All the beds will additionally need:
- One end cap
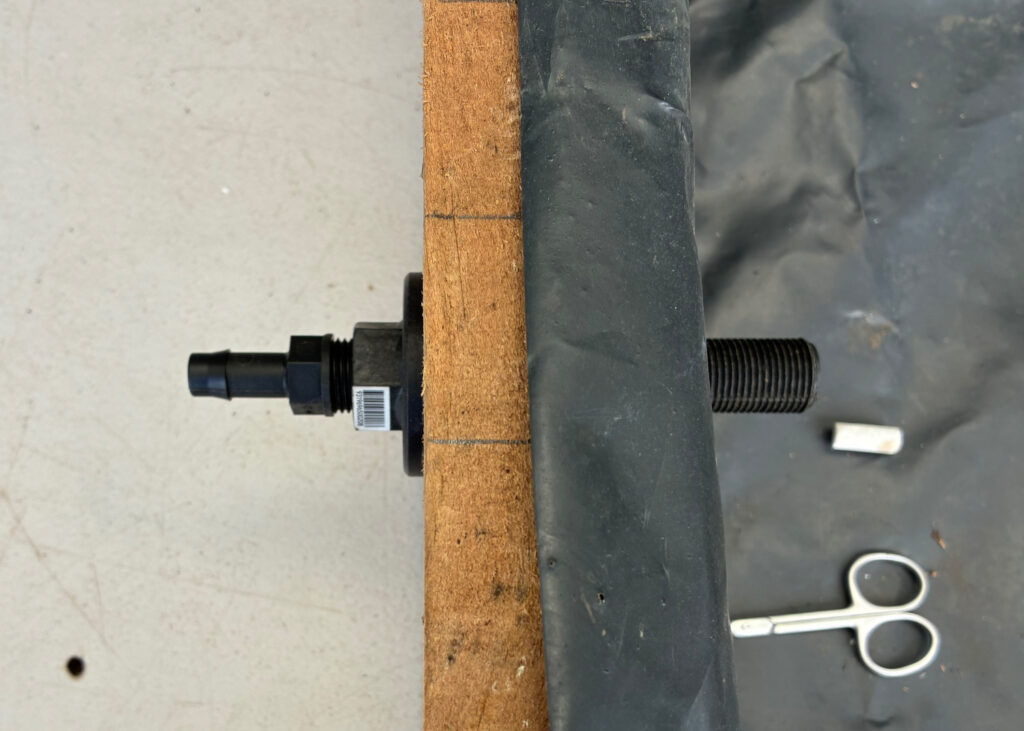
- One screen cap (this prevents objects being dropped into the reservoir and stops mosquitoes, frogs and other small wildlife getting in. It is required in Townsville.)
The Overflow
The overflow allows excess water to drain from the bed. By connecting the overflow to the reservoir directly, we eliminate the risk of the overflow clogging, keeping the bed safe even during heavy rainfall.
Tools
You will need an electric drill with:
- 60 mm hole-saw (to cut the drainage holes in the PVC pipe)
- 22 mm drill bit (to cut the outlet hole in the timber)
- 12 mm drill bit (to cut a hole in the PVC pipe)
- 6 mm drill bit (to predrill holes for the screws when assembling the timber frame).
A method to sand the corners of the sleepers, such as a flat or belt sander (80 grit).
Various hand tools such as:
- A small pair of pliers (to remove the cut-out bits from the hole-saw).
- A screwdriver (to put the frame together).
- A rats-tail rasp (to widen the 12 mm outlet hole in the fill-pipe to 13 mm).
- A pair of scissors (to cut the liner).
- A pair of nail scissors (to cut the outlet hole in the liner).
- Clamps or duct tape (to hold the liner in place while filling the bed with soil).
- A hacksaw (to cut the PVC pipes).
- A permanent marker (to mark where to cut)
- A tape measure (to measure the pipe and sleepers)
Building the Bed
The bed can be built both onsite directly, or prepared into a kit allowing for it be put together elsewhere in under two hours. When preparing as a kit, make sure to not pierce the liner until it is at its final destination.
Before heading out to install the bed, double check that you have all your tools and everything else you need (we know from experience). When you arrive, check that the site is still in a good condition for building.
Checklists with all the materials and site requirements is available at the bottom of this article.
Assembling the frame
To ensure that all the sleepers are cut to the correct lengths, lay the sleepers out on the ground so that the lengths match the diagrams from above.
Label each of the eight sleepers, marking each sleeper with its position (upper layer or lower layer) and the side (front, back, left or right as it relates to the diagrams below). An example of the appropriate labels is shown below in diagram 4.

Take the Lower Left sleeper and mark and drill a 22mm hole. Depending on the size of bed, you will have a different location to drill.
On Long Wide Beds or Square Beds, the hole should be 0.3m from the right edge and 9cm above the bottom edge.
On Long Narrow Beds, the hole should be in the centre (or 0.4m from the side) and 9cm above the bottom edge.

Take the Lower sleepers and place them in their respective positions as shown. The sleepers on the left and right should have their ends butted up against the sides of the front and back sleepers.
Measure and adjust the distance between opposite corners until they are the same and the sides of the bed are parallel. This ensures that the corners are square.
Screw in 2 x 100mm batten screws for each corner of the bed. Screw in through the front and back battens into the side battens placing the screws 5cm from the top and bottom edges.
Repeat the process with the Upper sleepers, and place them on top of the first layer.
The 400 mm long, 90 mm wide planks secure the two courses so they are firmly connected and prevent the top layer from sliding sideways. Use eight 10-8 × 40 mm fasteners per securing plank, as shown in the diagram below.
We found that pre-drilling is not necessary. However, when drilling into the side of a sleeper, it can help to pre-drill a hole with a small drill bit about half the length of the fastener. Do not pre-drill into the cut end, as the screw runs parallel to the wood fibres and will already have less grip.
Use a sander to round the edges.
Adding the liner
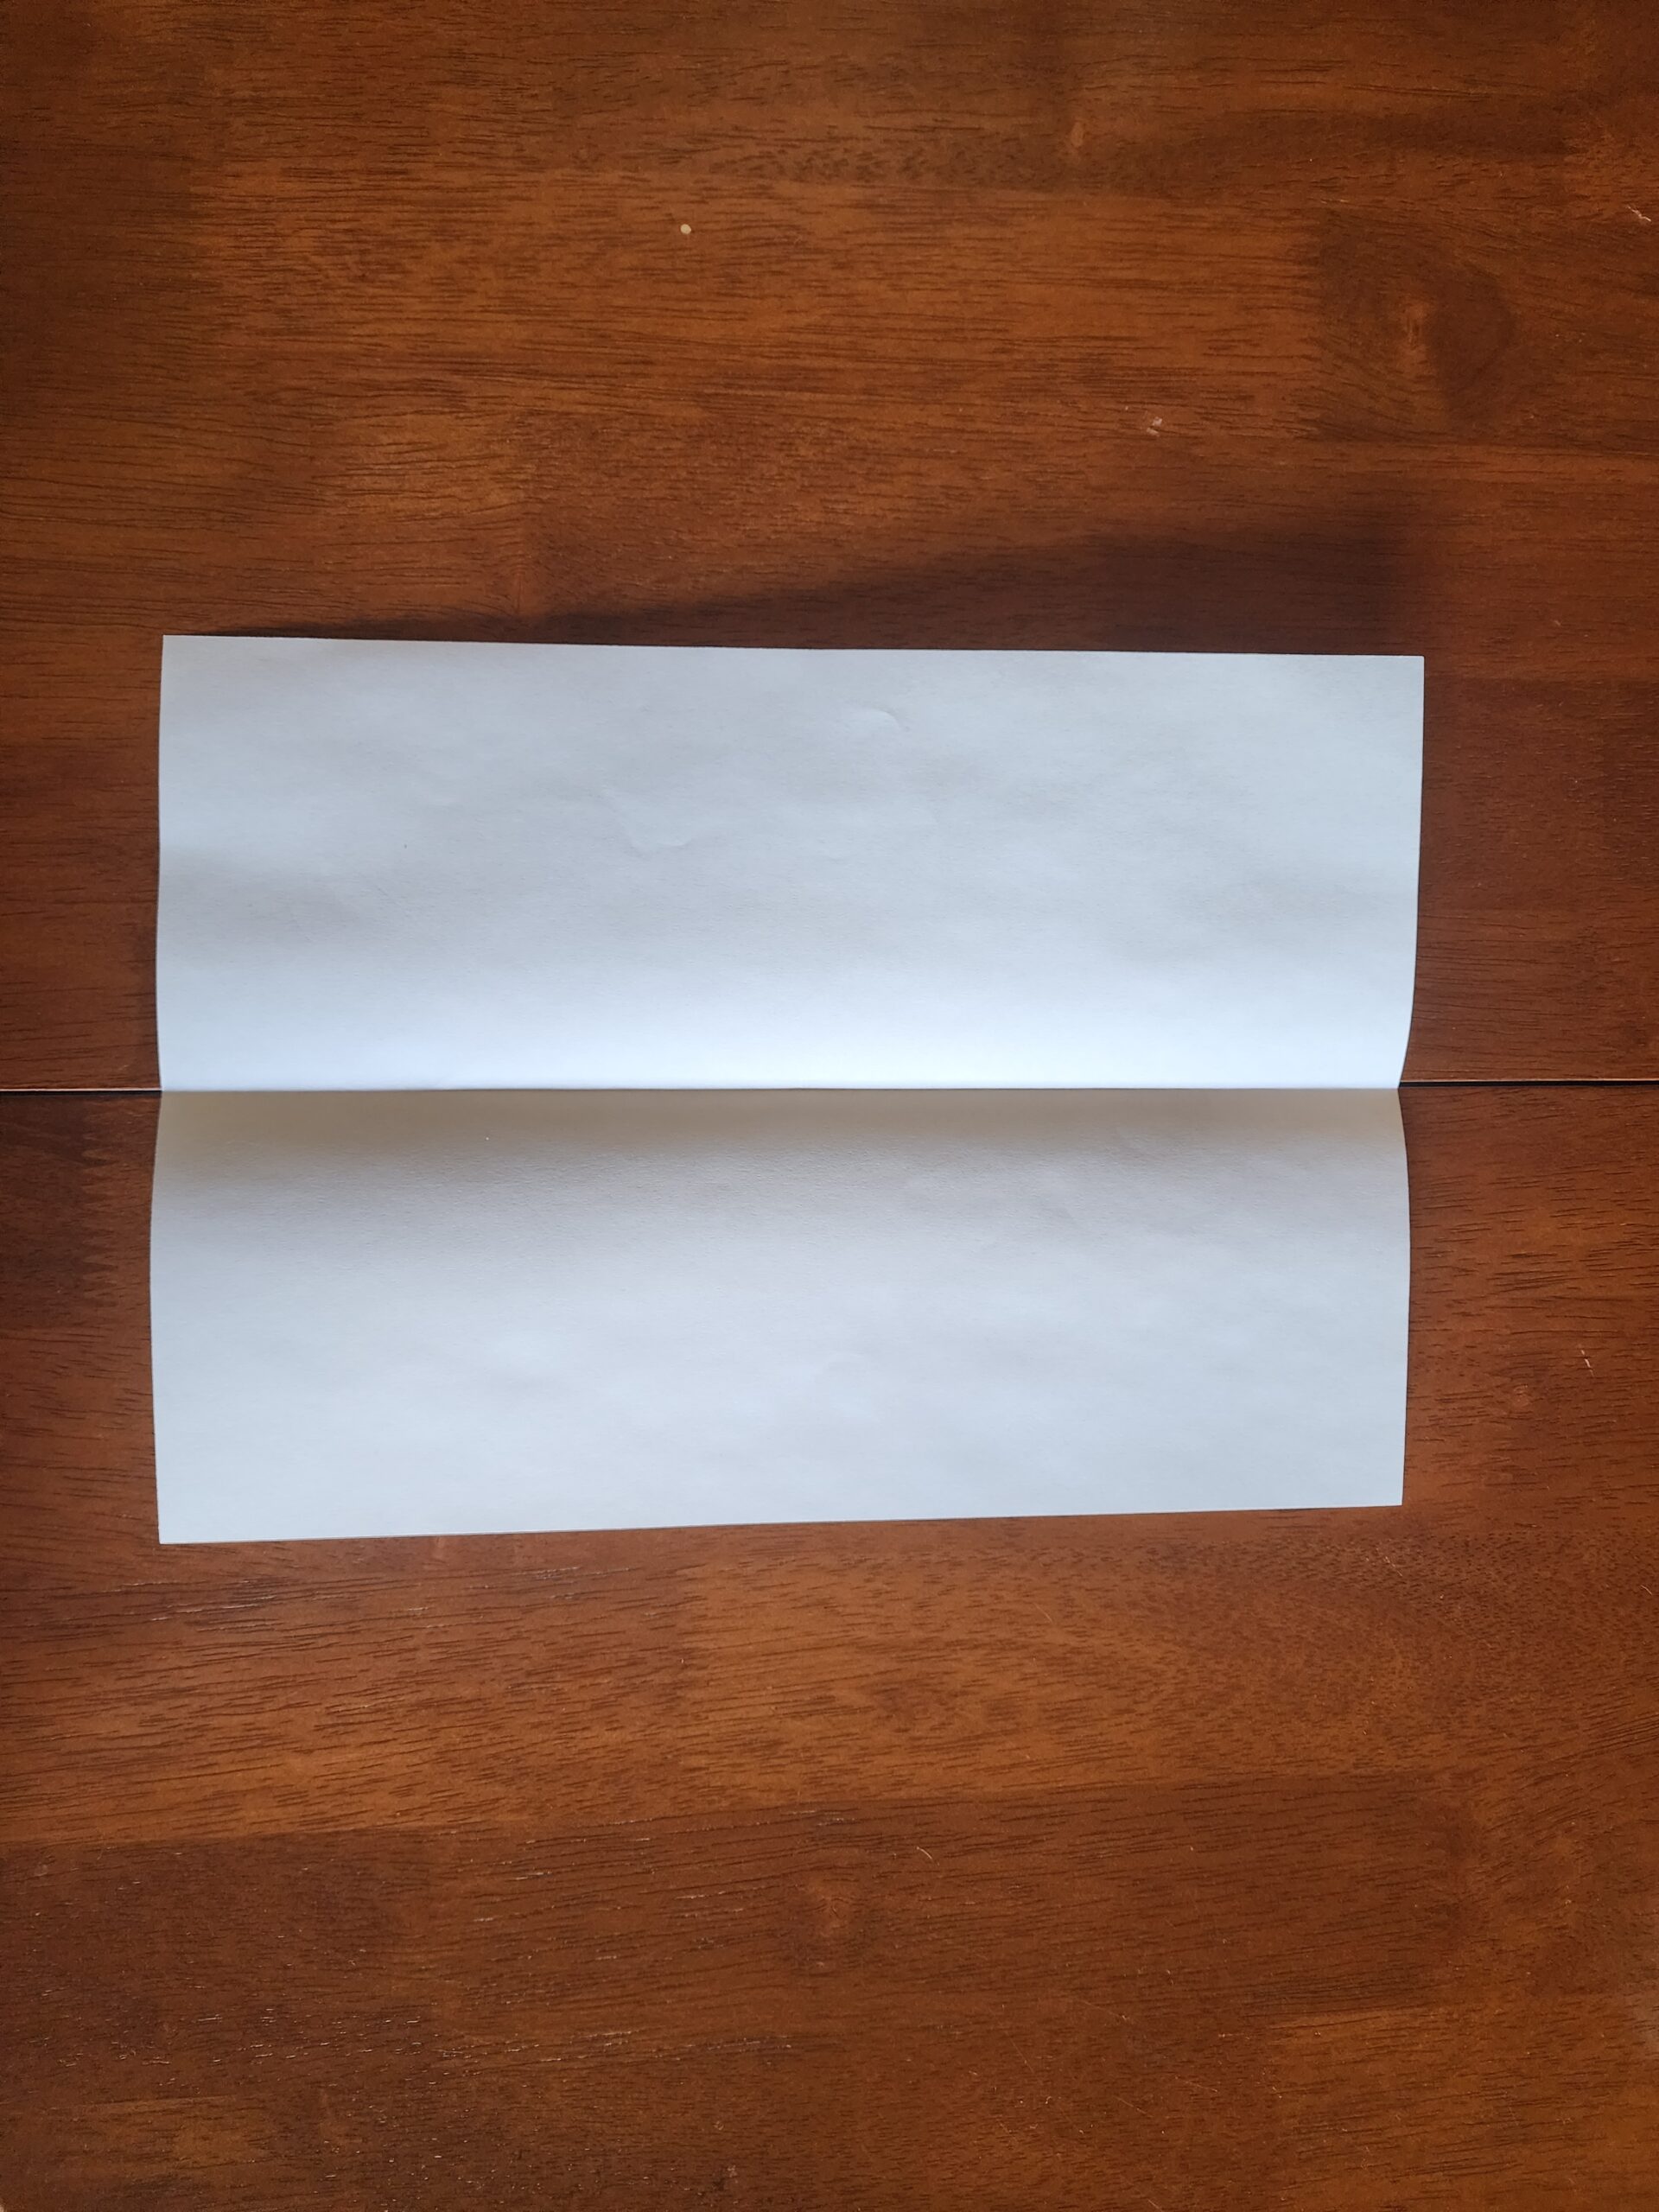
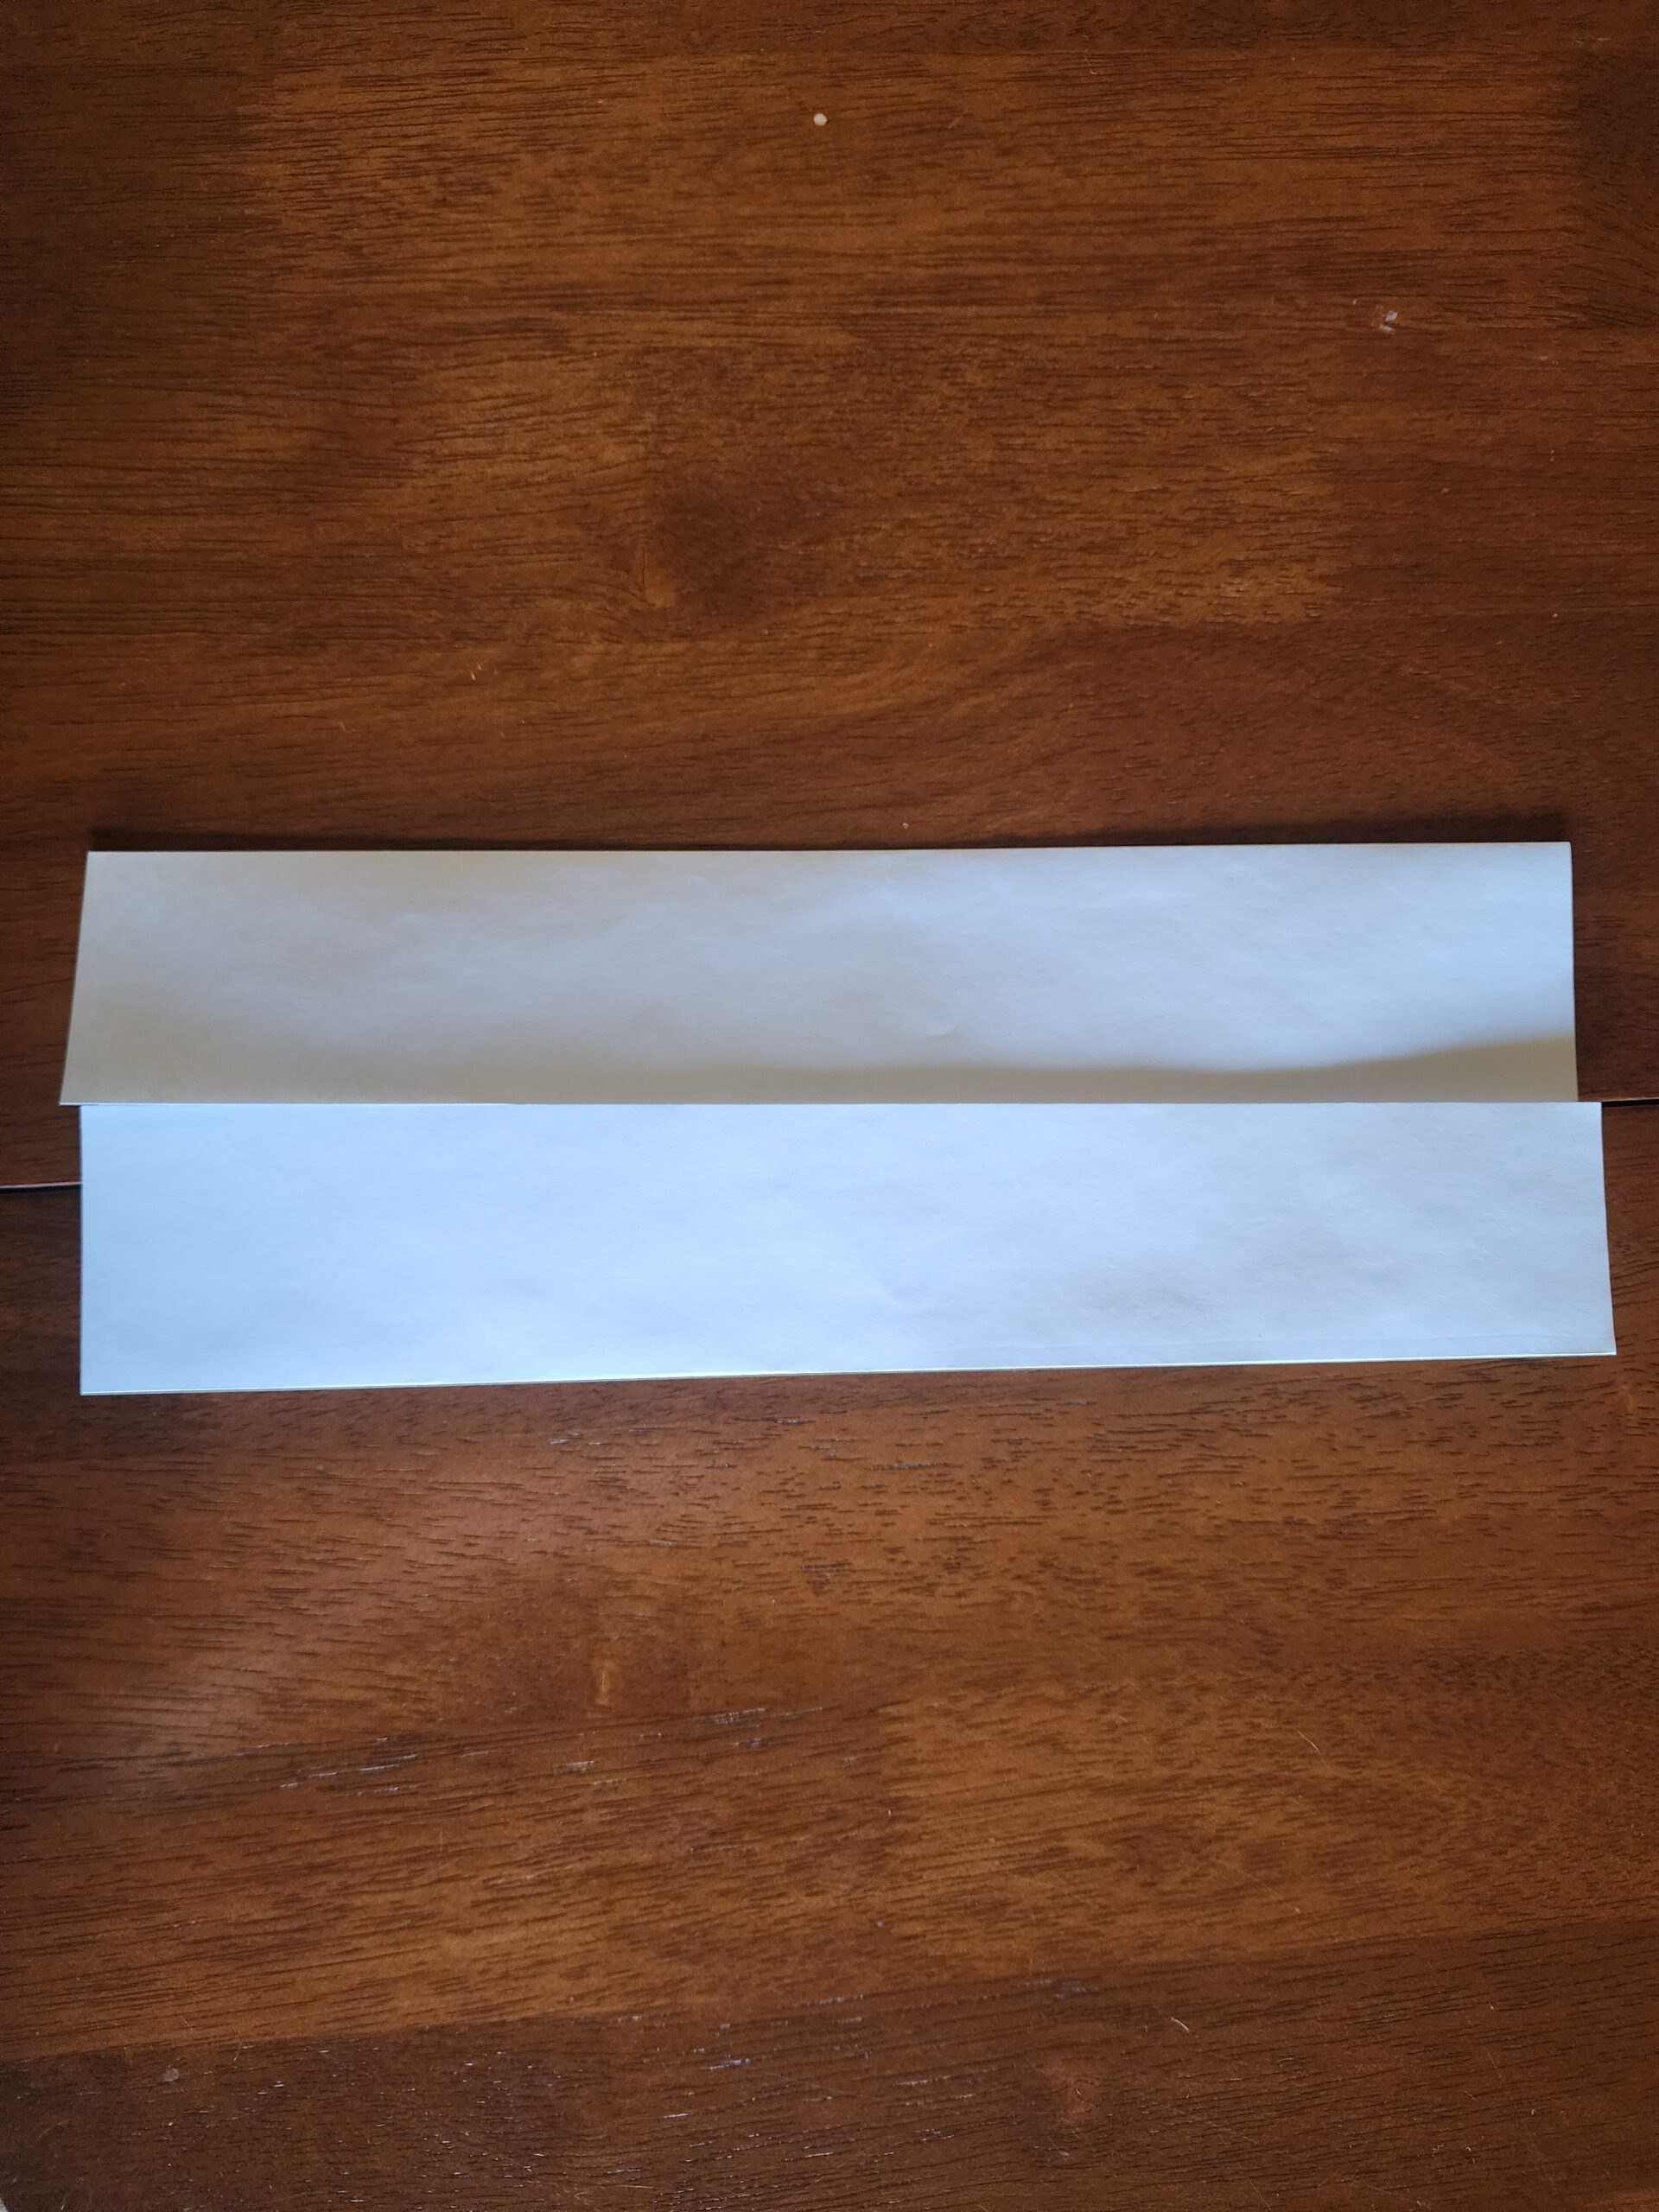
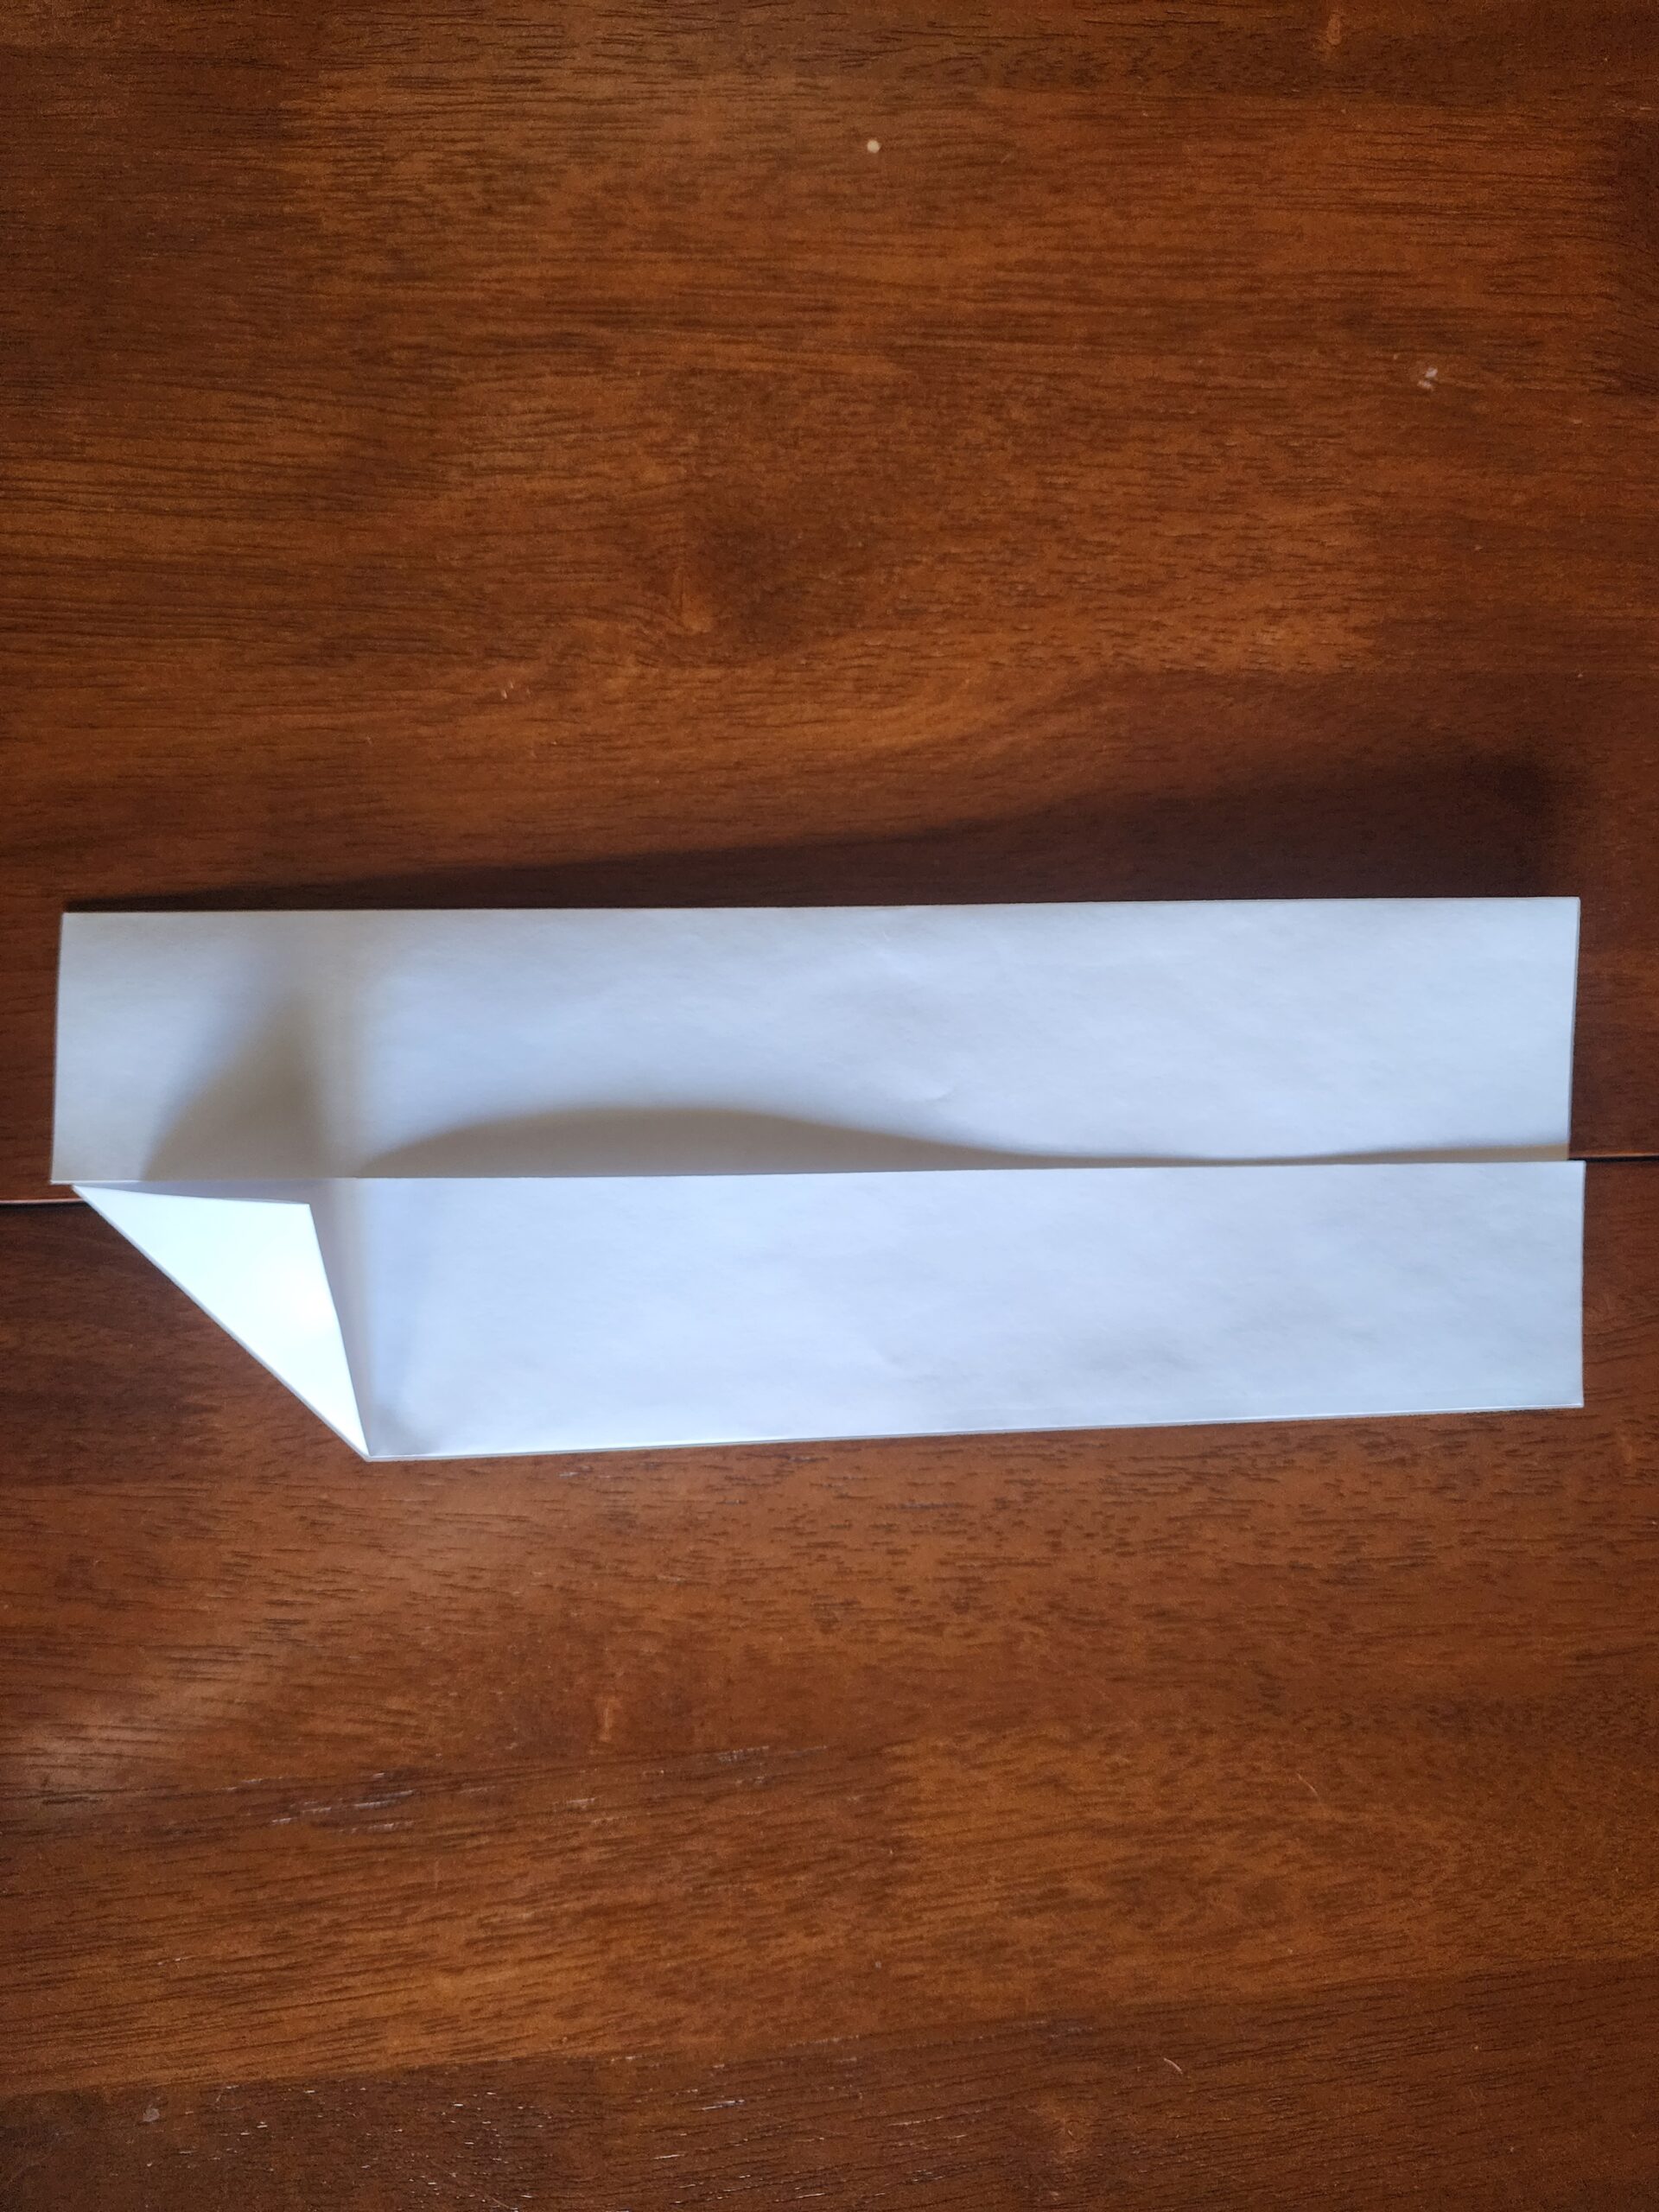
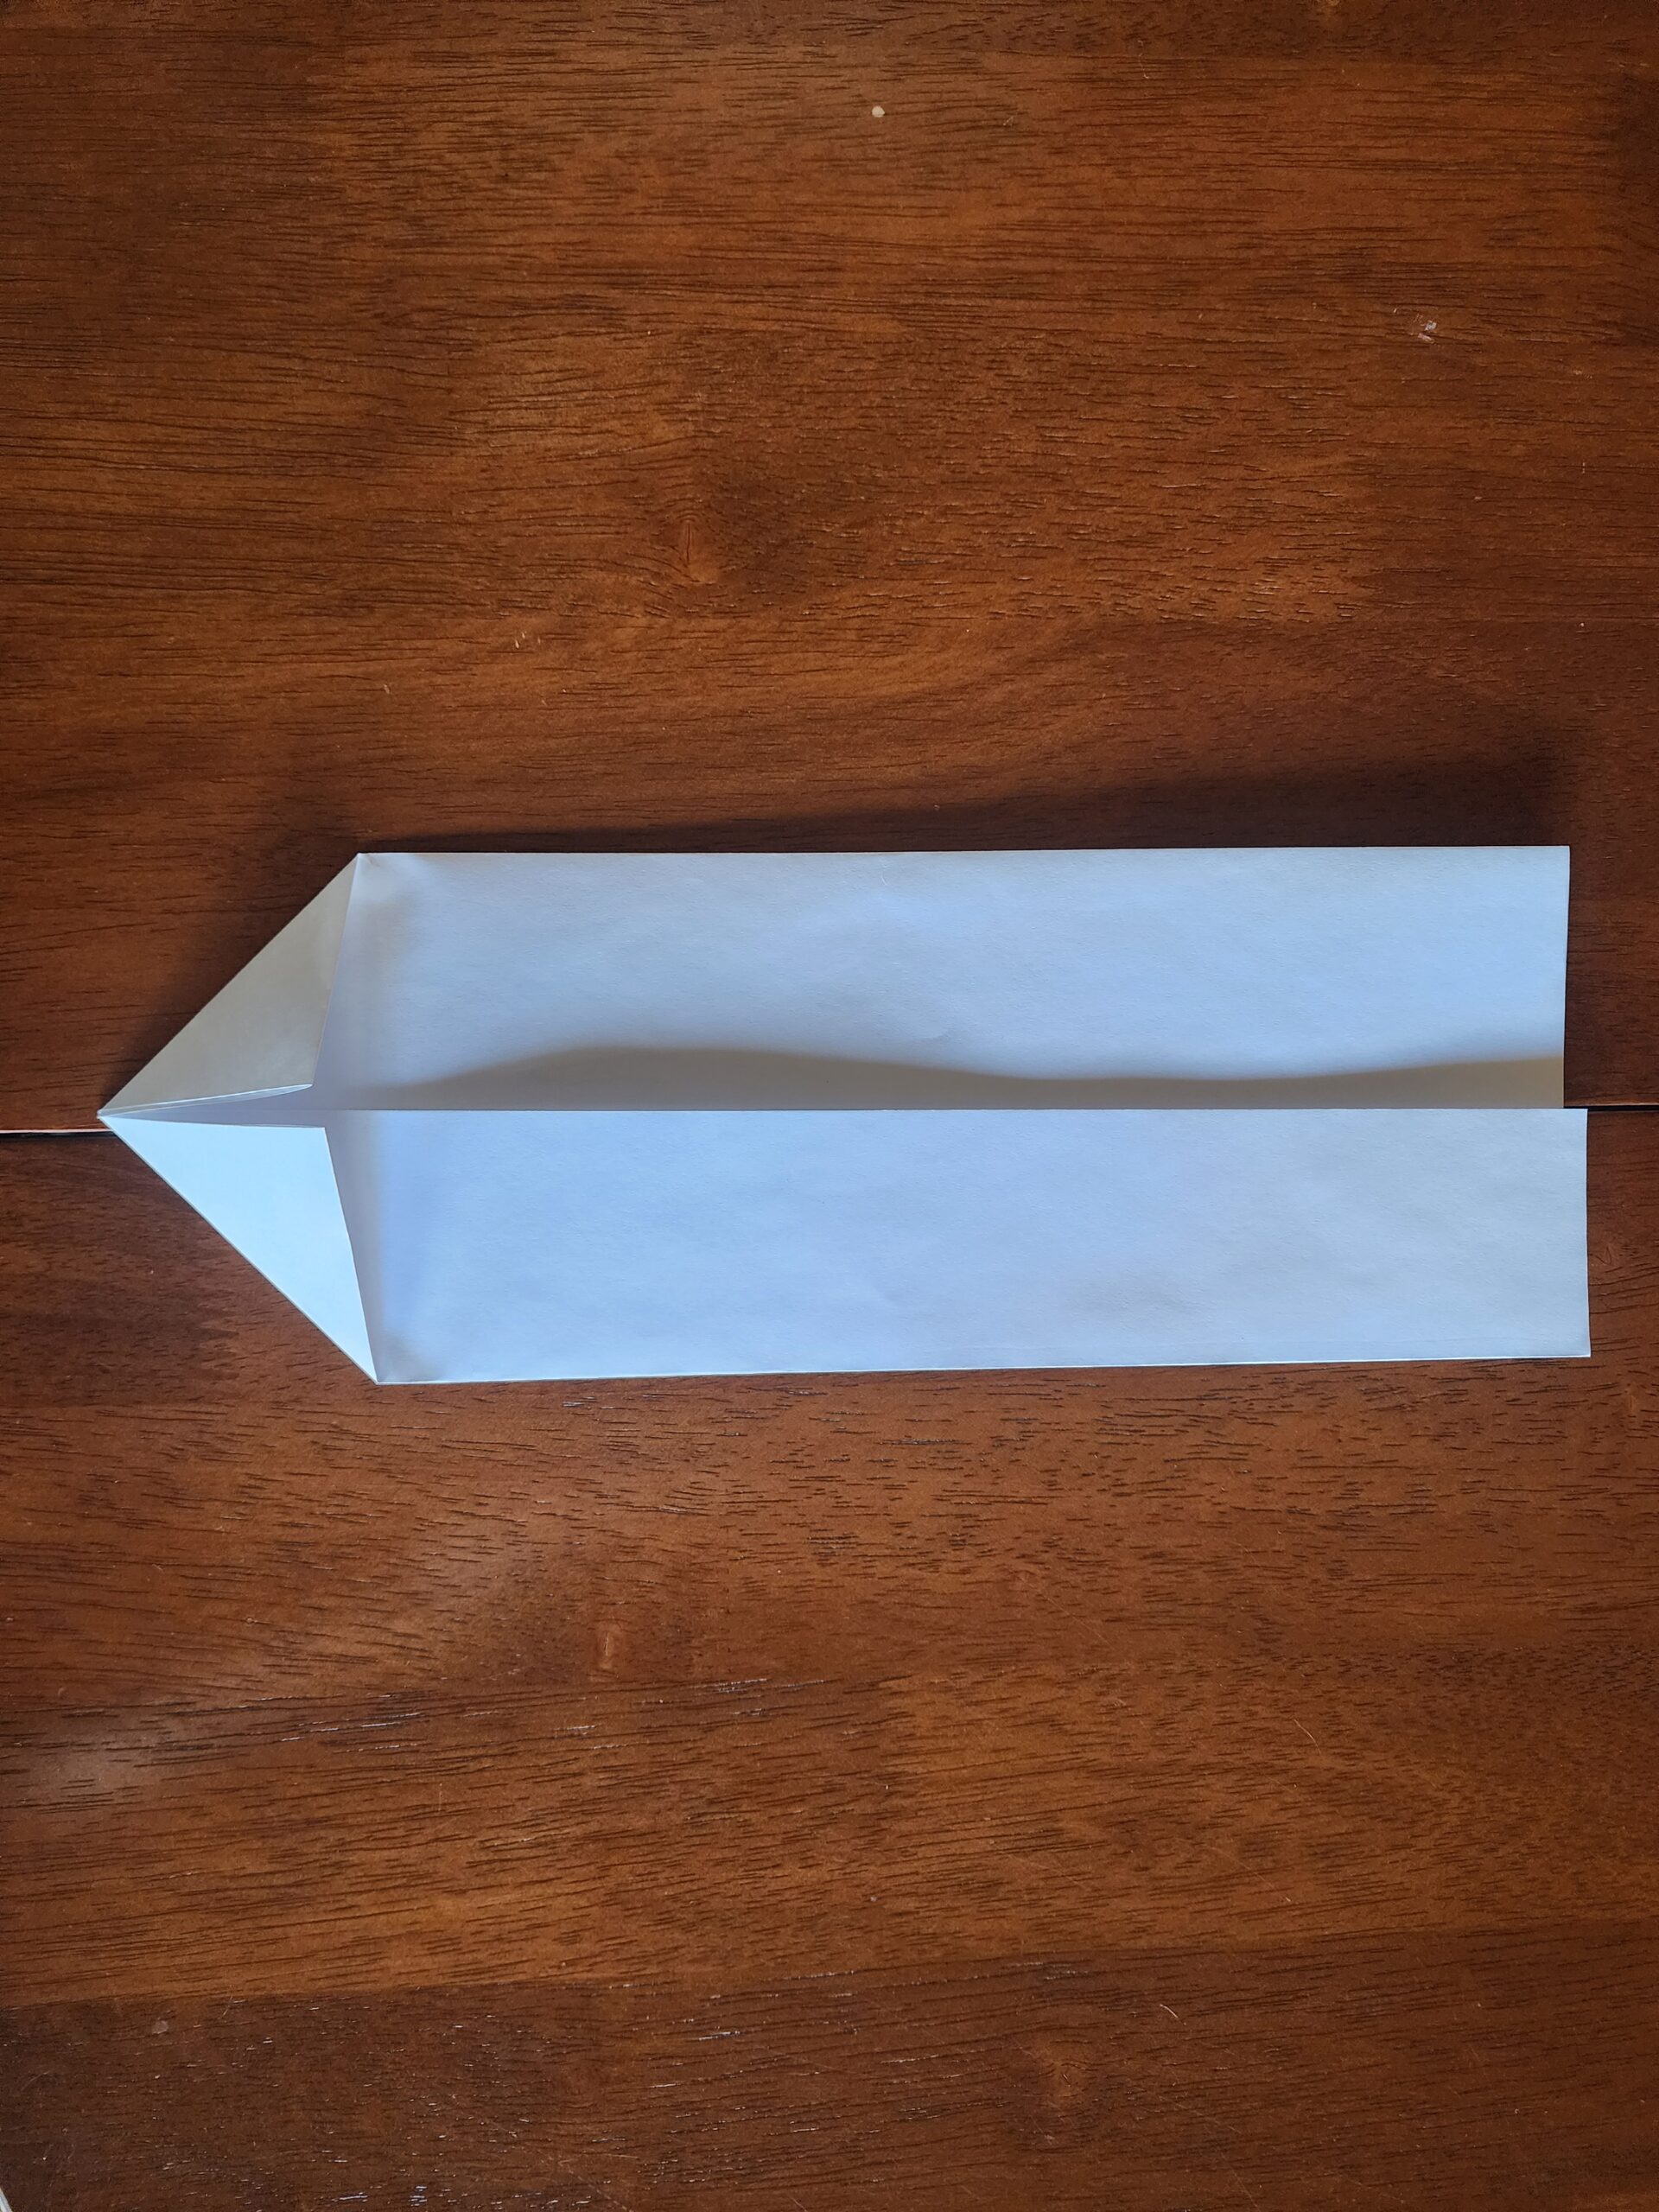
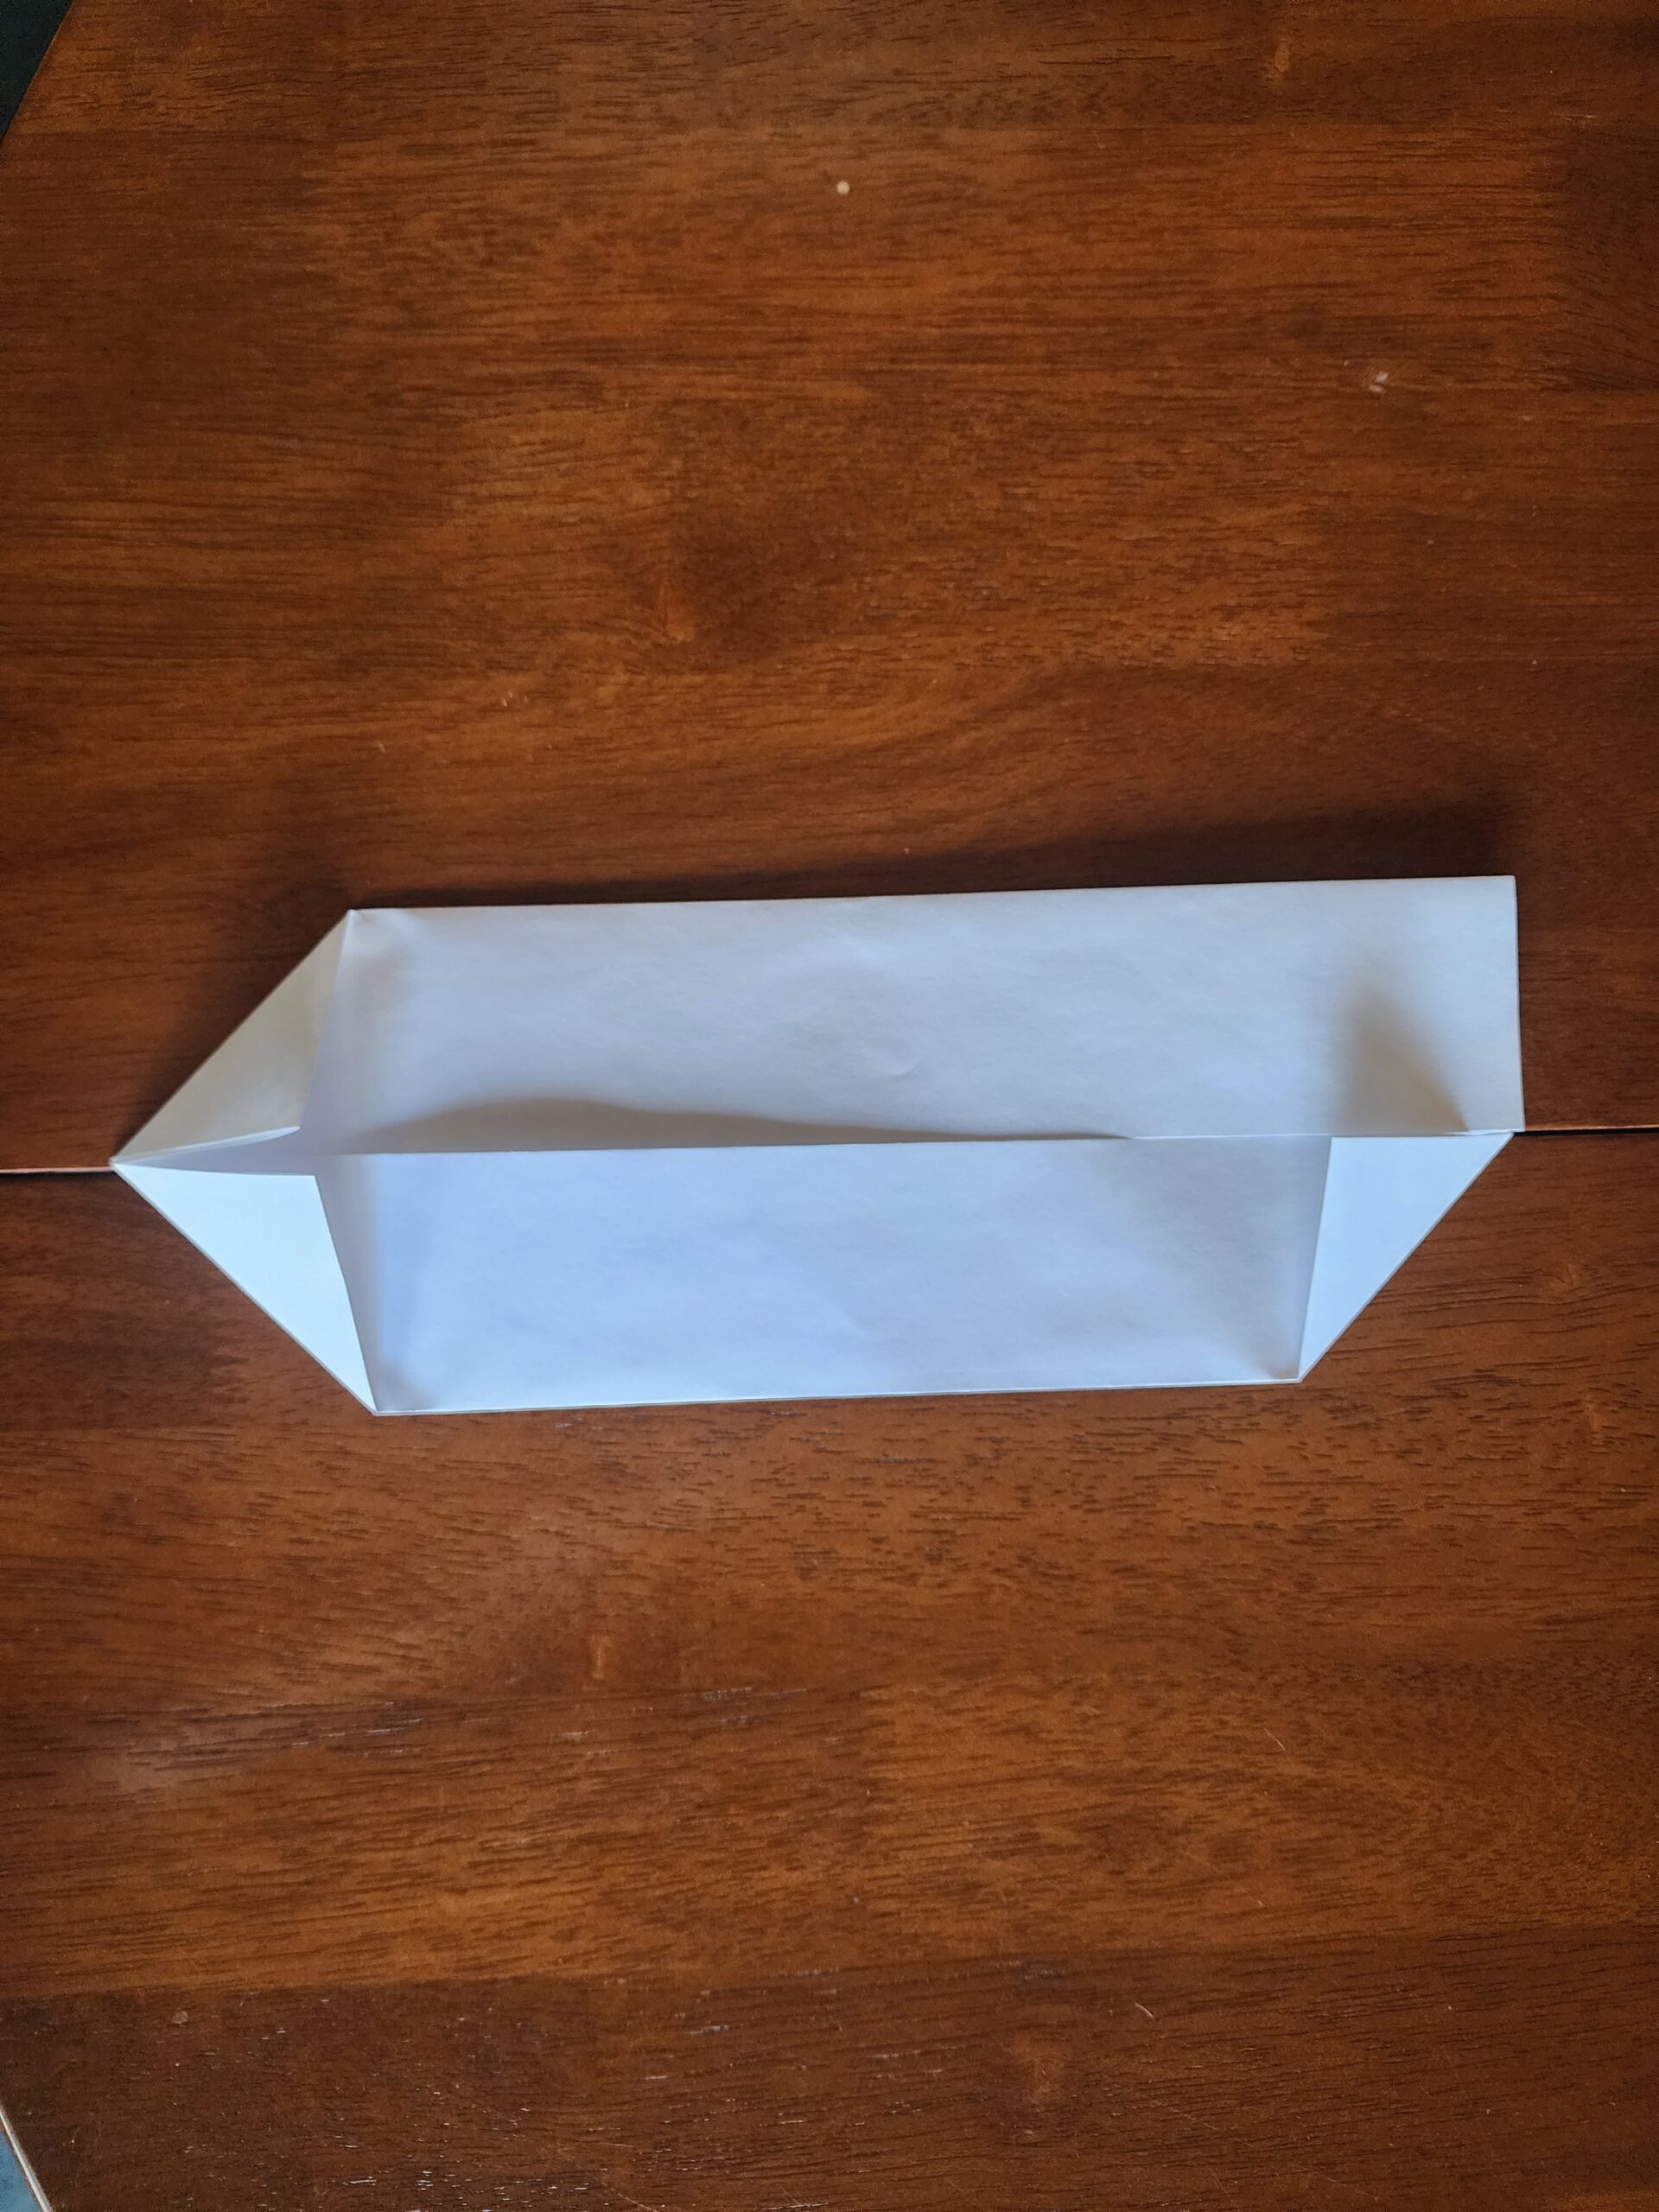
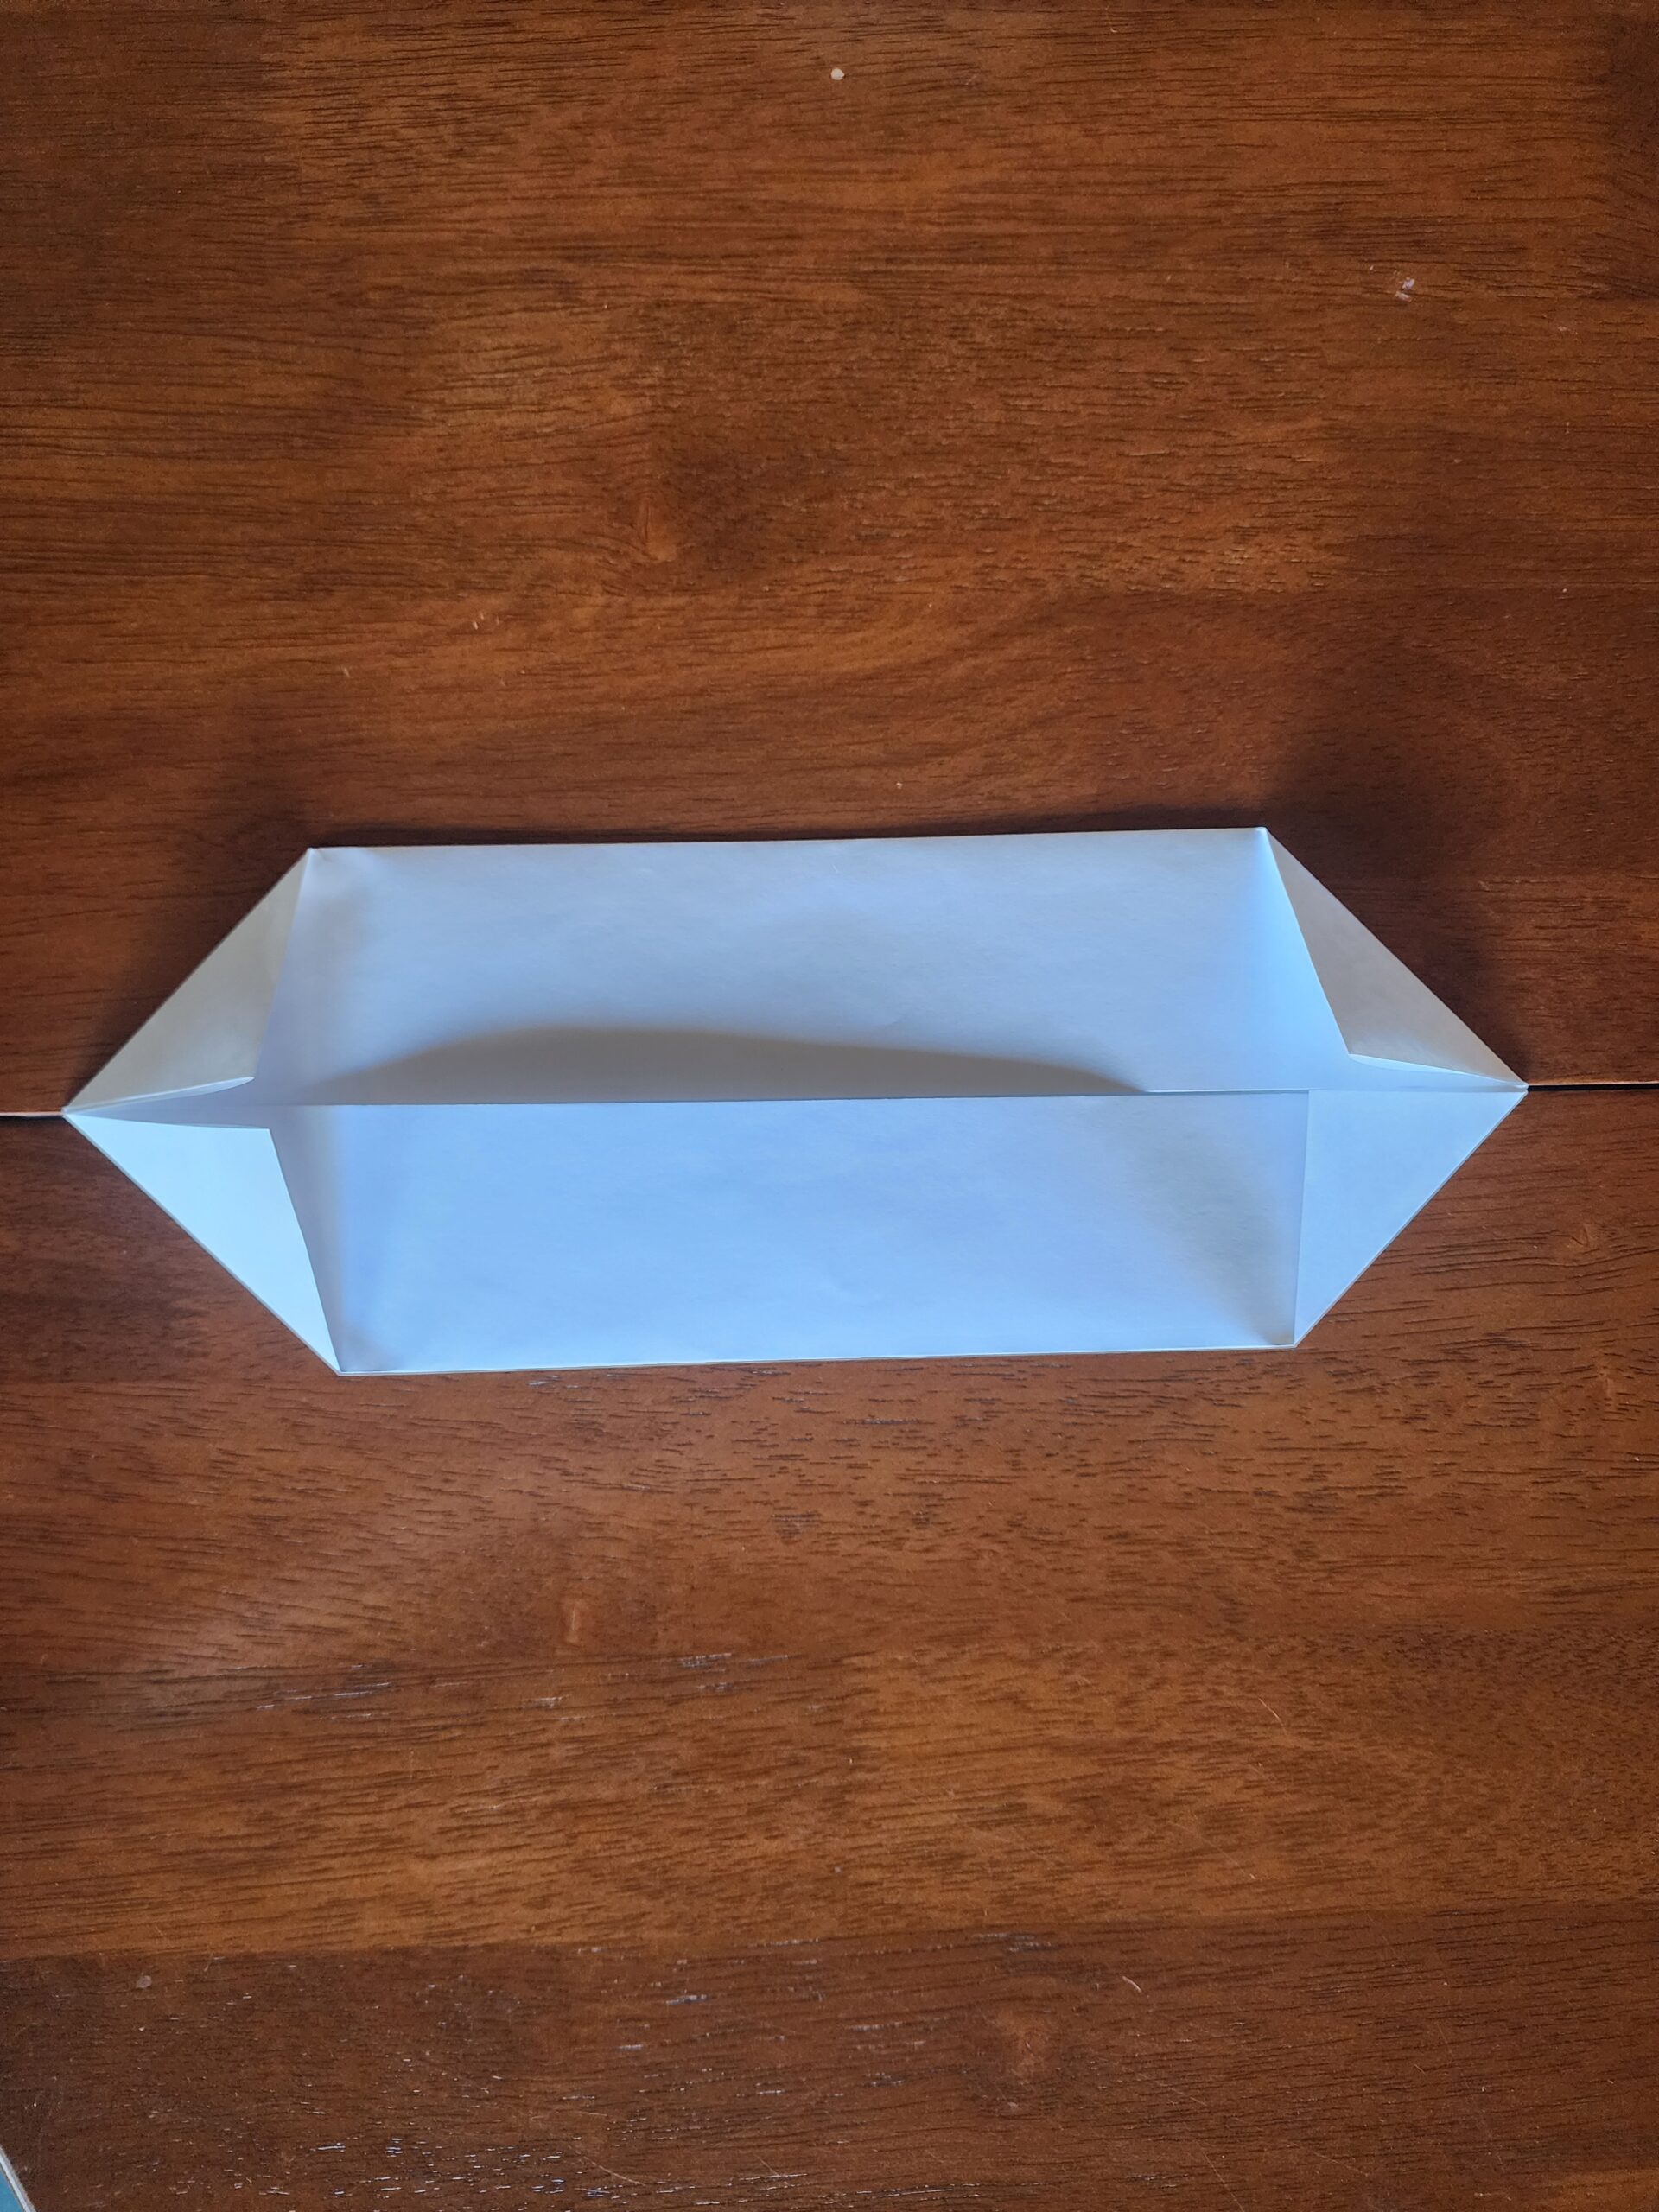
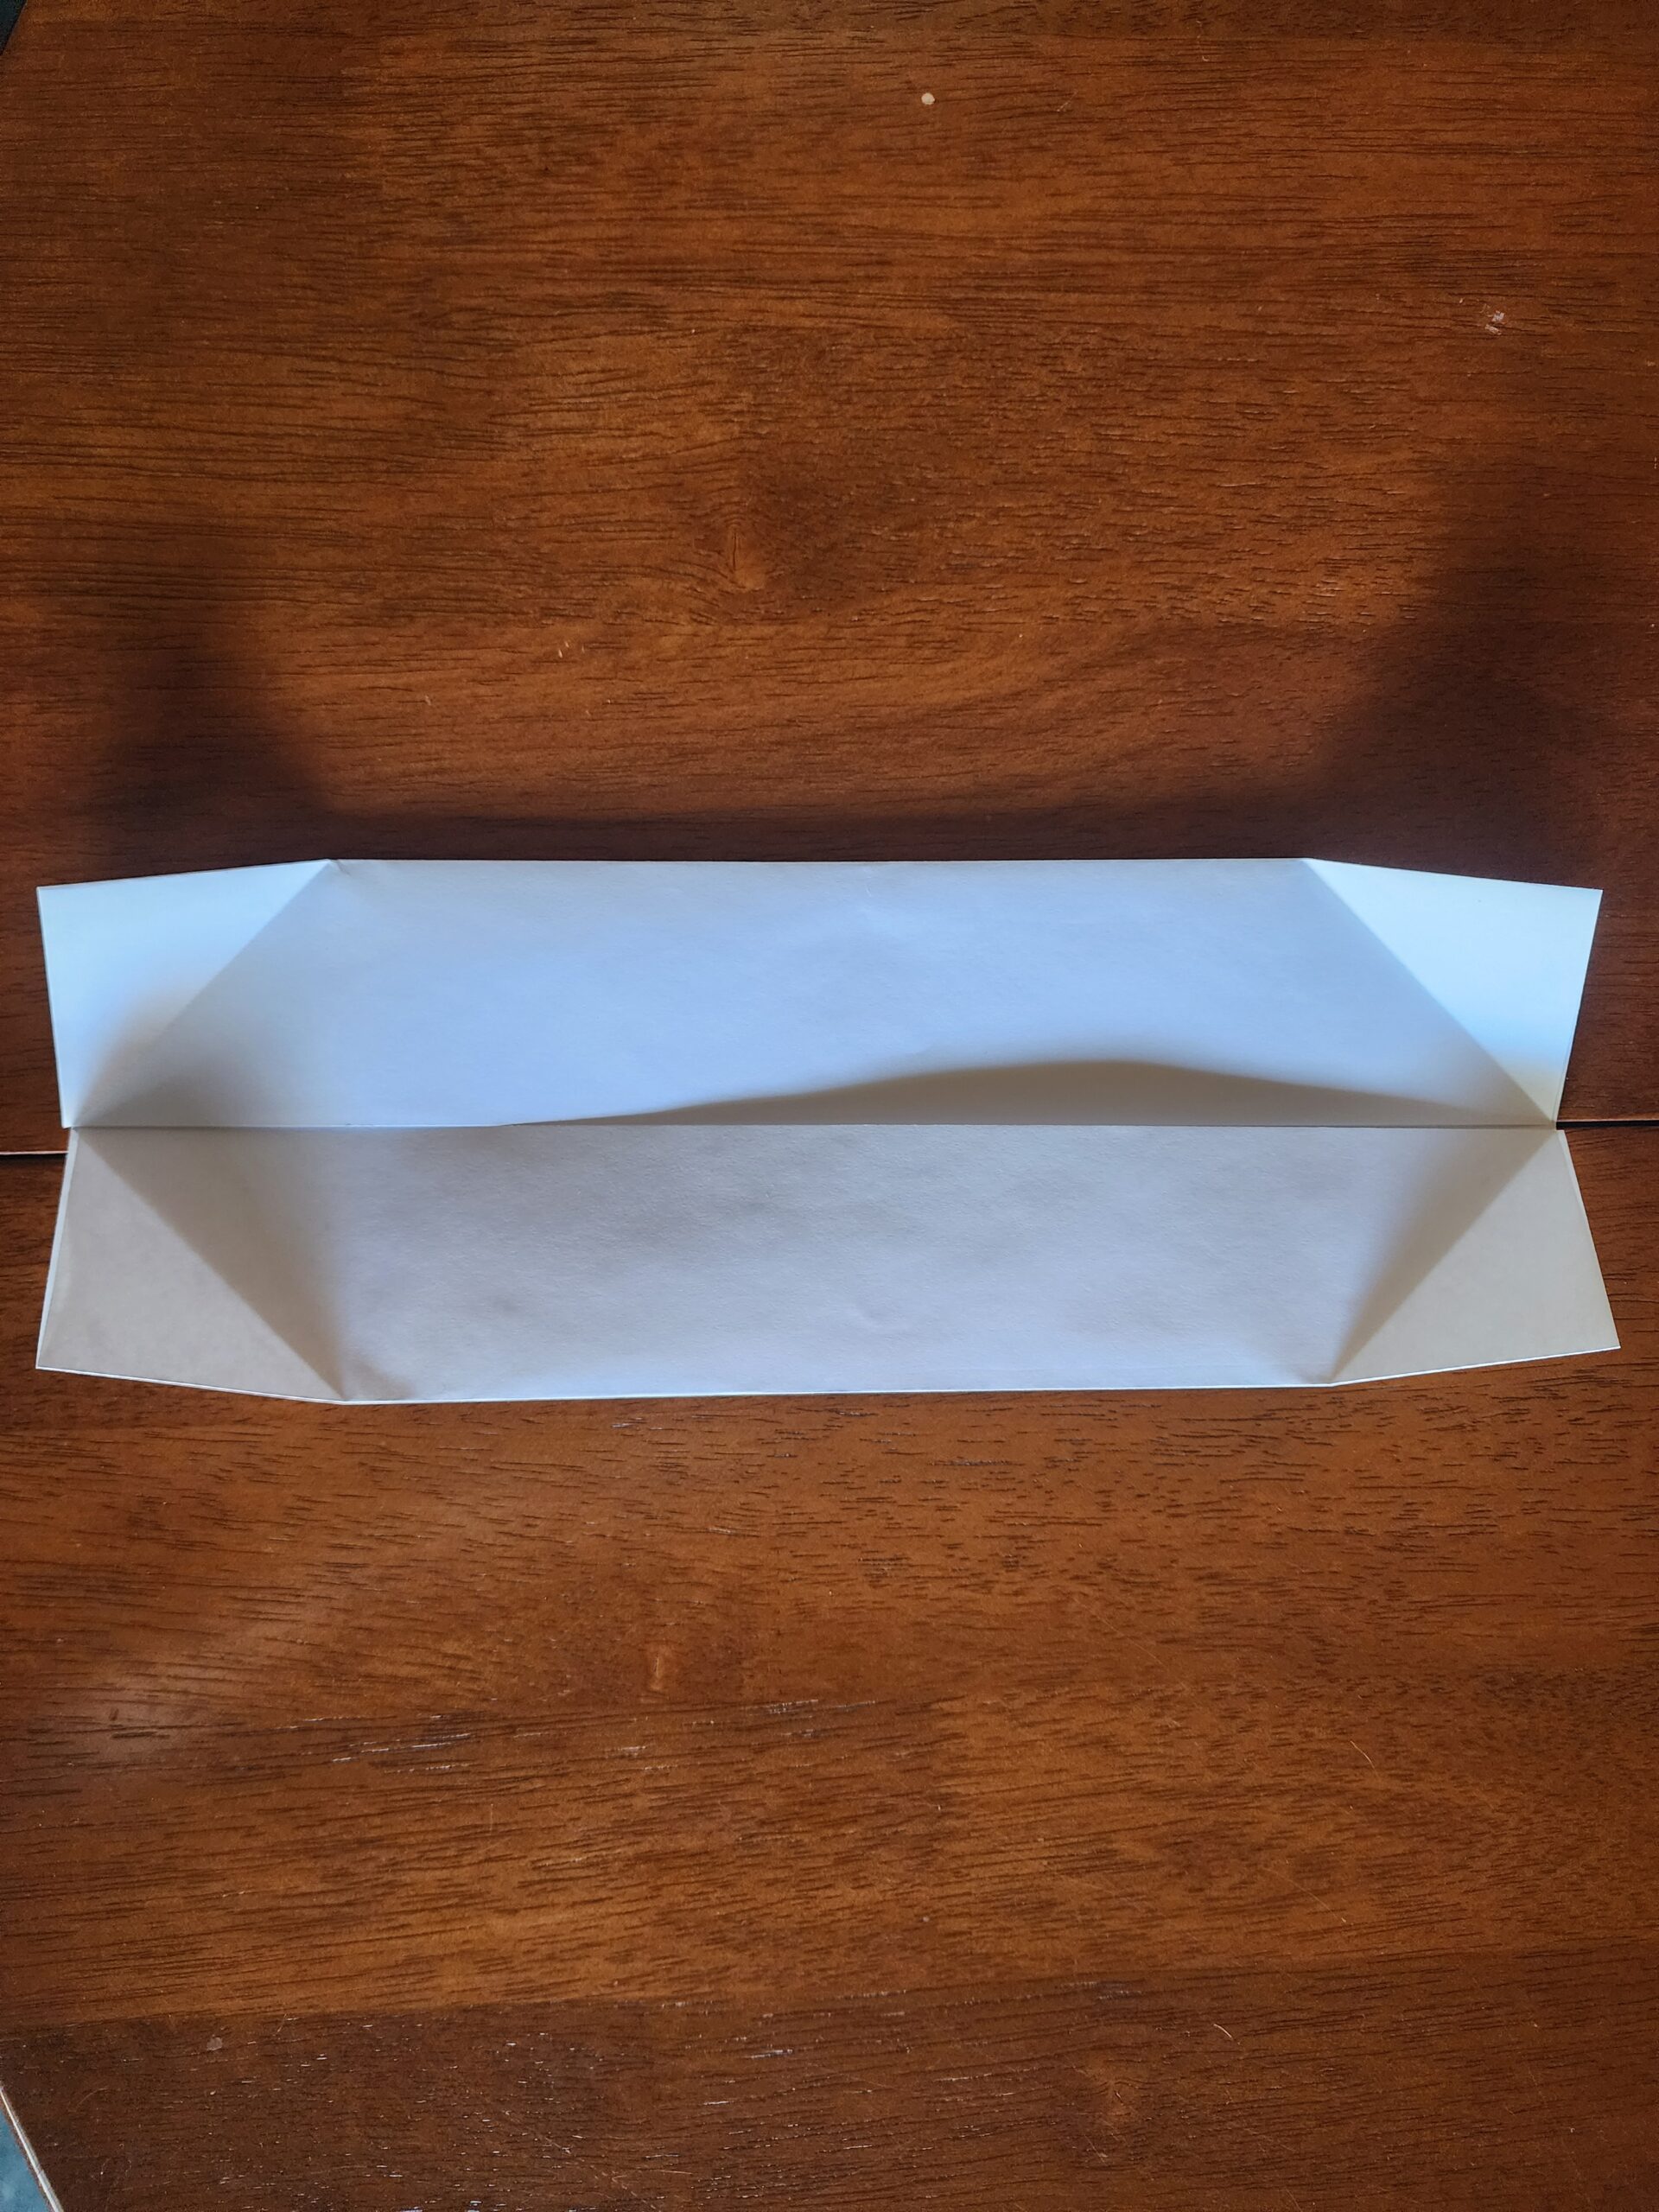
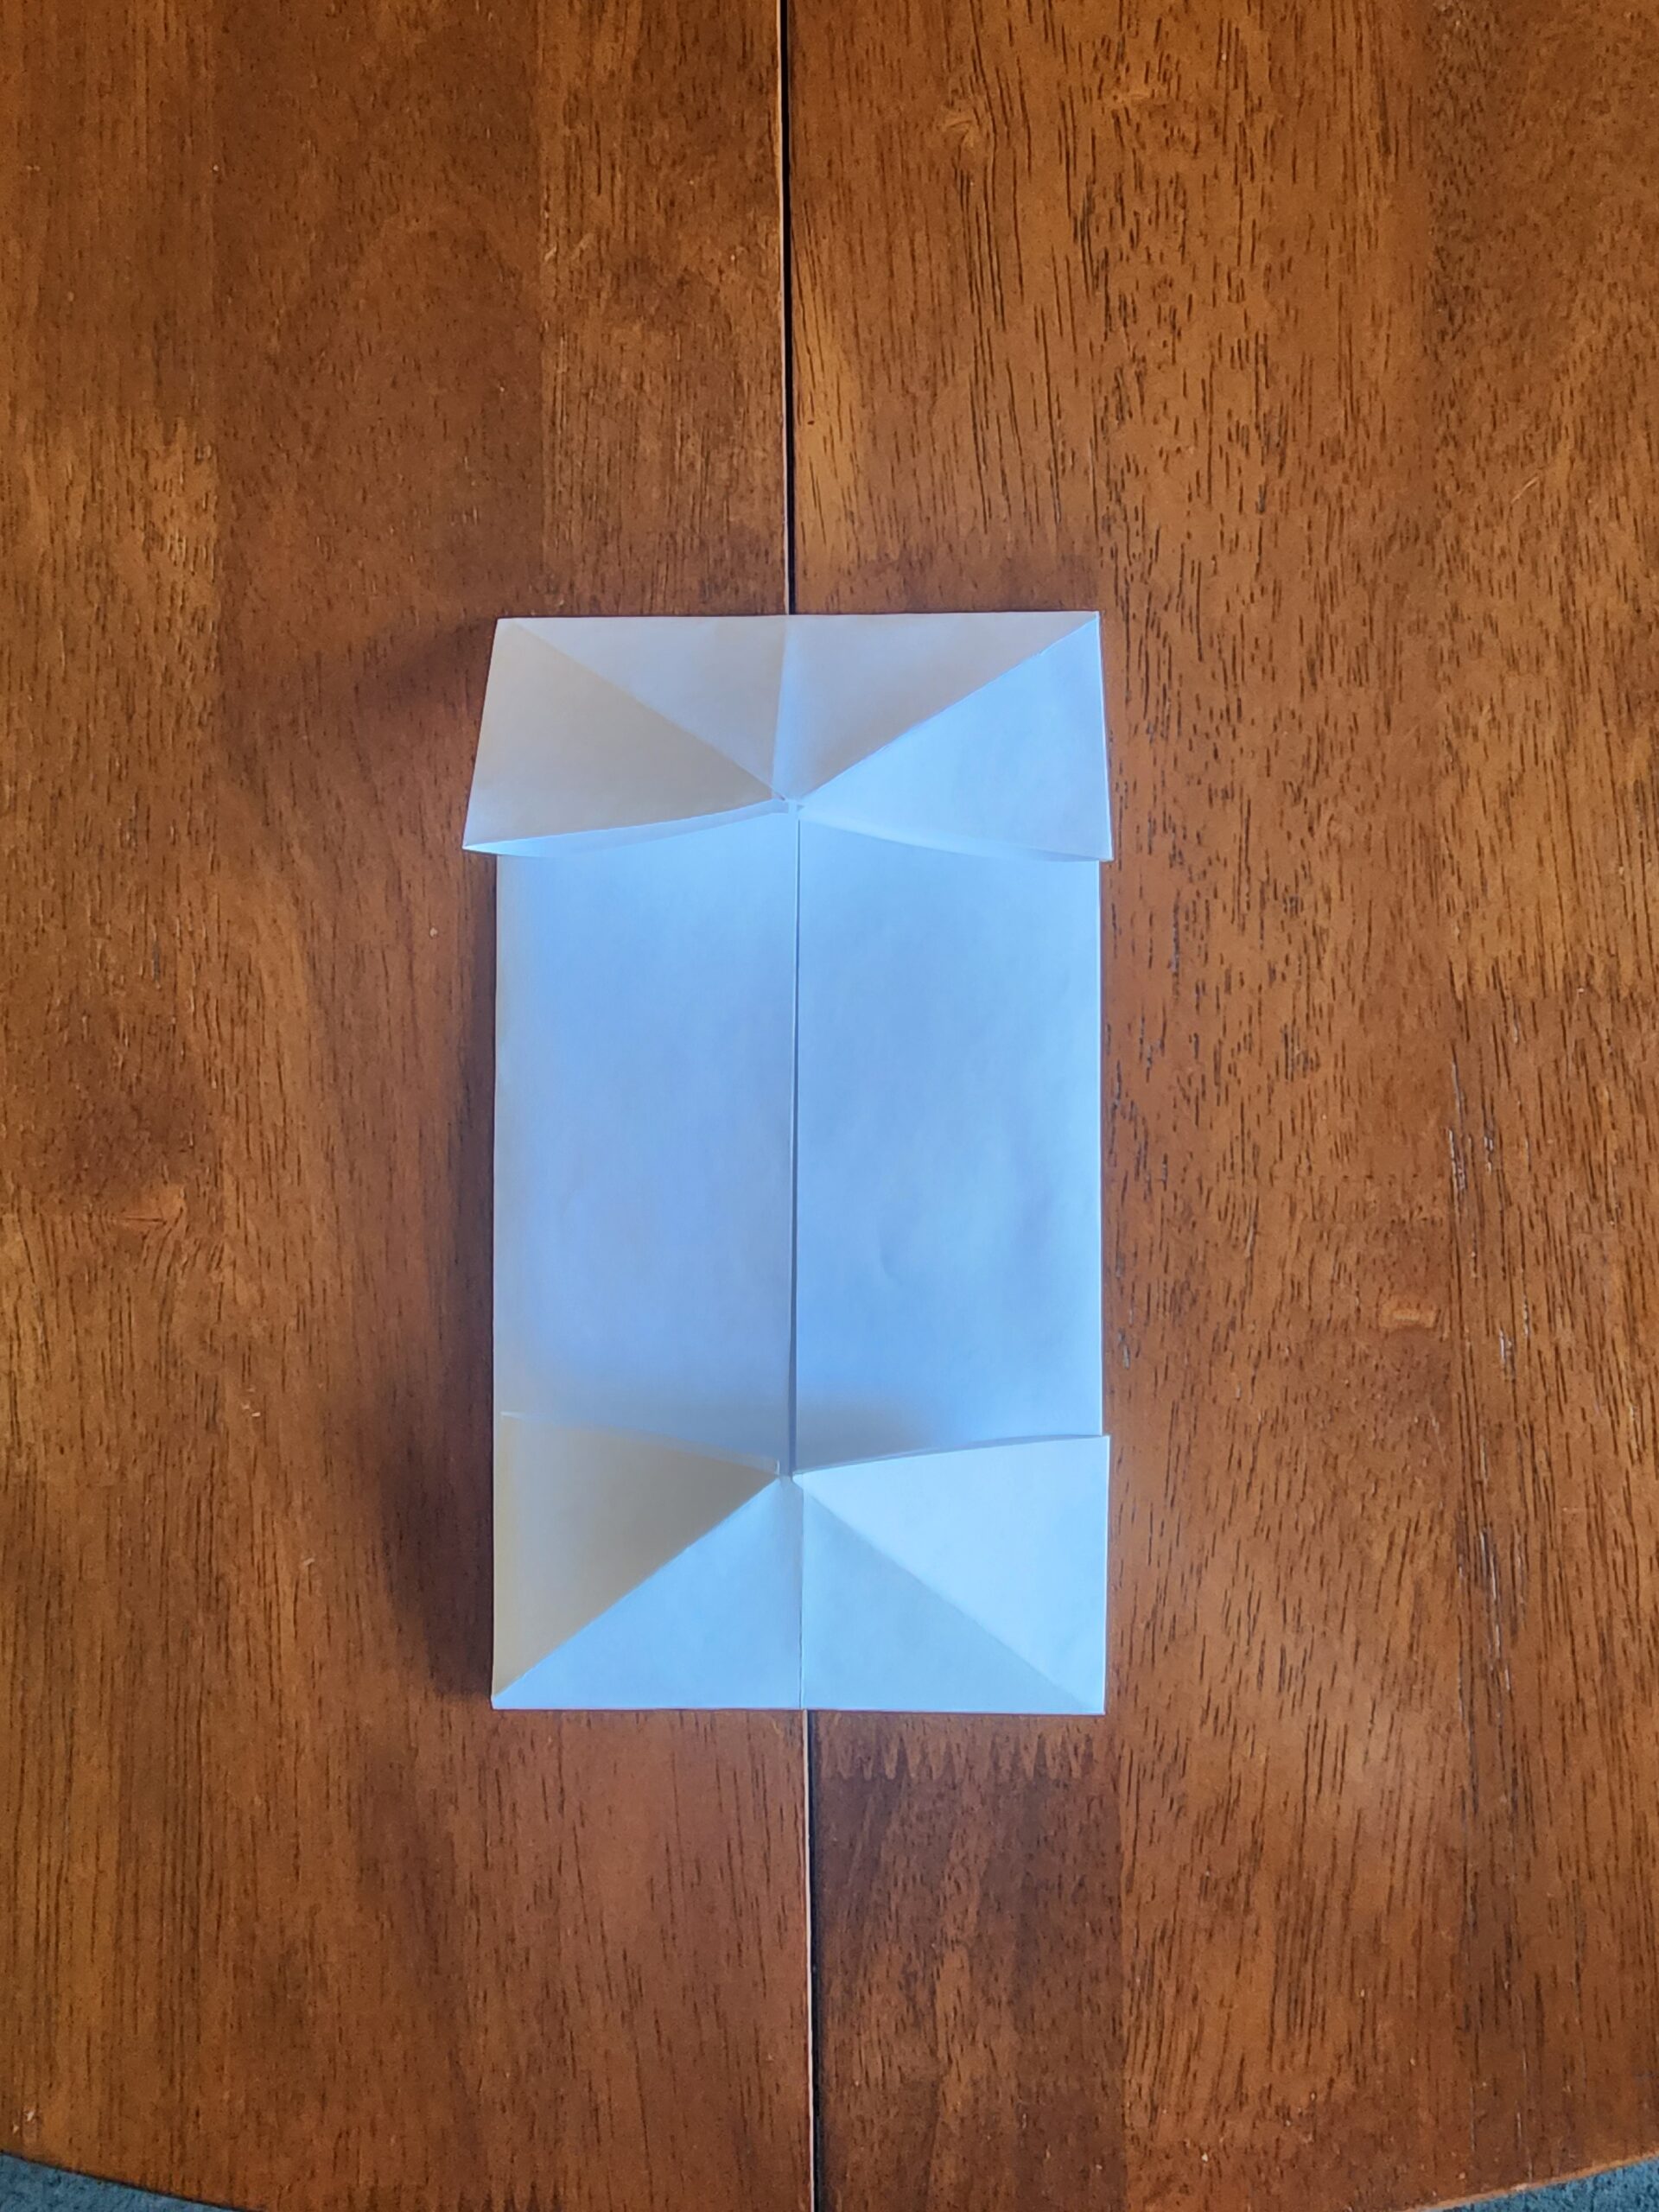
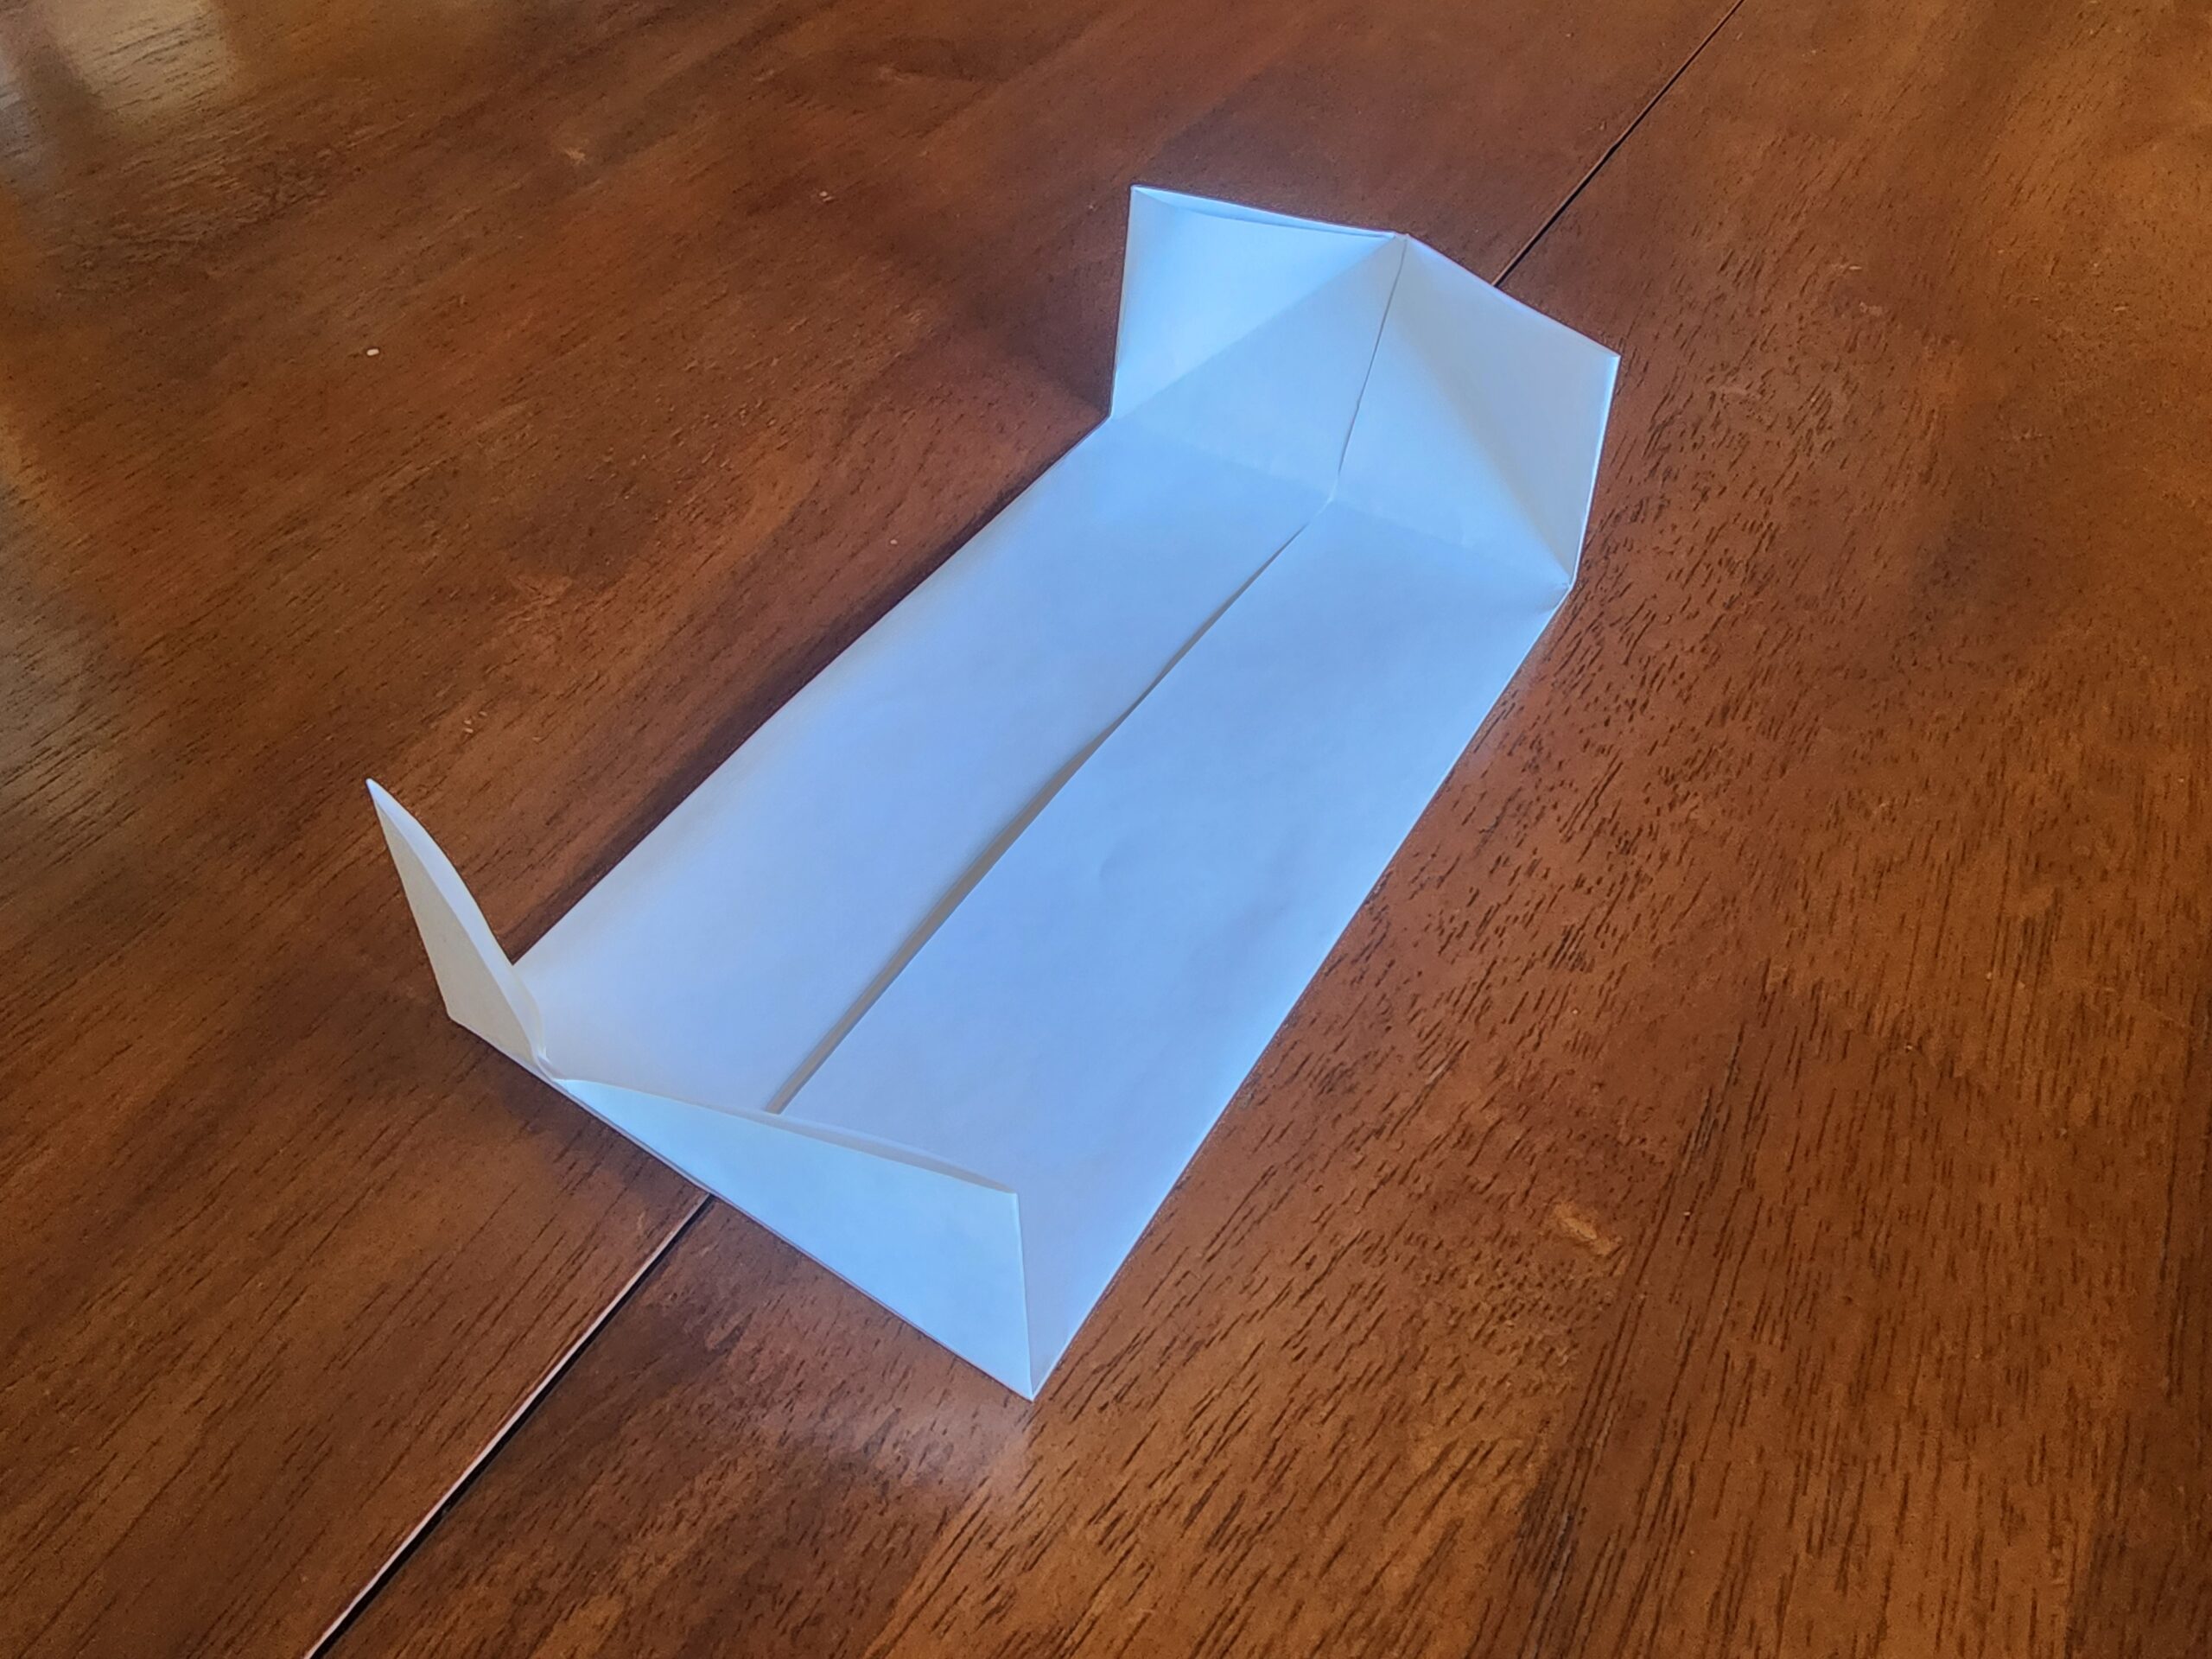
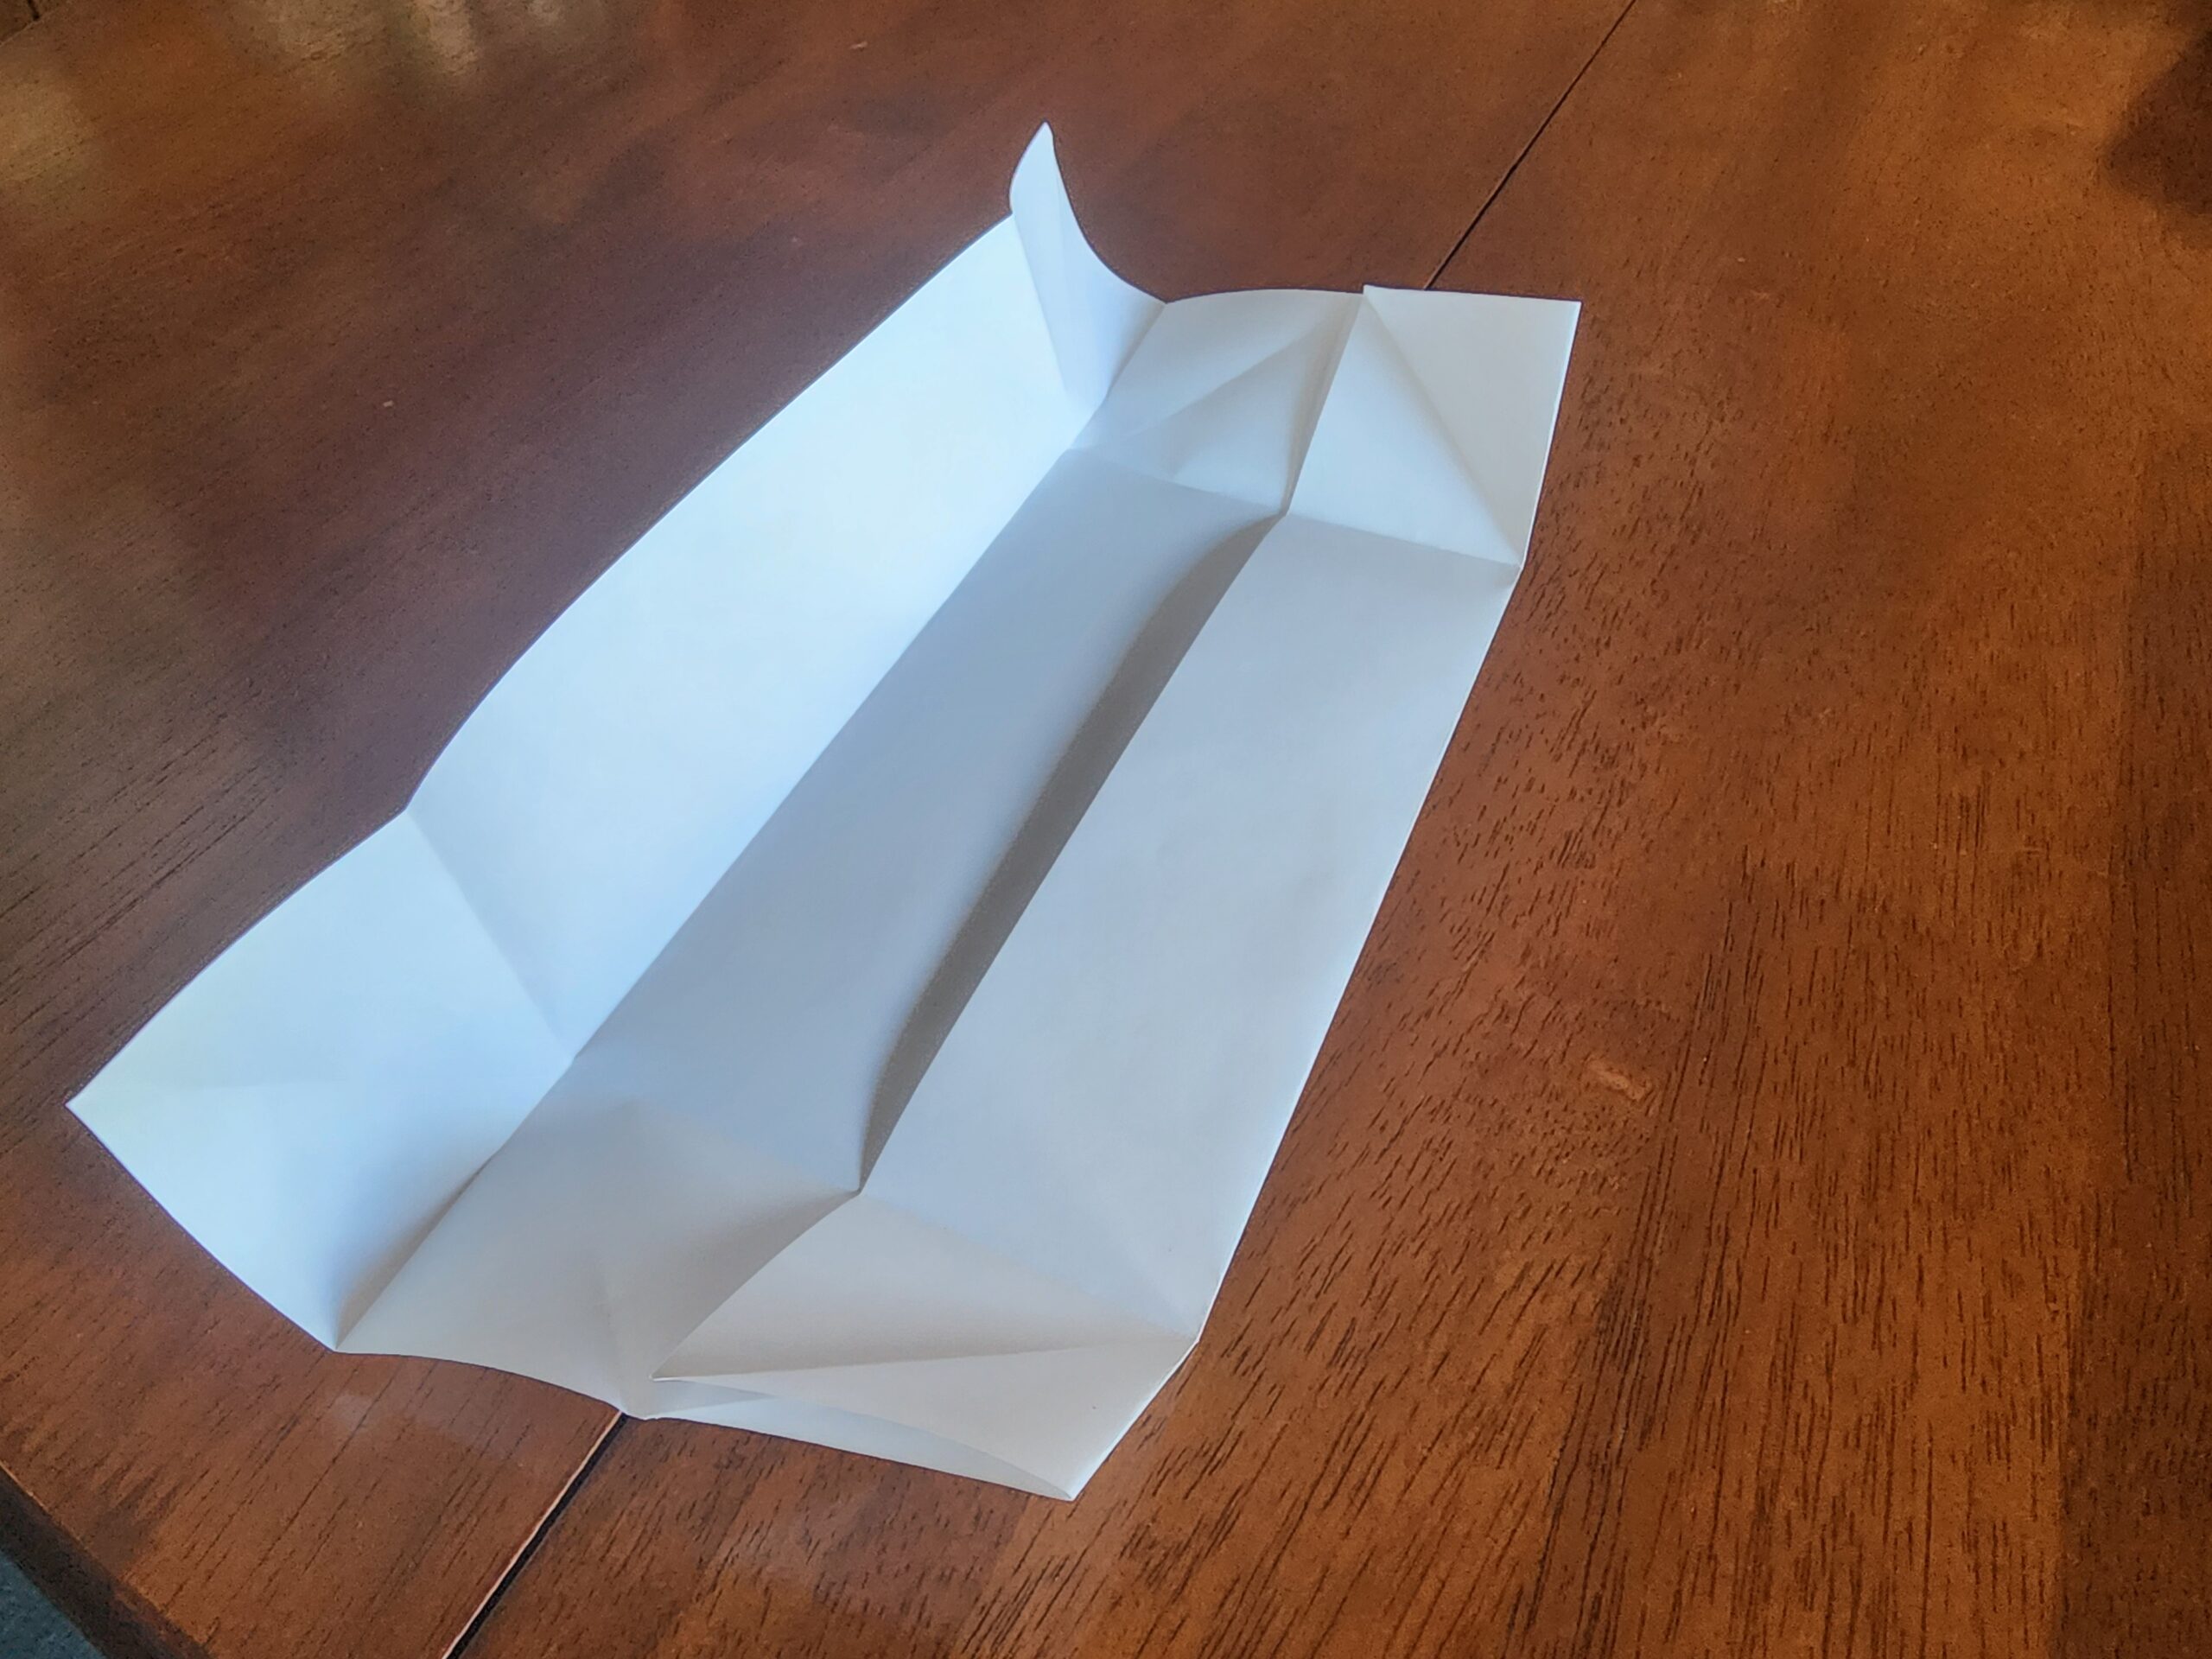
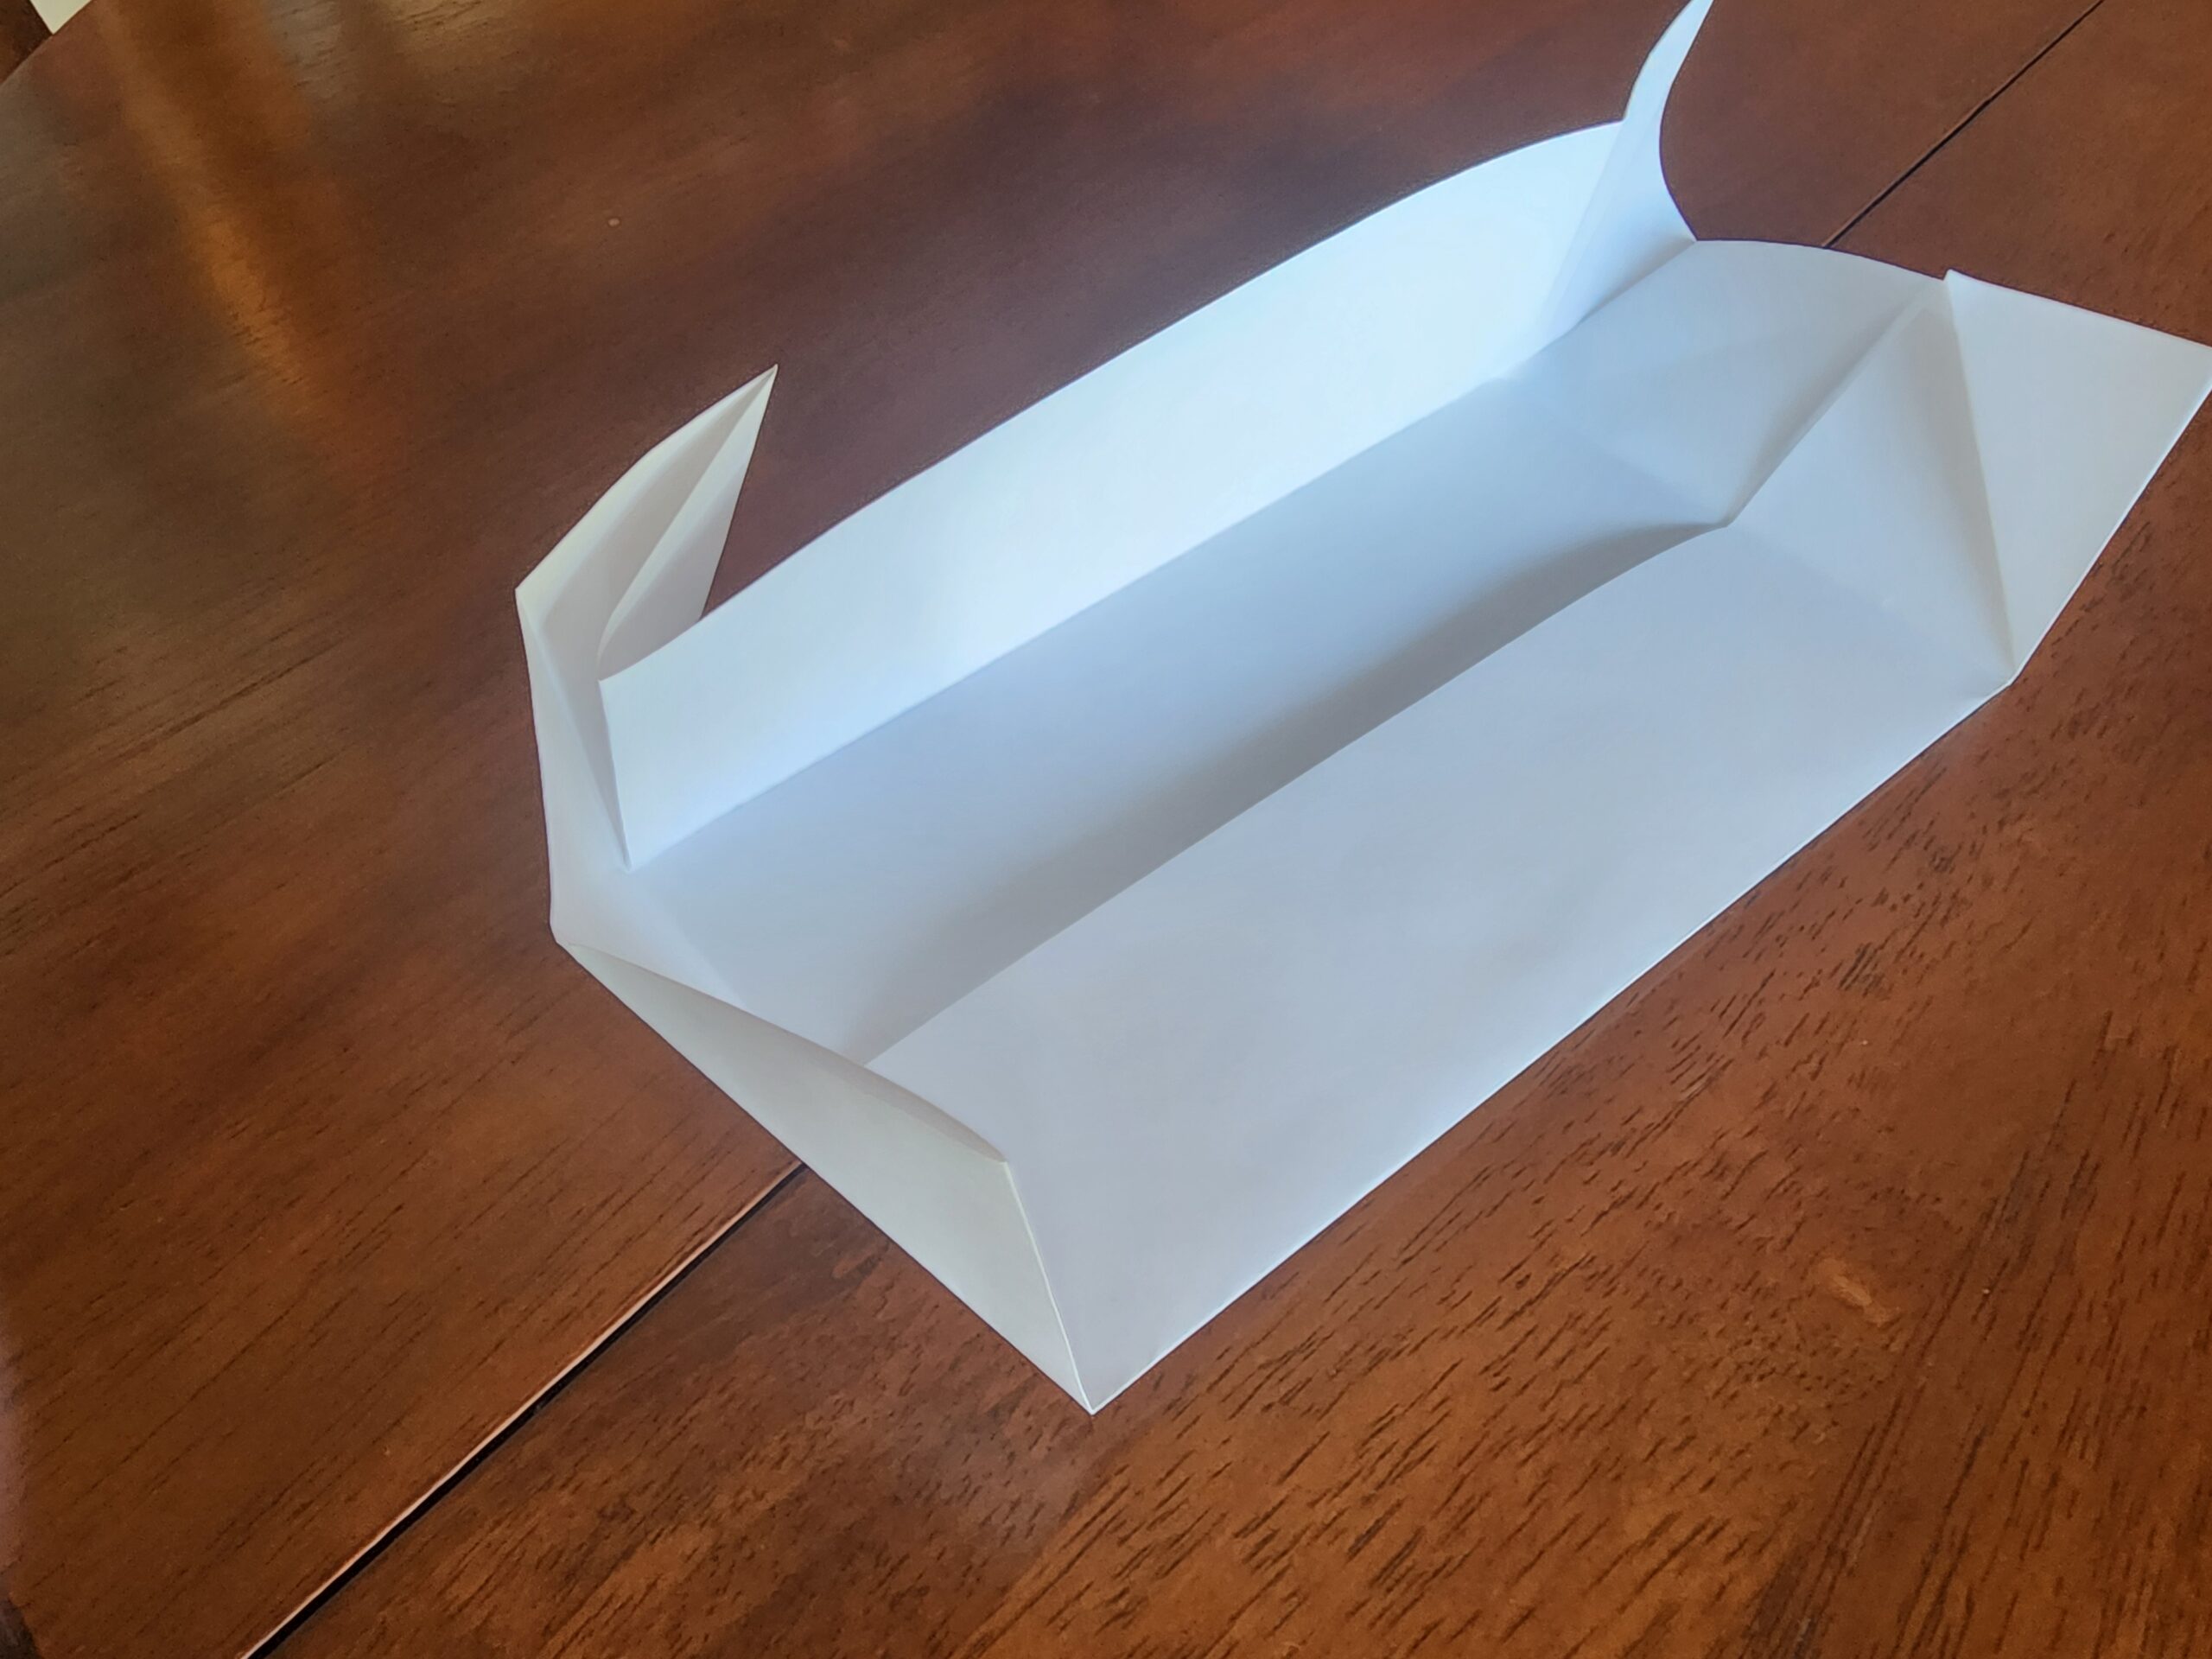
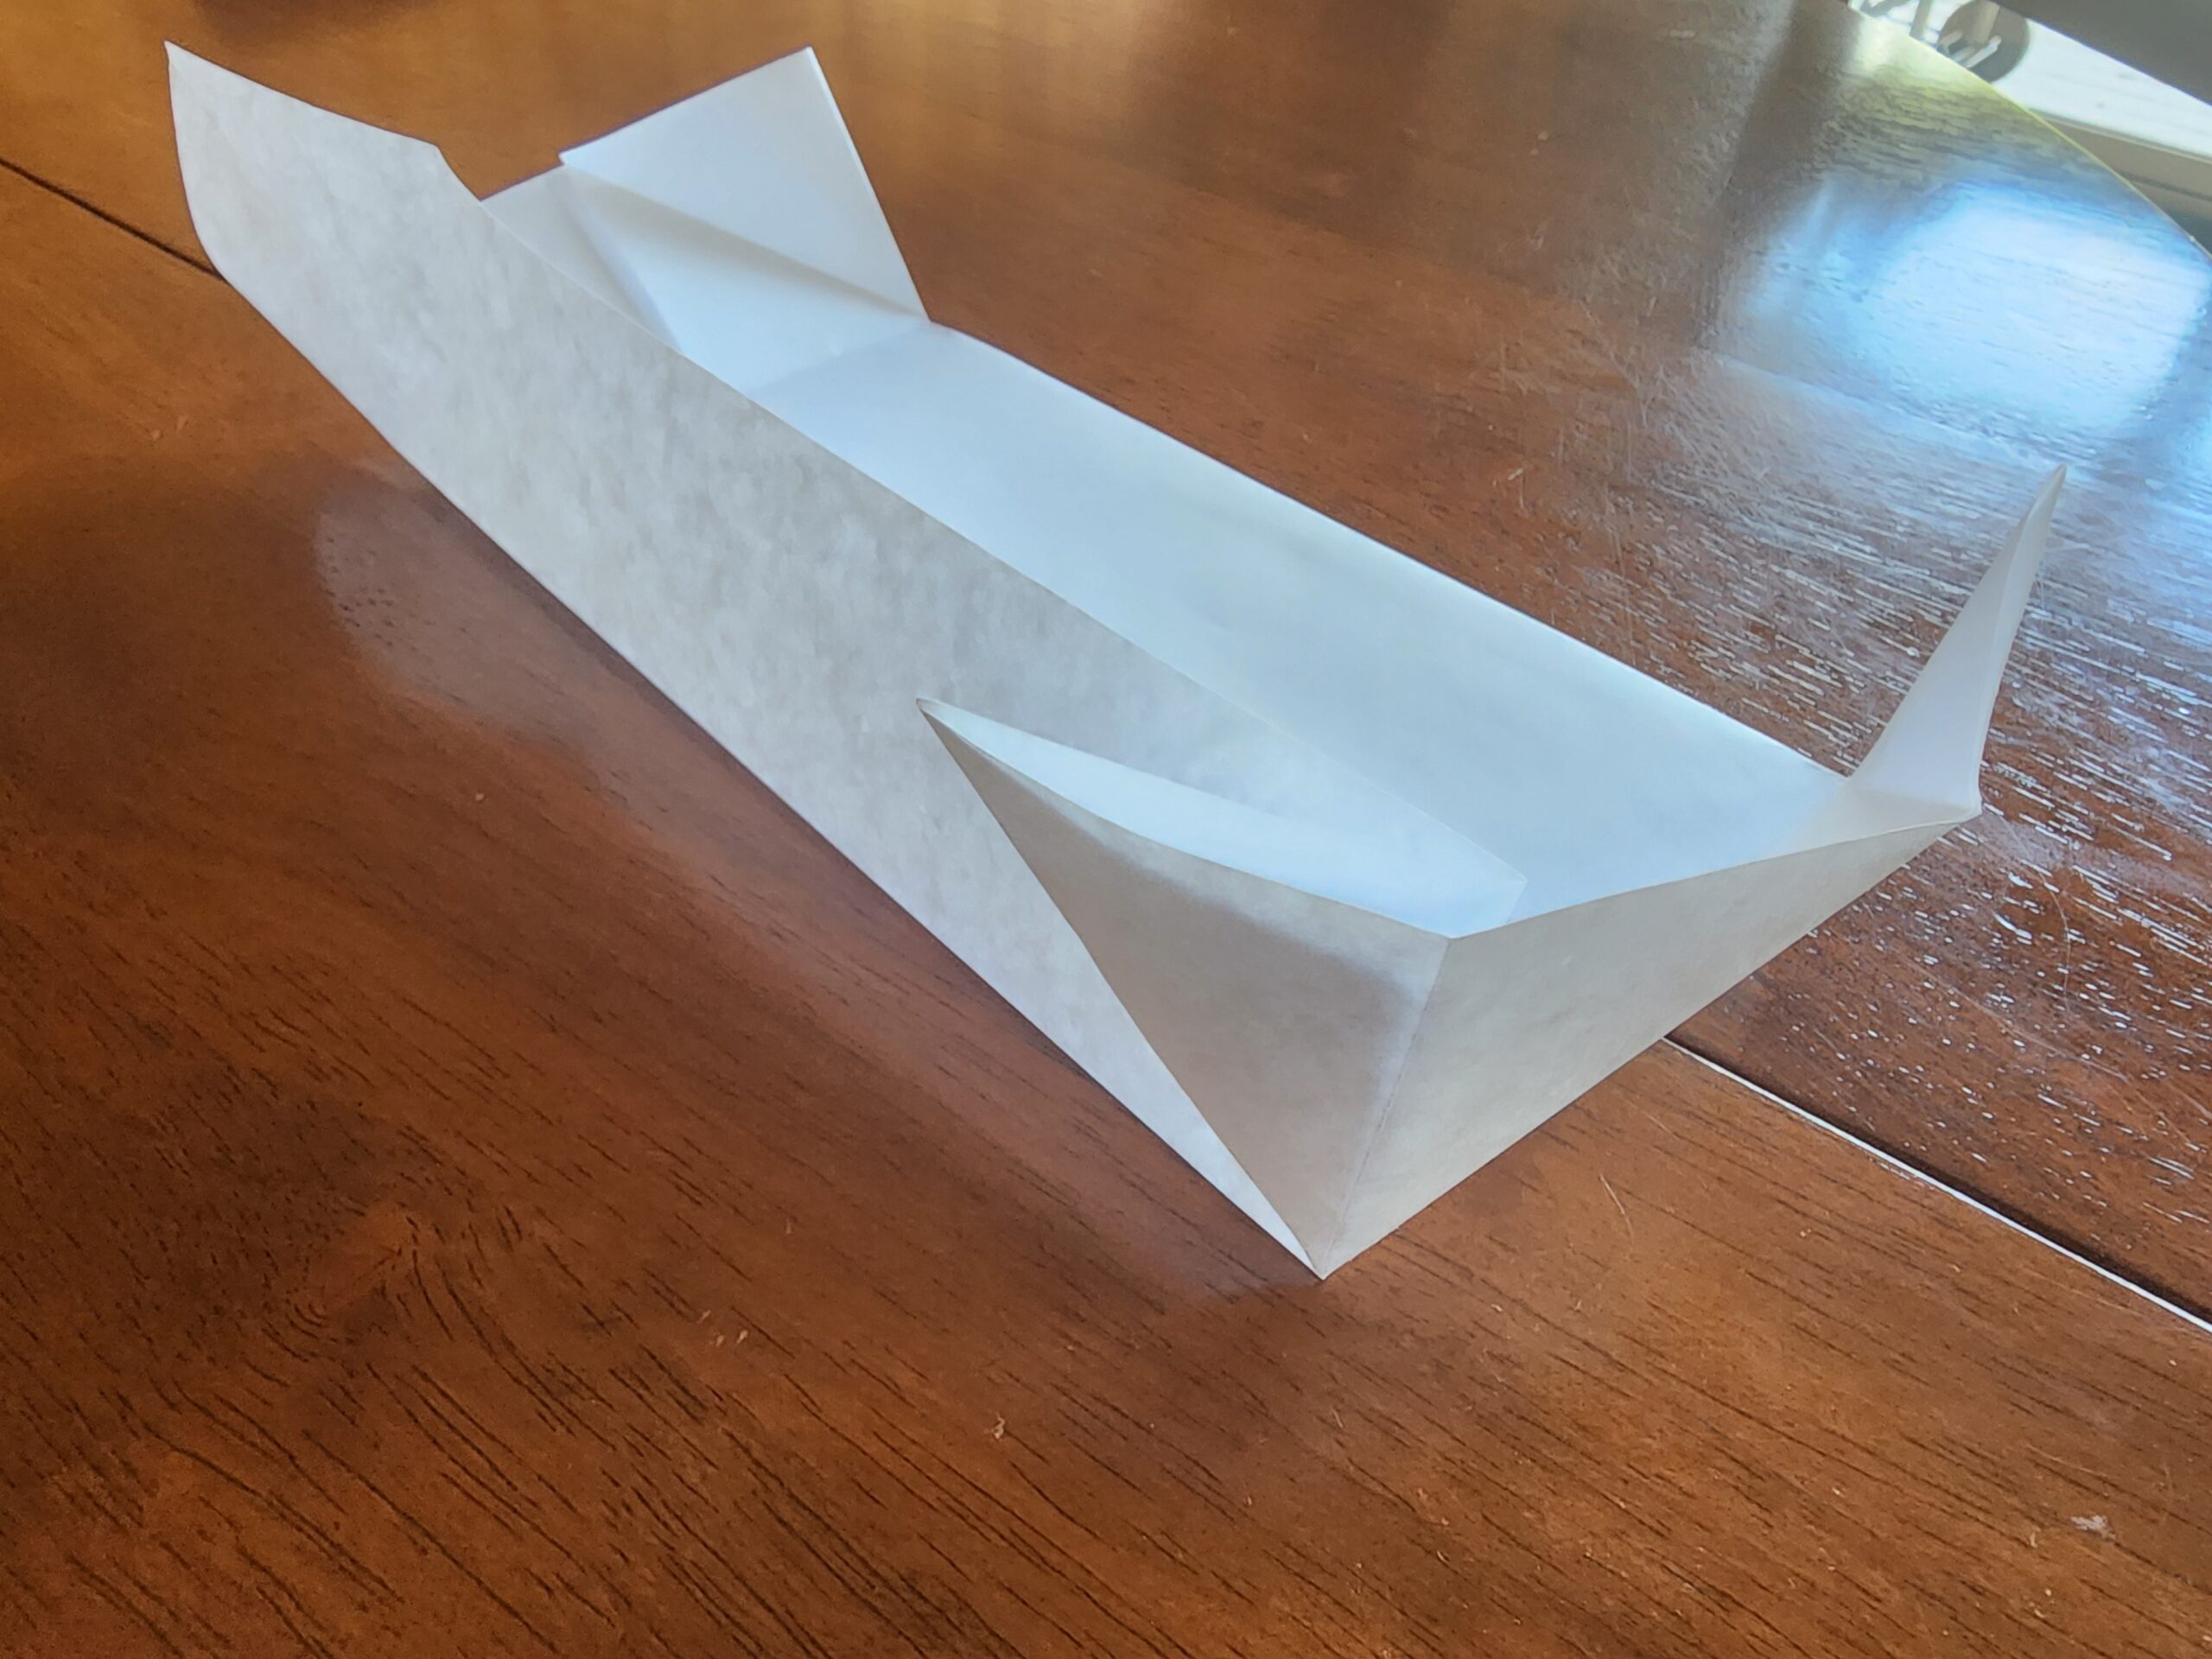
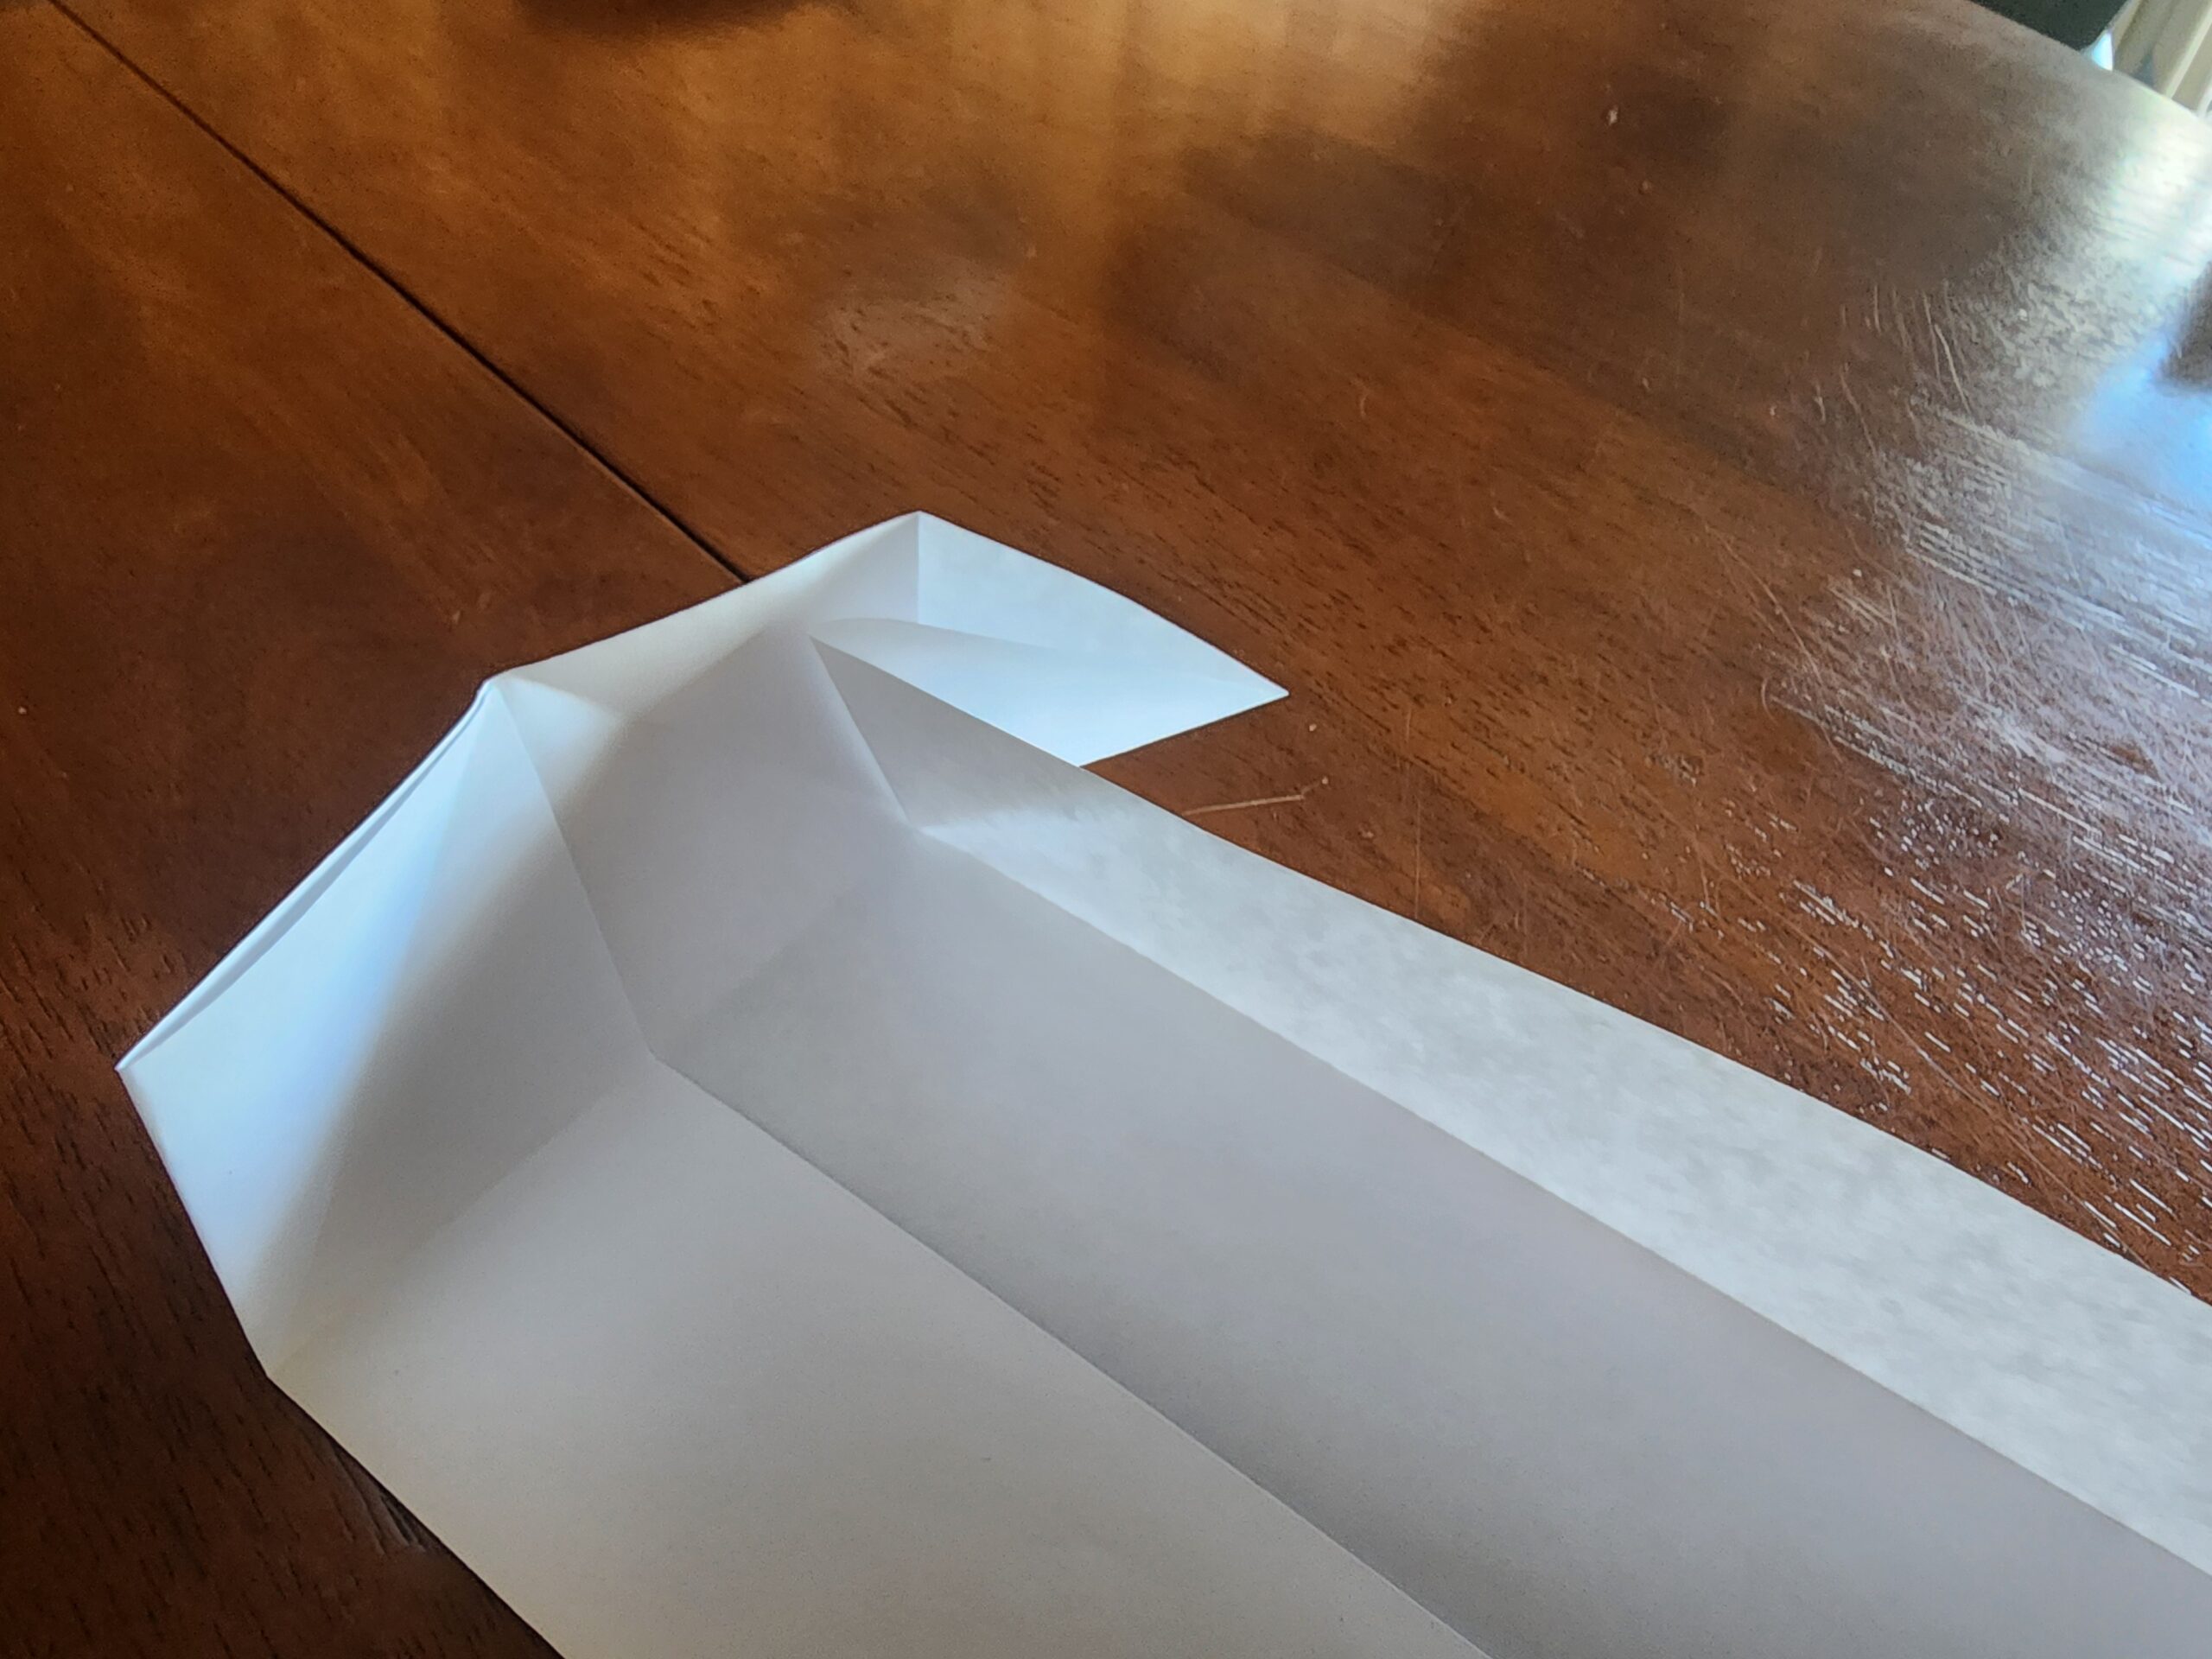
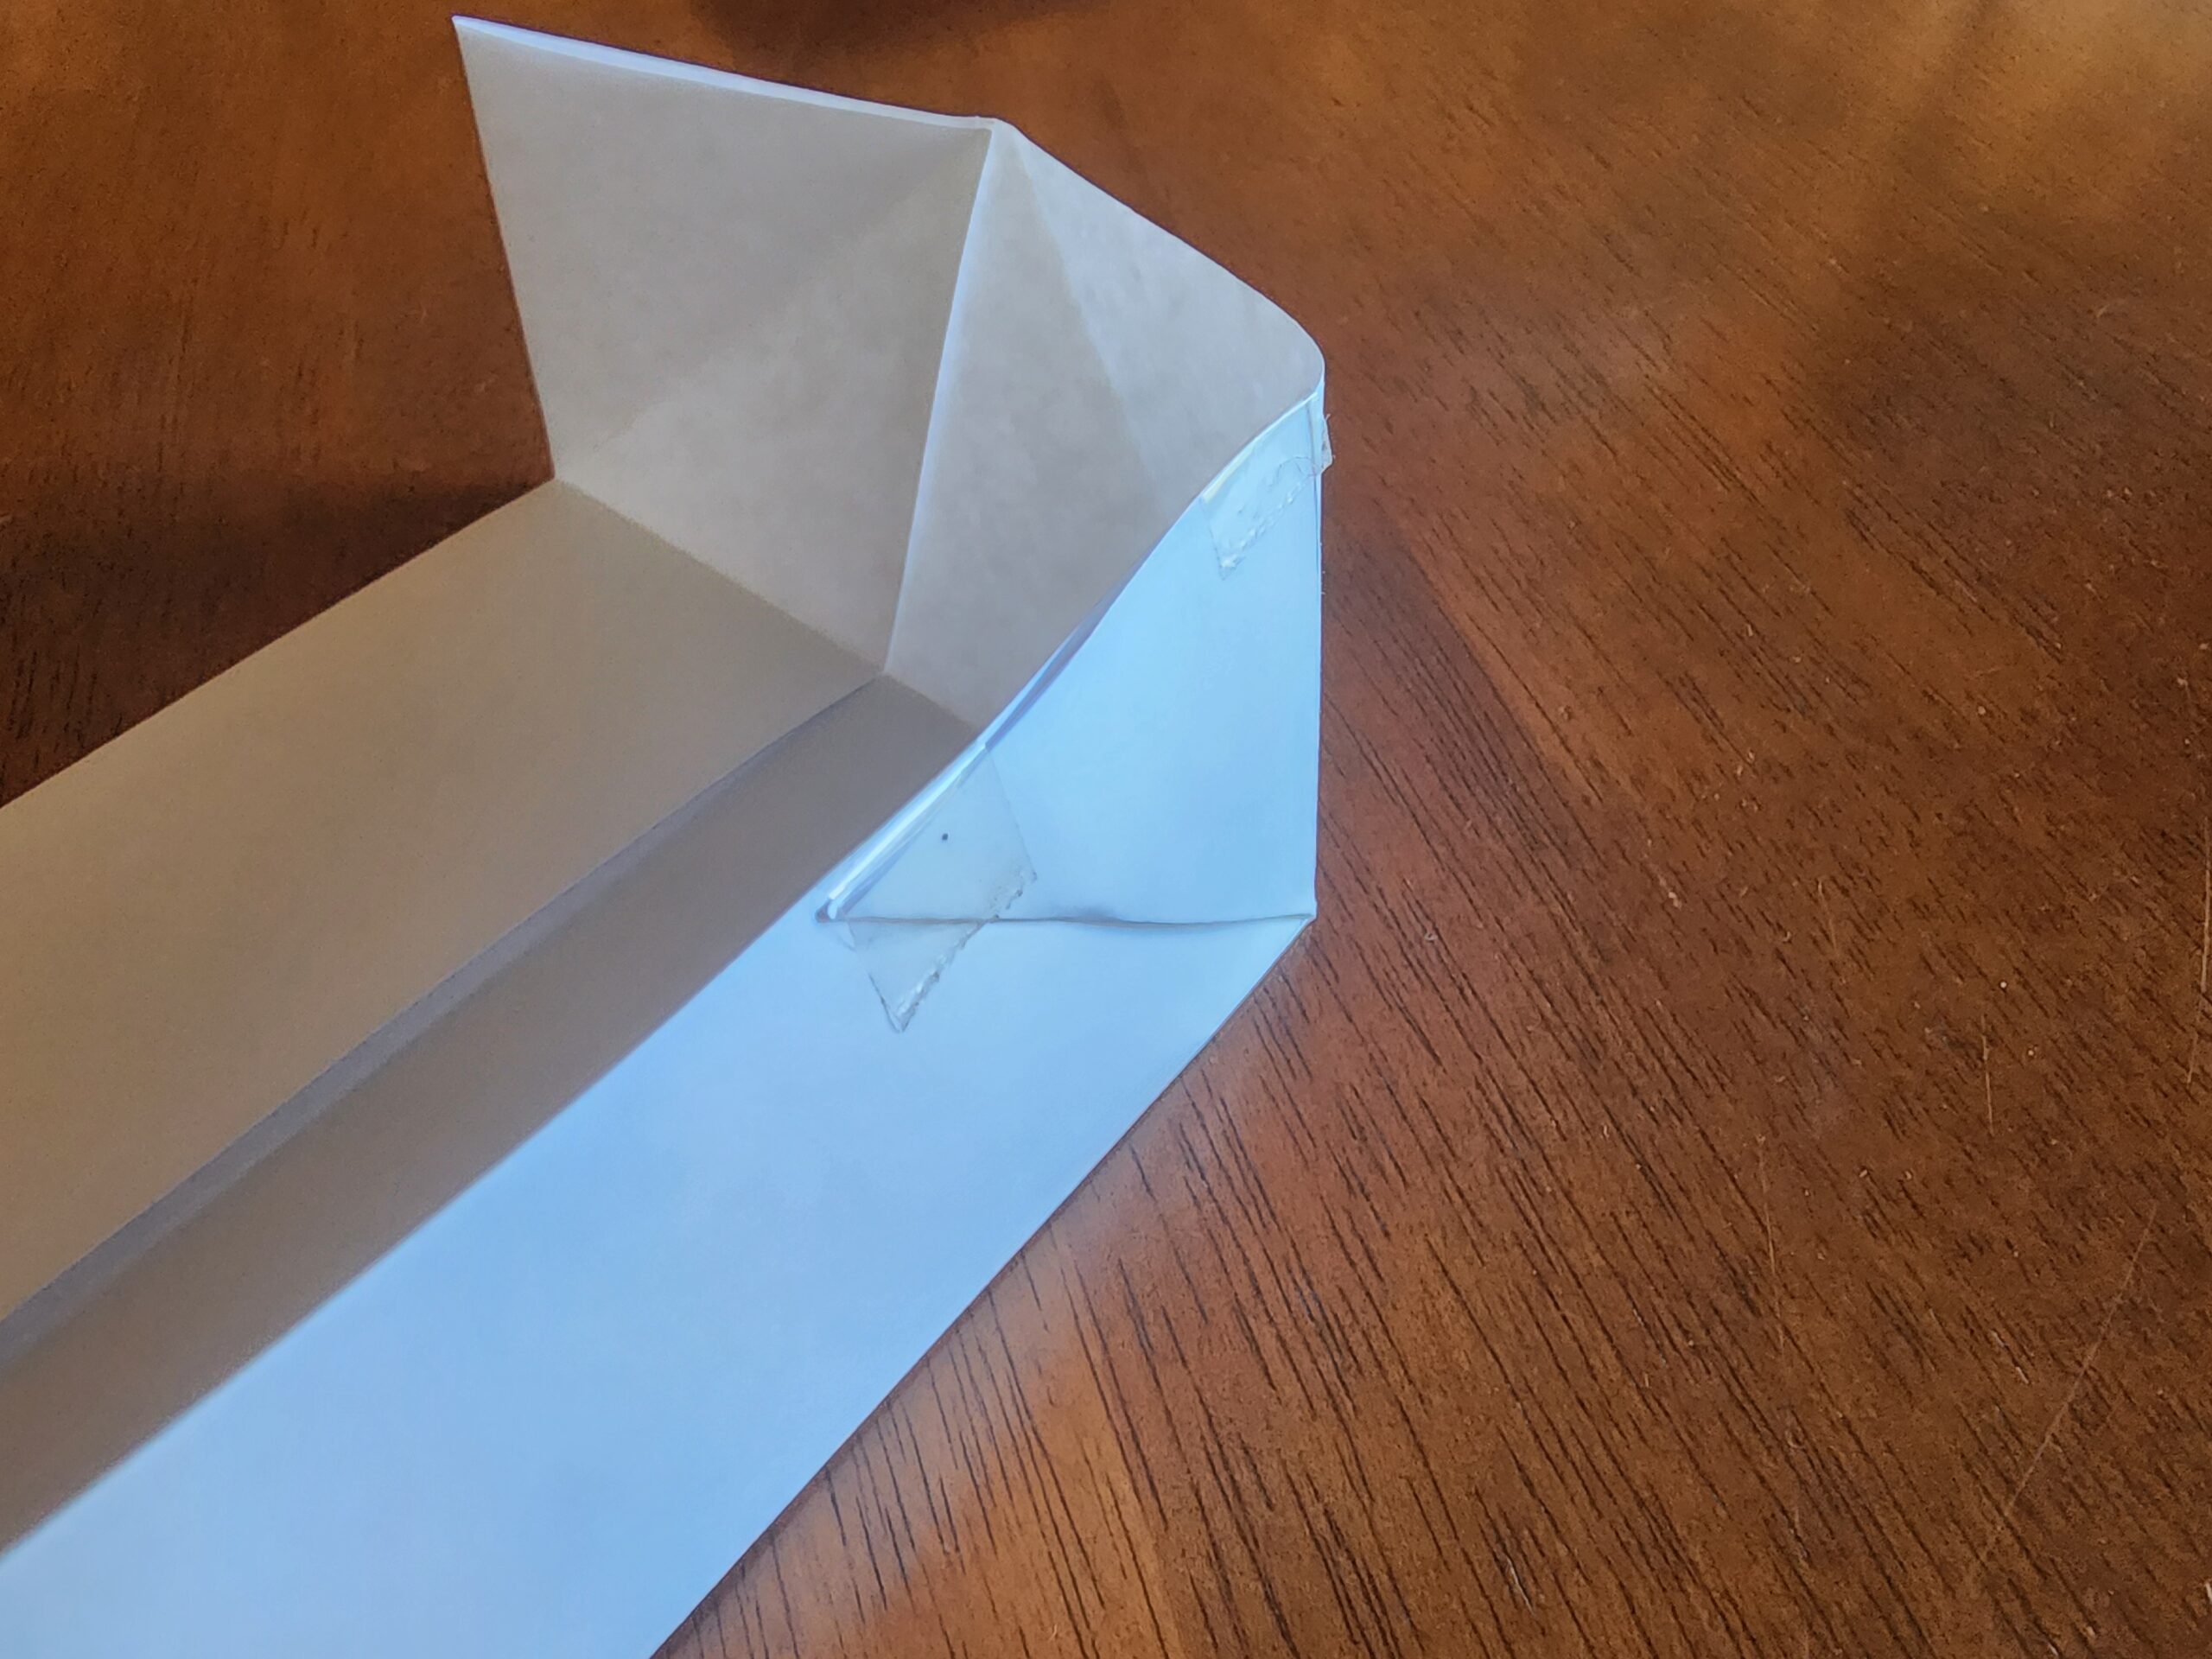
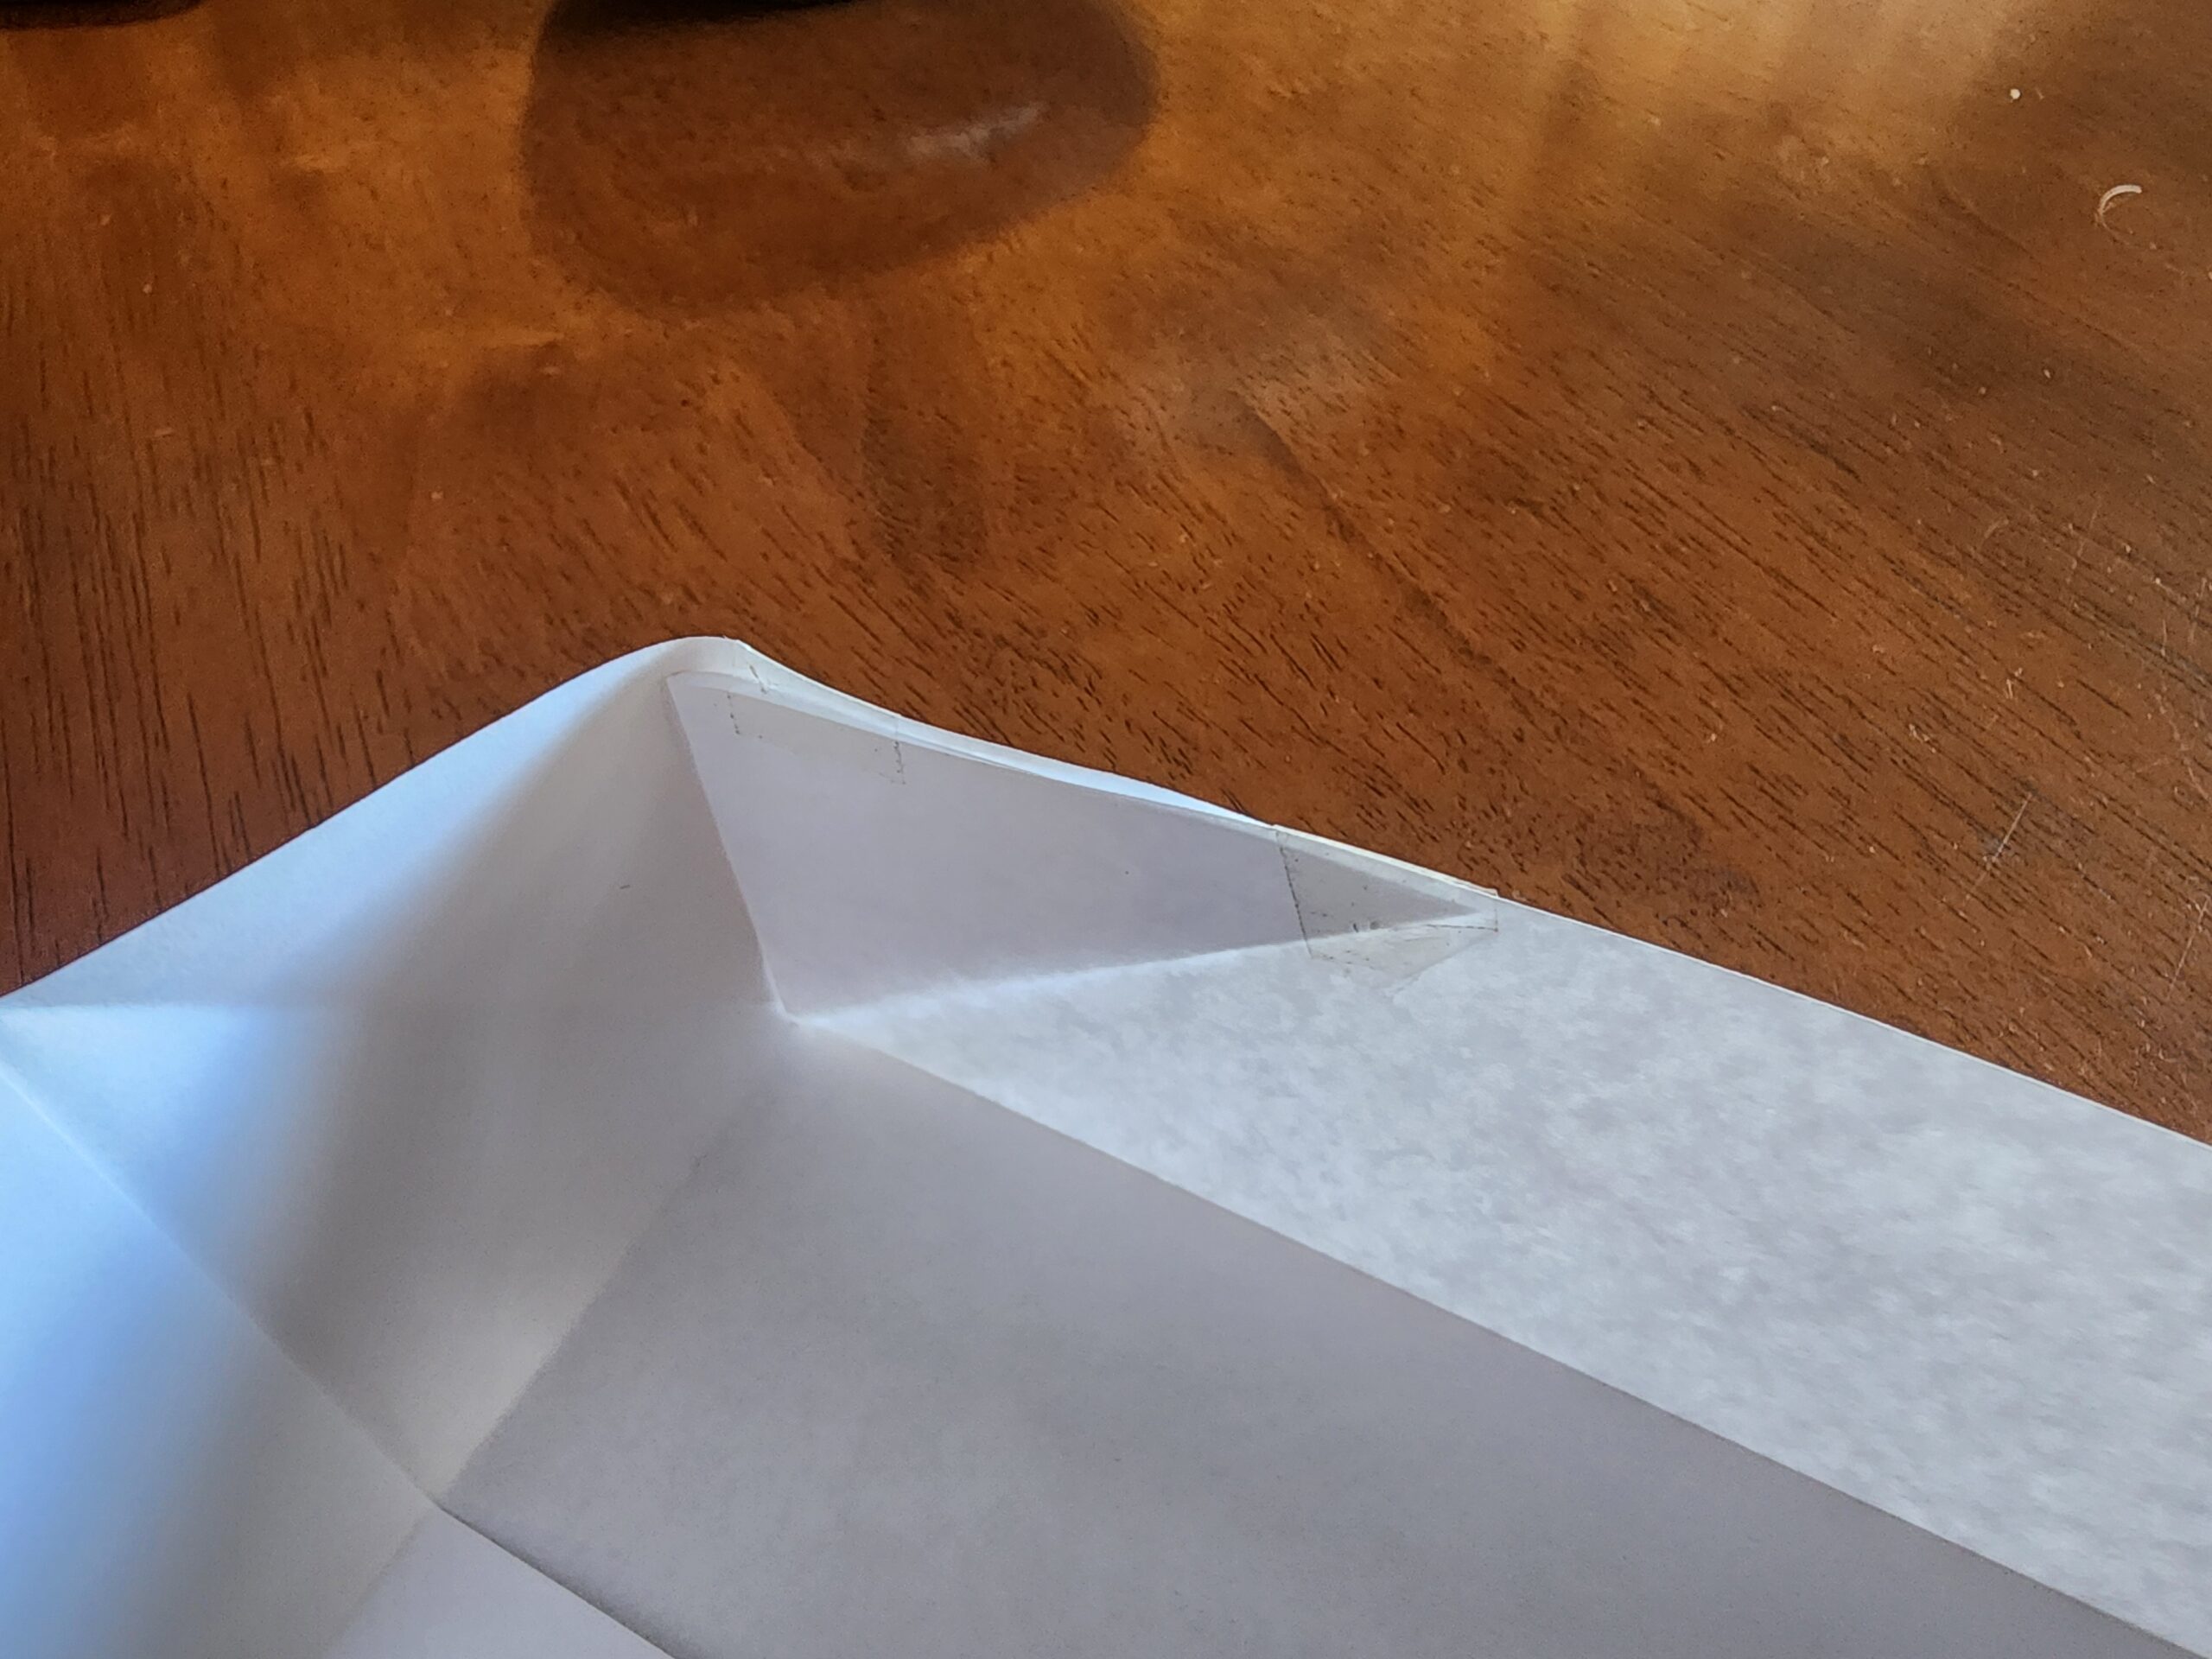
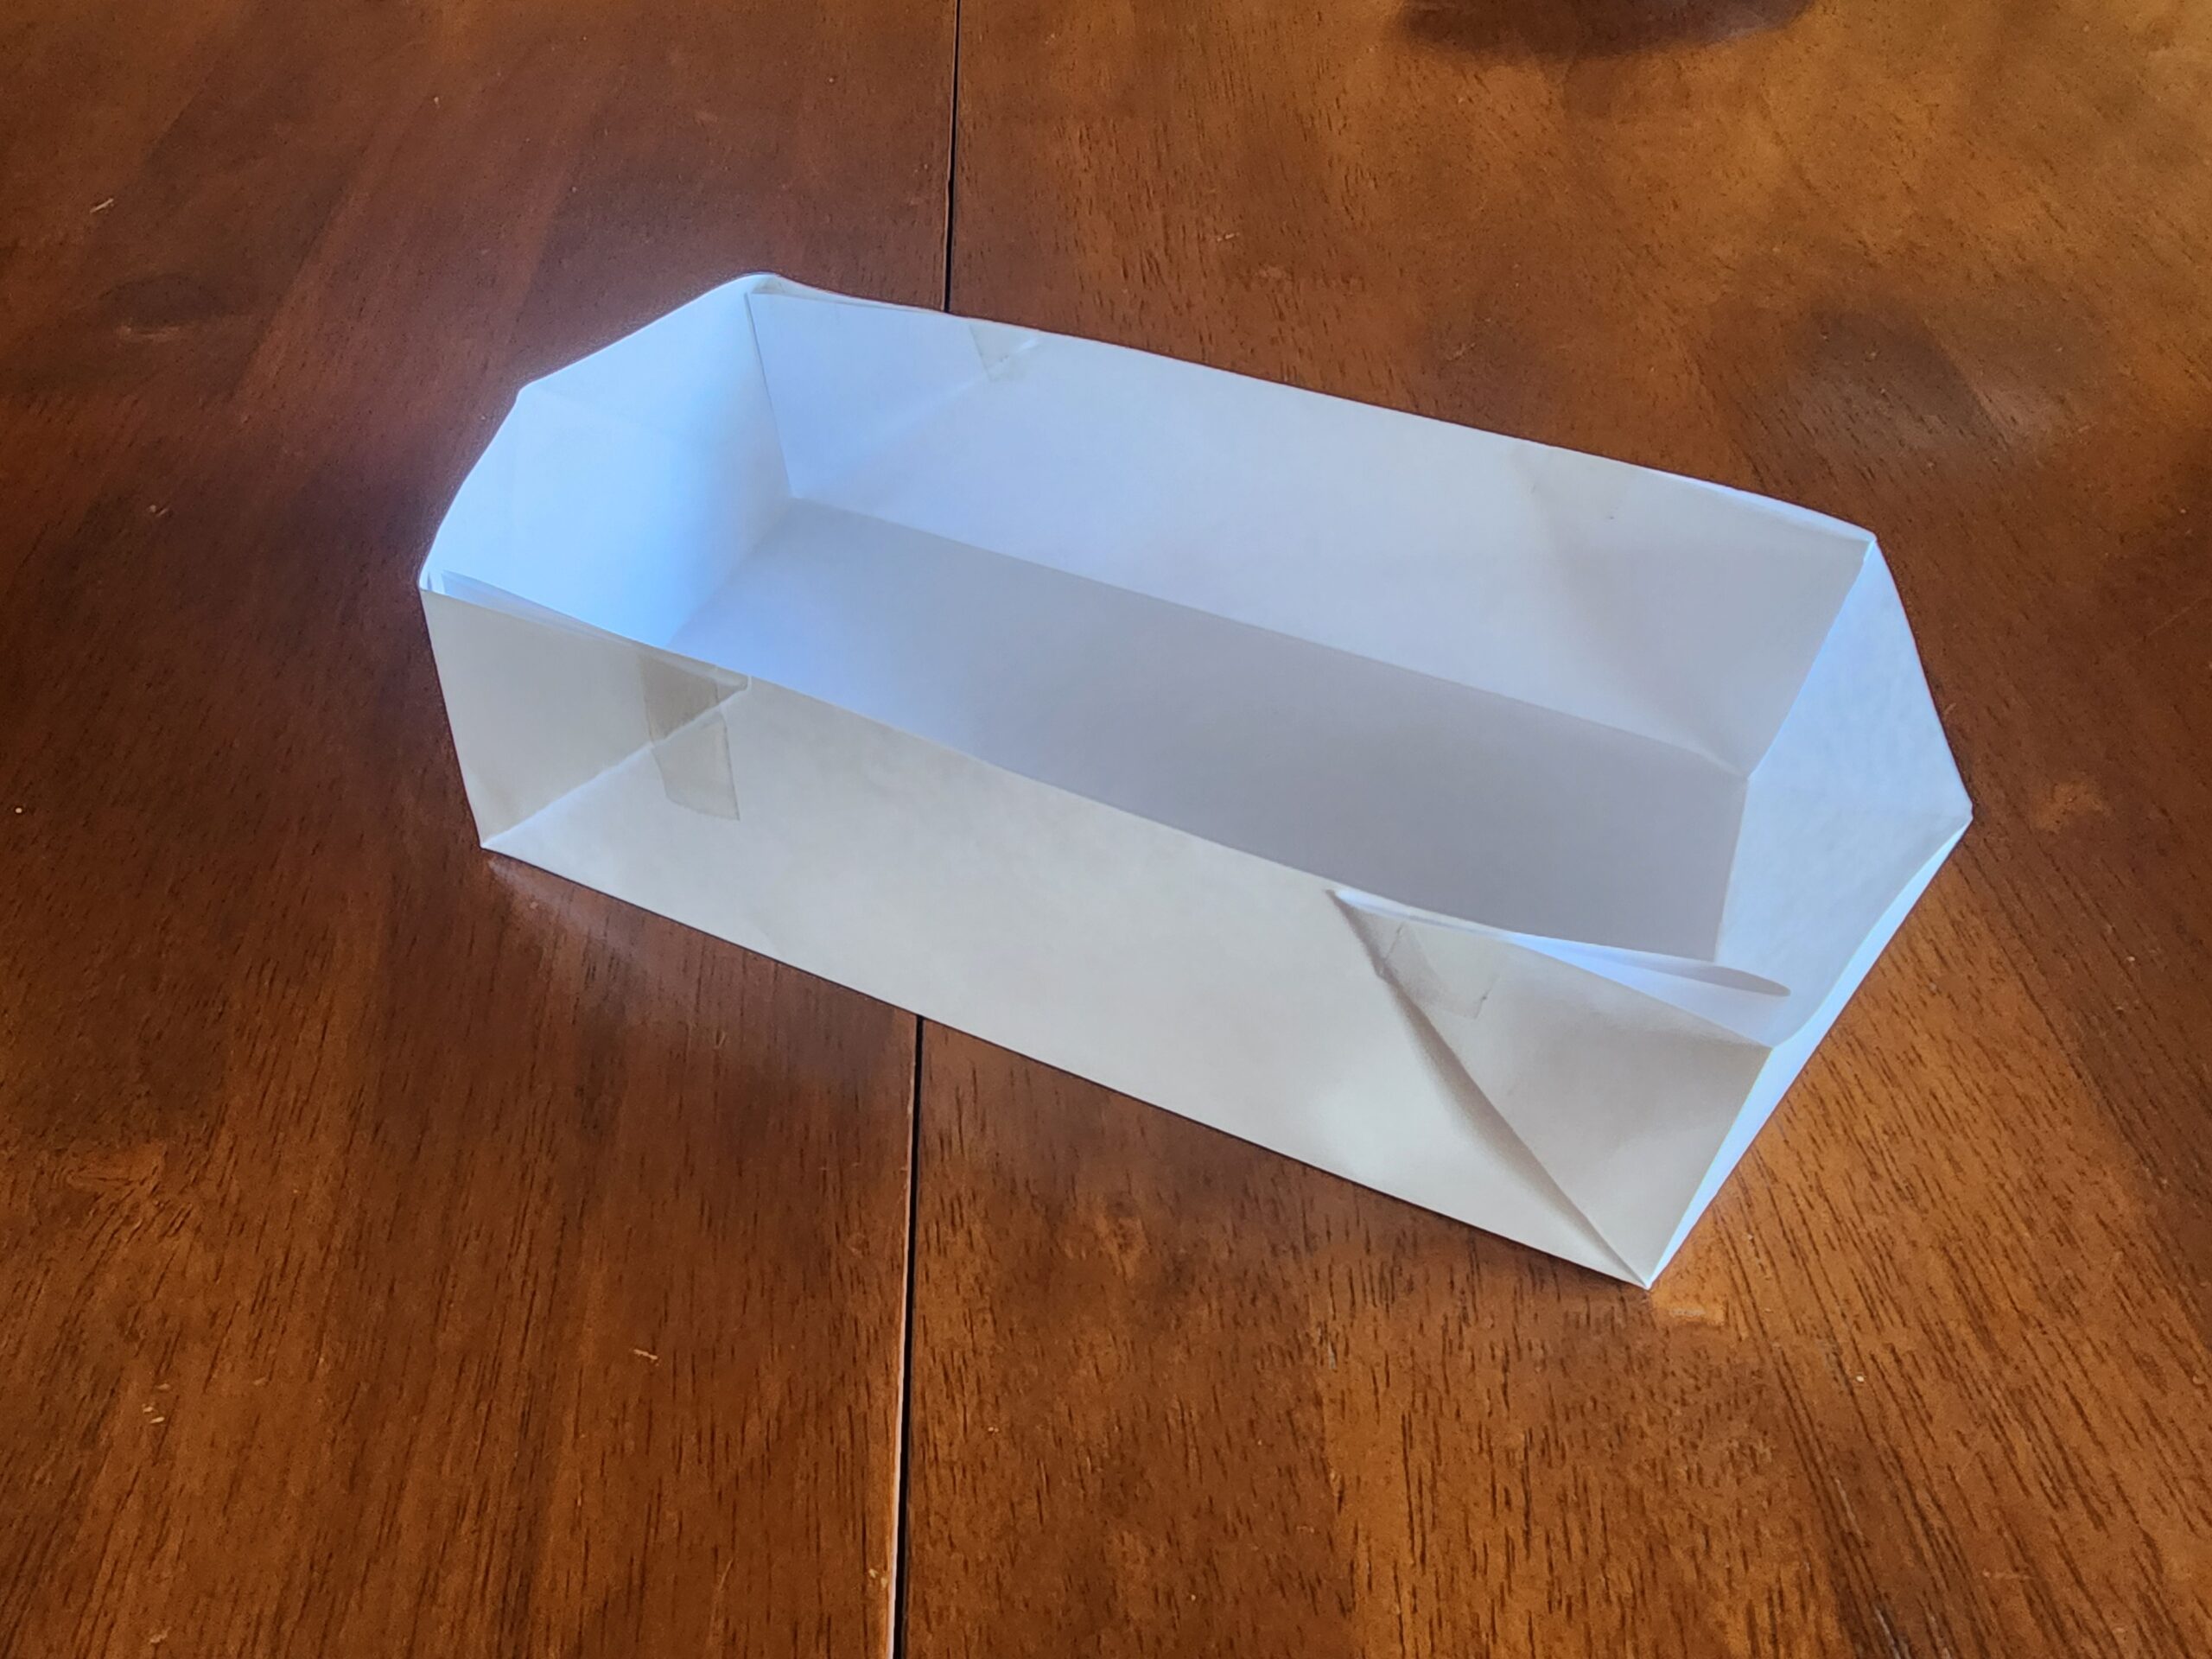
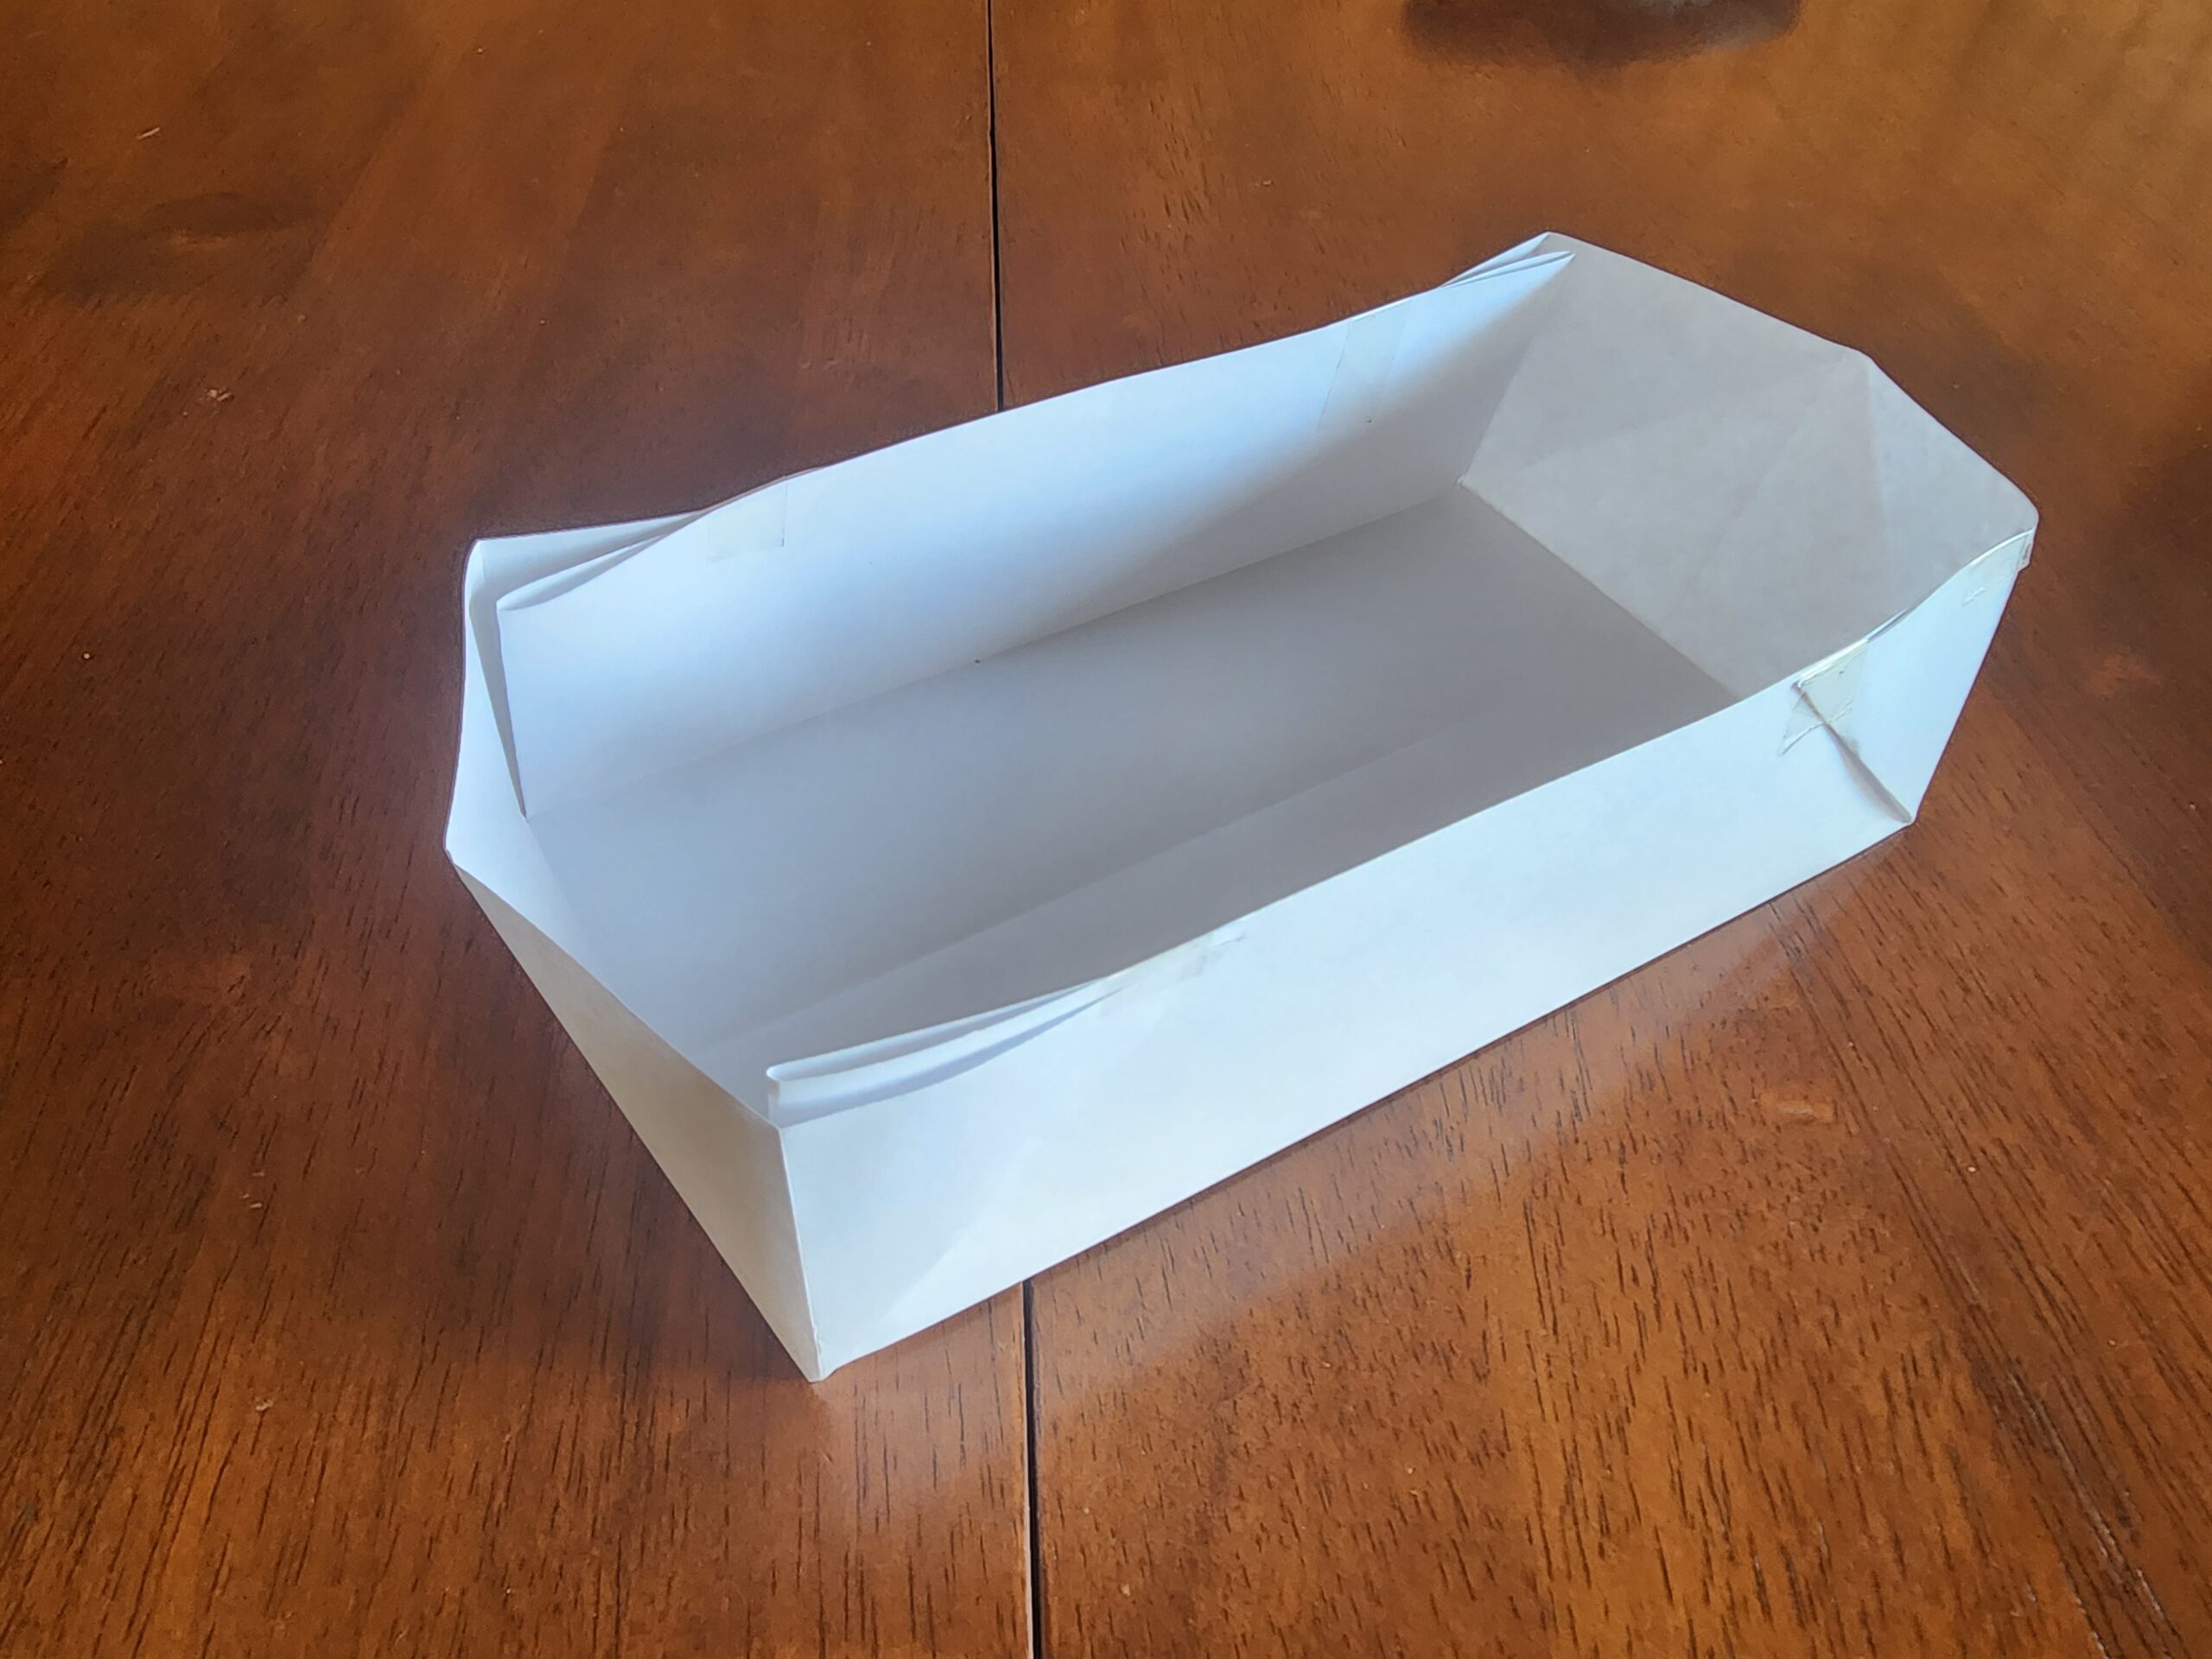
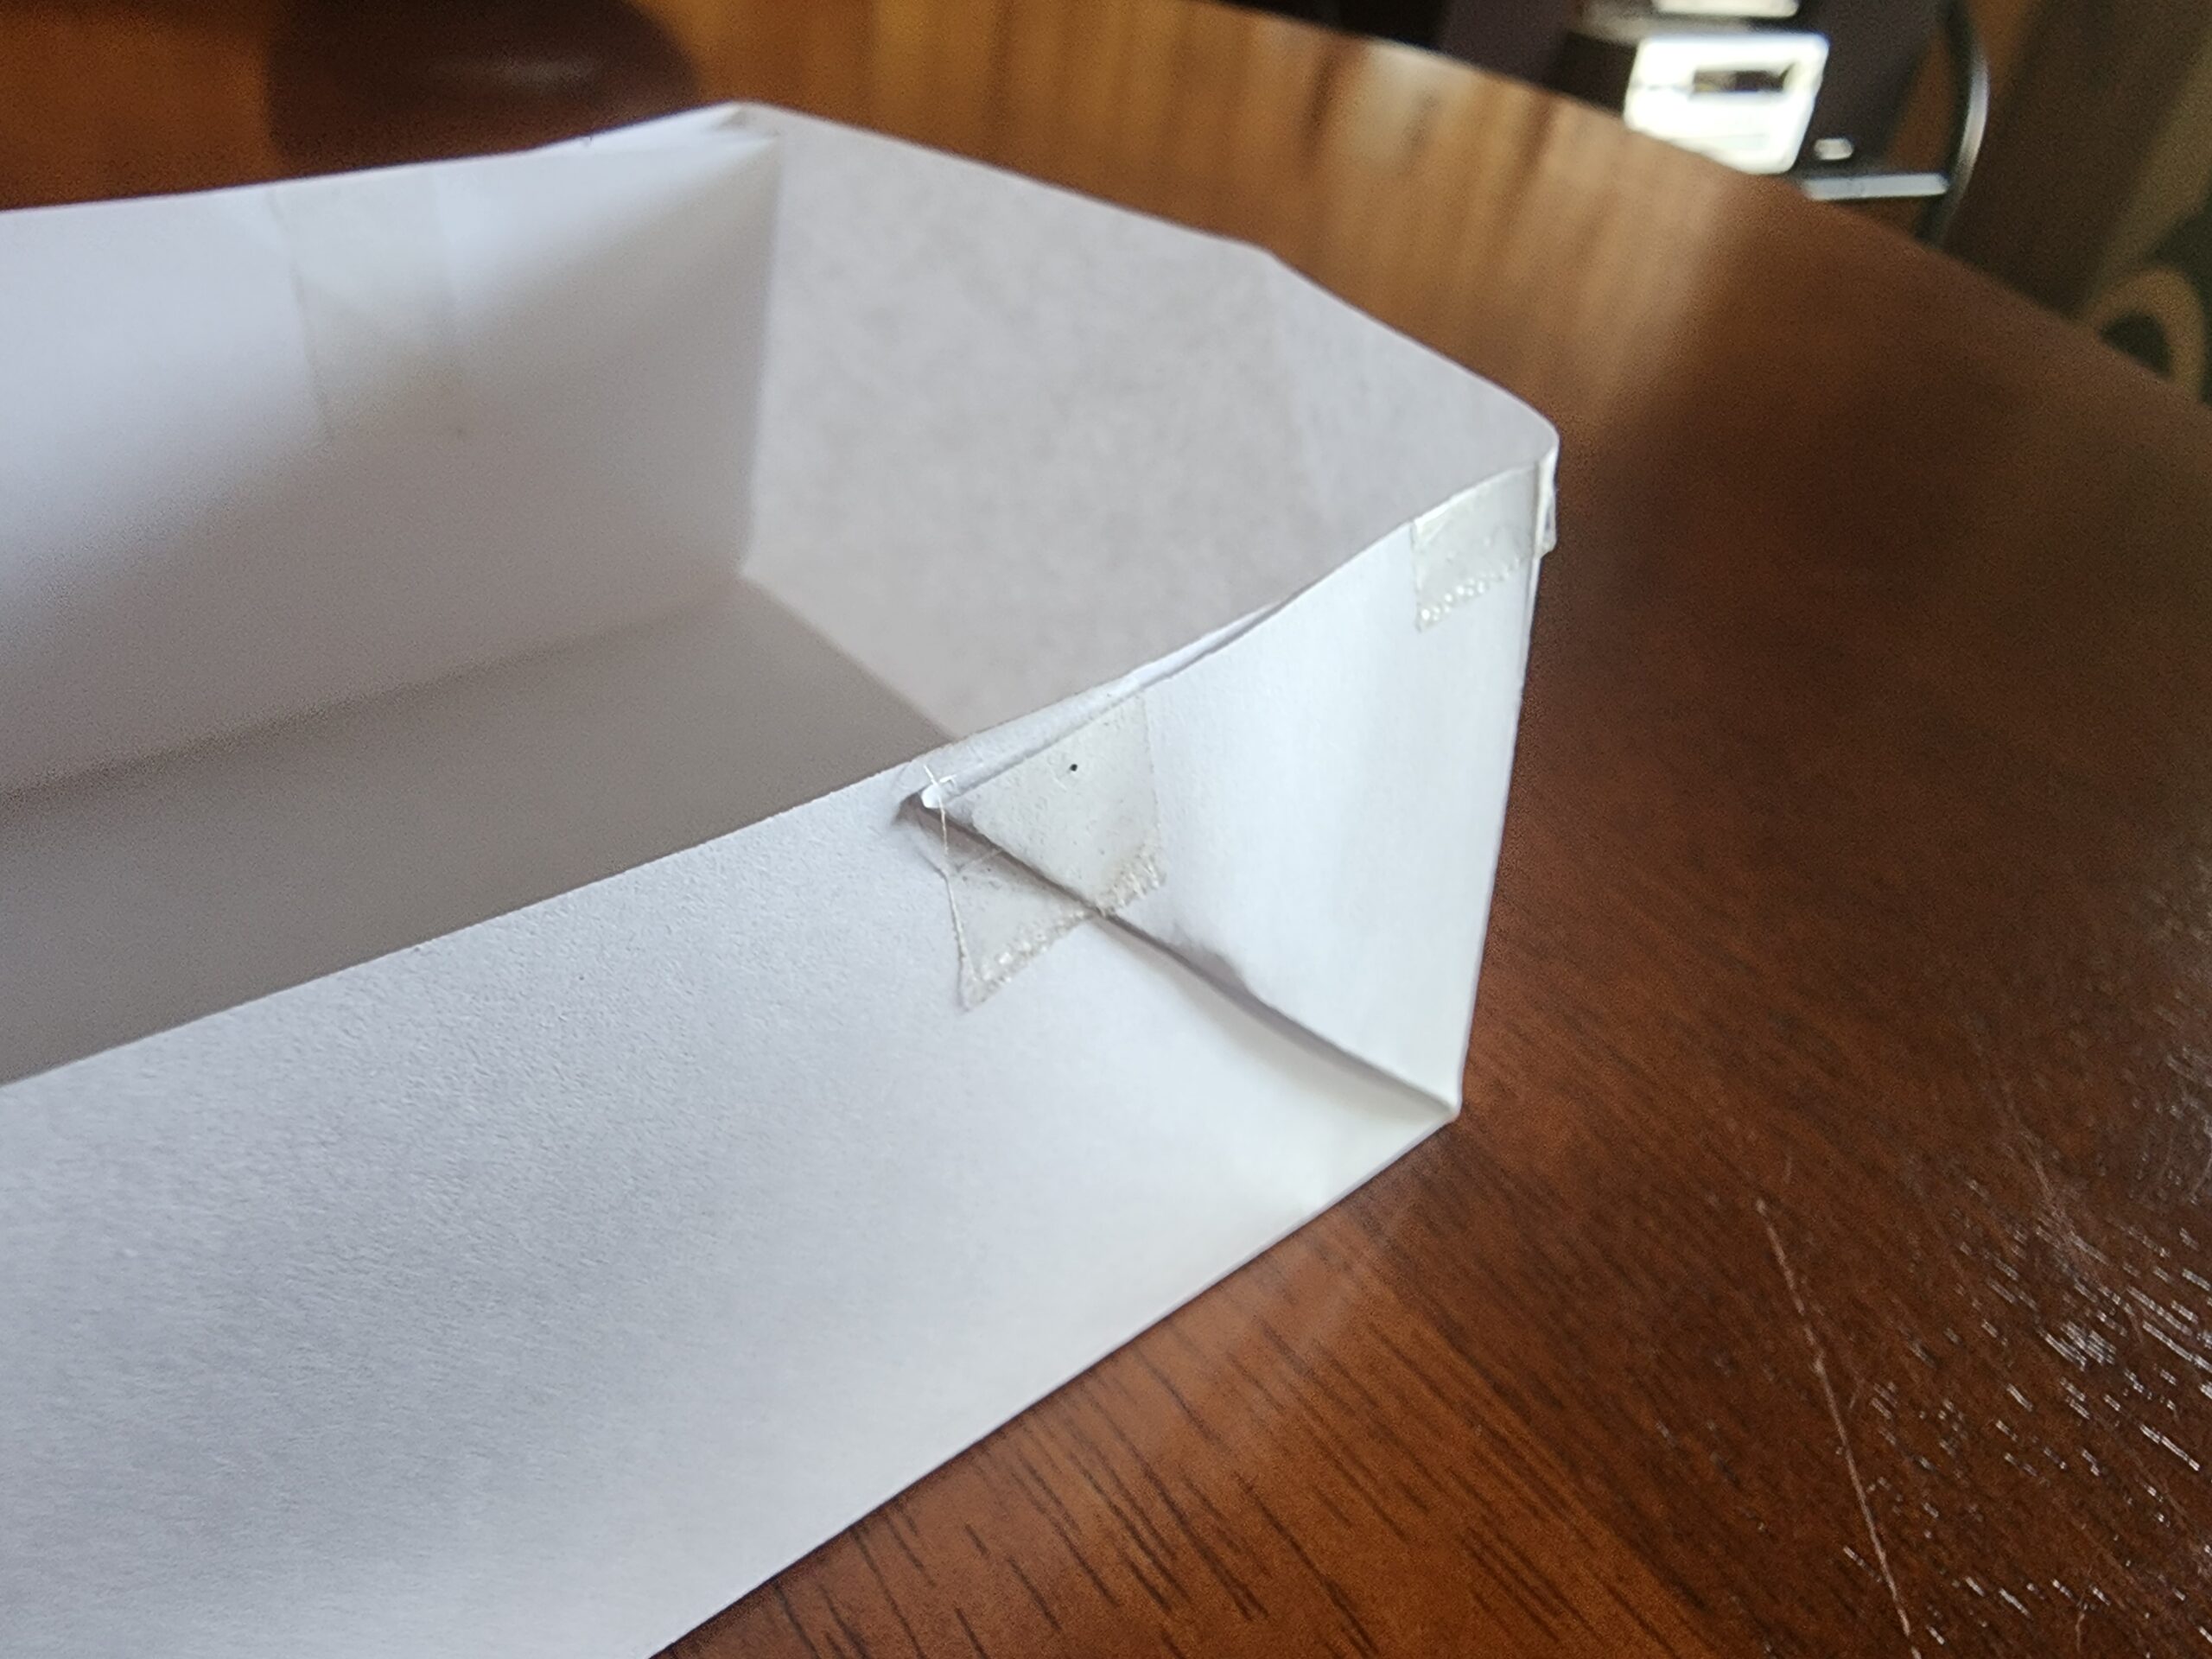
Ensure the liner is cut to size and folded over into its doubled up state. For those who have done origami, the steps below may feel familiar. If you are having trouble understanding, we have demonstrated the folds in the slider below.
Fold over the long sides by 40cm, pressing hard to get a good crease. The lengthwise folding must be done first so that, when opened, the excess liner in the corners will sit against the long side and not be in the way for the overflow.
Fold over the short sides by 40cm, once again pressing hard to make a crease. Fold each corner in, crease hard, then unfold them, we will use these creases later to help fold the plastic into its final position.
Lift the liner into the bed. It should cover the entire bottom of the bed.
Fold up the short edge against the side of the bed. Use pieces of duck tape to hold it up. Unfold the long edge, tucking a triangle of the plastic against the outside long edge.
We have demonstrated the appropriate folds below on a piece of paper. You’ll know you have it right when the liner can be pressed tight against the timber, the liner is not stretched, its corners are supported and there is a right angled triangle of excess is against the long edge of the wood.
Assembling the Water Reservoir
The water reservoir holds the water in the bottom of the bed while still allowing it to be filled rapidly using the fill pipe and it facilitates drainage to prevent the bed flooding during heavy rain.
Cut the pipes to the sizes mentioned for your bed in the materials section. There are many ways to cut the pipe, the cuts don’t have to be perfect. It may be possible get the pipes pre-cut, the Bunnings order form below contains the specifications.
Click here for a quick guide to cutting the pipe at home
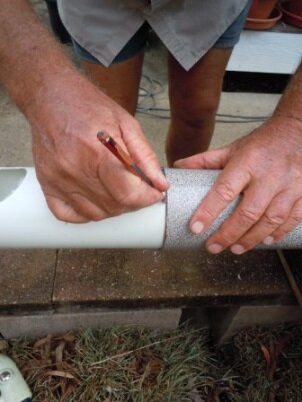
Tie the pipe onto a table with bungee cords at each end of the table and mark where to cut it, using a tape measure held by the bungee cords.
At each mark, wrap the straight edge of the piece of lino or paper tightly around the pipe so it forms a circle and mark that circle around the pipe with a pencil. When cutting with a hacksaw, roll the pipe towards you and follow that circle. The cuts don’t have to be perfect, but smoothing them with sandpaper will make it easier to push them into the bends.
Depending on the type of bed, the reservoir assembly is slightly different. The long narrow bed has a single pipe and the Long Wide and Square beds use a U shaped layout.
All of the pipes longer than 50cm, need to have holes drilled along the length of the pipe. The holes should be spaced 30cm apart and be at least 15cm away from the ends of the pipe. Mark out the locations and use a 60mm drill bit (no larger or smaller) to drill the holes. When installing the pipe, make sure the holes face down.
Click here for a quick guide to drilling the pipe
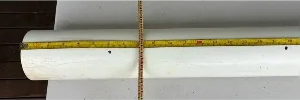
Strap the length(s) of pipe to the table with bungee cords at both ends of the pipe. Then mark the centre of the first outlet at 15 cm from one end and the centres of the other holes at 30 cm apart.
Drill the first outlet hole and slide this under a bungee cord to prevent the pipe rolling somewhat and drill the other holes at the marked spots.
All beds use the same Fill Pipe Assembly and Overflow.
Assembling the Fill Pipe
To assemble the fill pipe, attach the mesh filter to one end of the 50 cm pipe and a 90-degree elbow to the other end. This is the upright pipe you will fill the bed with.
The 90 degree elbow attached to the fill pipe will need a 22mm hole drilled, this will be done when setting up the overflow.
Assembling the single pipe layout
For the long narrow bed, attach an end cap to one end of the 2.1 m pipe and connect the fill pipe assembly’s 90-degree joint to the other end. When installing it in the bed, support the pipe so the fill pipe points upward. Once the bed is filled with soil, the pipe will remain stable.
Assembling the U shaped layout
For the long wide bed and the square bed, attach a 90-degree elbow to each end of the 50 cm pipe. Then attach the long pipe segments (2.1 m for long wide beds, 0.8 m for square beds) to each elbow so the pipes form a U-shape lying flat.
With the U-shape open side facing up, place an end cap on the right pipe and attach the fill pipe assembly to the left pipe, with the fill pipe pointing upward.
Putting it all together
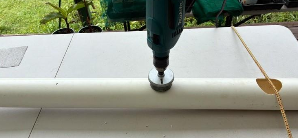
By this stage, the bed should already be in its final position with the liner installed. Begin by marking and then cutting or piercing a hole in the liner that aligns with the overflow hole in the bottom left sleeper. You can easily make the hole by stabbing with a screwdriver through the hole in the sleeper from the outside, resulting in a small hole in the liner. You can then use a small pair of scissors to cut the hole to size.
The overflow is one of the most important parts of the bed, so take care when installing it. Insert the tank fitting through the hole in the sleeper and the liner, then secure it firmly. The male threaded end of the tank fitting should be pointing into the bed.
Onto the outward facing end, screw on the male director fitting.
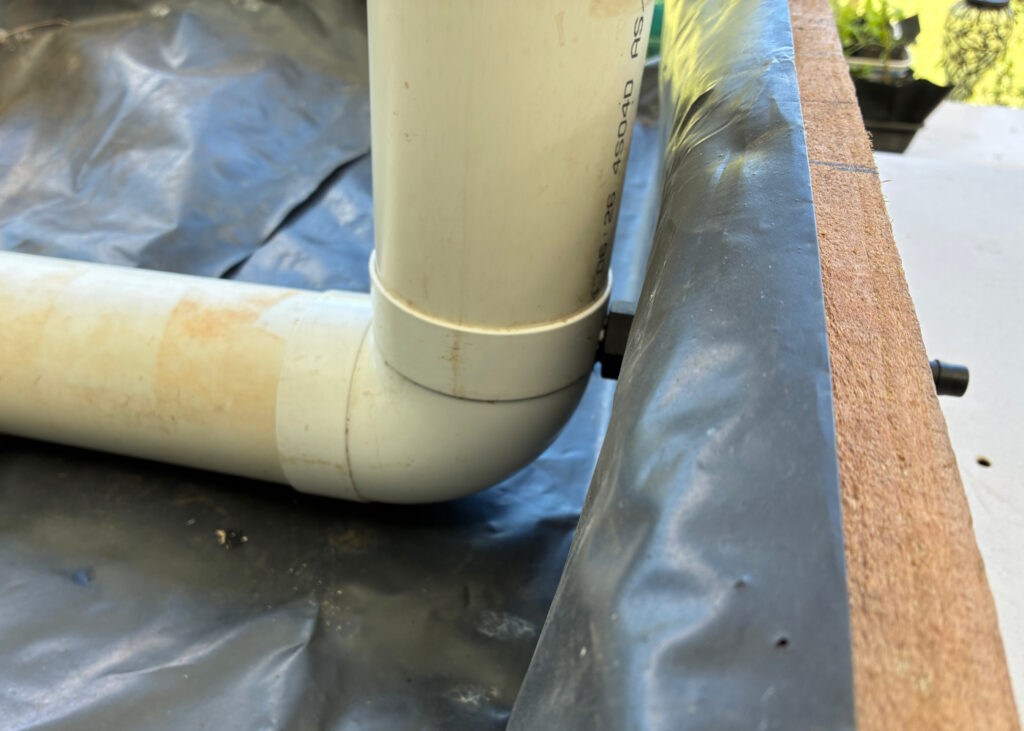
Next, place the reservoir assembly you prepared earlier into the bed. With it in position, mark the spot on the fill pipe elbow where a hole will need to be drilled. This location should line up with the part of the overflow sticking into of the bed. When the hole is drilled, the overflow pipe should slide into the fill pipe without lifting the pipe off the ground.
Remove the reservoir assembly from the bed again and detach the fill pipe section for now. Drill a 22 mm hole in the fill pipe elbow at the marked spot. Once this is done, reattach the fill pipe to the reservoir assembly.
Finally, place the reservoir back into the bed. The hole in the fill pipe elbow should now align with the overflow, allowing the pipe to slot neatly onto the overflow fitting. You will need to support the upright pipe until the bed is filled with soil.
Tips when building offsite
When making kits and building offsite, don’t pierce the liner until you reach the final destination!
Once the liner has been pierced, it is almost impossible to realign the holes if the bed or liner is moved. For this reason, do not make any holes in the liner until it is assembled in its final destination.
If the bed ever needs to be relocated, a new liner will need to be prepared.
Finishing the Bed
Once assembled, the bed will need to be filled with soil to the top of the bed. The soil is expected to settle and the airspace above is used for mulch. The amount of soil varies depending on the type of bed is shown below.
| Bed Type | Amount of Soil |
|---|---|
| Long Narrow Bed | 644L |
| Long Wide Bed | 1012L |
| Square Bed | 528L |
To give an idea on how much soil is needed, the average wheelbarrow load is between 85 to 100L. To learn how to make your own soil, check out our guide to Mixing Your Own Healthy Soil for Wicking Boxes and Tubs.
Once the bed is filled with soil, fill the reservoir till it starts overflowing. Then water the bed from the top till it starts overflowing again, using the “shower” setting on the hand piece to ensure it is a gentle rain. This will wet the soil and provide the right compaction to ensure that wicking will happen.
It may take a surprising amount of water and take a long time to fill.
Final Step
About a month later, once the bed has fully settled, cut the liner just at or below the soil level of the bed. This keeps the bed looking neat and protects the liner from solar deterioration.
Maintaining the Bed
Don’t leave the bed empty when not in use, plant a green manure crop instead. This is especially important if the bed will be unattended over the holidays or for an extended period. Keeping it planted prevents the soil from drying out and helps maintain its soil biology and structure.
Checklists & Order Forms
Coming Soon!